Hole drilling method
The hole drilling method is a method for measuring residual stresses,[1][2] in a material. Residual stress occurs in a material in the absence of external loads. Residual stress interacts with the applied loading on the material to affect the overall strength, fatigue, and corrosion performance of the material. Residual stresses are measured through experiments. The hole drilling method is one of the most used methods for residual stress measurement.[3]
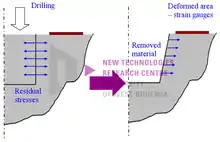
The hole drilling method can measure macroscopic residual stresses near the material surface. The principle is based on drilling of a small hole into the material. When the material containing residual stress is removed the remaining material reaches a new equilibrium state. The new equilibrium state has associated deformations around the drilled hole. The deformations are related to the residual stress in the volume of material that was removed through drilling. The deformations around the hole are measured during the experiment using strain gauges or optical methods. The original residual stress in the material is calculated from the measured deformations. The hole drilling method is popular for its simplicity and it is suitable for a wide range of applications and materials.
Key advantages of the hole drilling method include rapid preparation, versatility of the technique for different materials, and reliability. Conversely, the hole drilling method is limited in depth of analysis and specimen geometry, and is at least semi-destructive.

History and development
The idea of measuring the residual stress by drilling a hole and registering the change of the hole diameter was first proposed by Mathar in 1934. In 1966 Rendler and Vignis introduced a systematic and repeatable procedure of hole drilling to measure the residual stress. In the following period the method was further developed in terms of drilling techniques, measuring the relieved deformations, and the residual stress evaluation itself. A very important milestone is the use of finite element method to compute the calibration coefficients and to evaluate the residual stresses from the measured relieved deformations (Schajer, 1981). That allowed especially the evaluation of residual stresses which are not constant along the depth. It also brought further possibilities of using the method, e.g., for inhomogeneous materials, coatings, etc. The measurement and evaluation procedure is standardised by the norm ASTM E837[4] of the American Society for Testing and Materials which also contributed to the popularity of the method. The hole drilling is currently one of the most widespread methods of measuring the residual stress. Modern computational methods are used for the evaluation. The method is being developed especially in terms of drilling techniques and the possibilities of measuring the deformations.
Fundamental principles
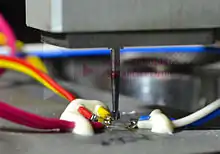
The hole drilling method of measuring the residual stresses is based on drilling a small hole in the material surface. This relieves the residual stresses and the associated deformations around the hole. The relieved deformations are measured in at least three independent directions around the hole. The original residual stress in the material is then evaluated based on the measured deformations and using the so-called calibration coefficients. The hole is made by a cylindrical end mill or by alternative techniques. Deformations are most often measured using strain gauges (strain gauge rosettes).

The biaxial stress in the surface plane can be measured. The method is often referred to as semi-destructive thanks to the small material damage. The method is relatively simple, fast, the measuring device is usually portable. Disadvantages include the destructive character of the technique, limited resolution, and a lower accuracy of the evaluation in the case of nonuniform stresses or inhomogeneous material properties.
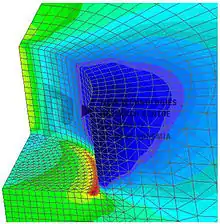
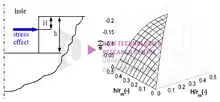
The so-called calibration coefficients play an important role in the residual stress evaluation. They are used to convert the relieved deformations to the original residual stress in the material. The coefficients can be theoretically derived for a through hole and a homogeneous stress. Then they depend only on the material properties, hole radius, and the distance from the hole. In the vast majority of practical applications, however, the preconditions for using the theoretically derived coefficients are not met, e.g., the integral deformation over the tensometer area is not included, the hole is blind instead of through, etc. Therefore, coefficients taking into account the practical aspects of measuring are used. They are mostly determined by a numerical computation using the finite element method. They express the relation between the relieved deformations and the residual stresses, taking into account the hole size, hole depth, shape of the tensometric rosette, material, and other parameters.

The evaluation of the residual stresses depends on the method used to calculate them from the measured relieved deformations. All the evaluation methods are built on the basic principles. They differ in the preconditions for use, the accuracy requirements on the calibration coefficients, or the possibility to take additional influences into account. In general, the hole is made in successive steps and the relieved deformations are measured after each step.
Evaluation methods for the residual stress
Several methods have been developed for the evaluation of residual stresses from the relieved deformations. The fundamental method is the equivalent uniform stress method. The coefficients for particular hole diameter, rosette type, and hole depth are published in the norm ASTM E837.[4] The method is suitable for a constant or little changing stress along the depth. It can be used as a guideline for non-constant stresses, however, the method may give highly distorted results.
The most general method is the integral method. It calculates the influence of the relieved stress in the given depth which, however, changes with the total depth of the hole. The calibration coefficients are expressed as matrices. The evaluation leads to a system of equations whose solution is a vector of residual stresses in particular depths. A numerical simulation is required to get the calibration coefficients. The integral method and its coefficients are defined in the norm ASTM E837.[4]

There are other evaluation methods that have lower demands on the calibration coefficients and on the evaluation process itself. These include the average stress method and the incremental strain method. Both the methods are based on the assumption that the change in deformation is caused solely by the relieved stress on the drilled increment. They are suitable only if there are small changes in the stress profiles. Both the methods give numerically correct results for uniform stresses.
The power series method and the spline method are other modifications of the integral method. They both take into account both the distance of the stress effect from the surface and the total hole depth. Contrary to the integral method, the resulting stress values are approximated by a polynomial or a spline. The power series method is very stable but it cannot capture rapidly changing stress values. The spline method is more stable and less susceptible to errors than the integral method. It can capture the actual stress values better than the power series method. The main disadvantage are the complicated mathematical calculations needed to solve a system of nonlinear equations.
Using the hole drilling method
The hole drilling method finds its use in many industrial areas dealing with material production and processing. The most important technologies include heat treatment, mechanical and thermal surface finishing, machining, welding, coating, or manufacturing composites. Despite its relative universality, the method requires these fundamental preconditions to be met: the possibility to drill the material, the possibility to apply the tensometric rosettes (or other means of measuring the deformations), and the knowledge of the material properties. Additional conditions can affect the accuracy and repeatability of the measuring. These include especially the size and shape of the sample, distance of the measured area from the edges, homogeneity of the material, presence of residual stress gradients, etc. Hole drilling can be performed in the laboratory or as a field measurement, making it ideal for measuring actual stresses in large components that cannot be moved.
External links
References
- "Měření zbytkových napětí | Thermomechanics of technological processes". ttp.zcu.cz. Retrieved 2019-04-05.
- "Residual stress measurement by rosette hole drilling per ASTM E 837". G2MT Laboratories. 2017-04-05. Retrieved 2019-04-05.
- "Měření zbytkových napětí | Thermomechanics of technological processes". ttp.zcu.cz. Retrieved 2019-04-05.
- [ASTM E 837: Standard Test Method for Determining Residual Stress by the Hole Drilling Strain-Gauge Method, ASTM Standard, American Society for Testing and Materials]