Pitched battle
A pitched battle or set piece battle is a battle in which both sides choose the fighting location and time. Either side may have the option to disengage before the battle starts or shortly thereafter.[1][2] A pitched battle is not a chance encounter such as a skirmish, or where one side is forced to fight at a time not of their choosing such as happens in a siege or an ambush. For example, the first pitched battle of the English Civil War, the Battle of Edgehill in 1642, was fought when the Royalists chose to move off an escarpment to a less advantageous position so that the Parliamentarians would be willing to fight. Pitched battles may result from a meeting engagement, where—instead of disengaging—the opposing generals choose to reinforce their positions and turn what was initially a skirmish into a pitched battle, as happened in the 1863 Battle of Gettysburg during the American Civil War.
Set-piece battles are usually carefully planned, to maximize one's strengths against an opponent's weaknesses, and use the full range of deception, feints and other maneuvers. They are also planned to take advantage of terrain favorable to one's force. Forces strong in cavalry for example tend to favor ground favorable to cavalry, and will not select difficult swamp, forest or mountain for the planned struggle. Carthaginian general Hannibal selected relatively flat ground near the village of Cannae for his great confrontation with the Romans, not the rocky terrain of the high Apennines.[3] Likewise, Zulu commander Shaka avoided forested areas or swamps, in favor of rolling grassland (flat or on mountain slopes), where the encircling horns of the Zulu impi could maneuver to effect.[4] Examples of some set-piece battles appear below.
Colonial era
Battle of Isandlwana
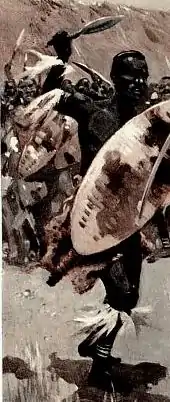
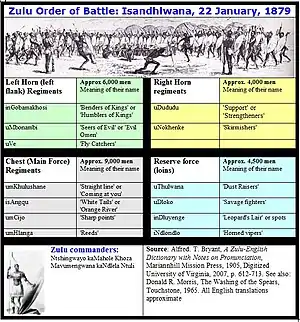
The Zulu army usually deployed in its well known "buffalo horns" formation. The attack layout was composed of three elements:[5]
- the "horns" or flanking right and left wing elements to encircle and pin the enemy. Usually these were the greener troops.
- the "chest" or central main force which delivered the coup de grace. The prime fighters made up the composition of the main force.
- the "loins" or reserves used to exploit success or reinforce elsewhere.
The Zulu forces were generally grouped into 3 levels: regiments, corps of several regiments, and "armies" or bigger formations. With enough manpower, these could be marshaled and maneuveed in the Western equivalent of divisional strength. The Zulu king Cetawasyo for example, two decades before the Anglo-Zulu War of 1879, cemented his rule with a victory at Ndondakusuka, using a battlefield deployment of 30,000 troops.[6] An inDuna guided each regiment, and he in turn answered to senior izinduna who controlled the corps grouping. Overall guidance of the host was furnished by elder izinduna usually with many years of experience. One or more of these elder chiefs might accompany a big force on an important mission. Coordination of tactical movements was supplied by the indunas who used hand signals and messengers. Generally before deploying for combat, the regiments were made to squat in a semicircle. This semi-circular squat served to align all echelons towards the coming set-piece battle, while the commanders made final assignments and adjustments. While formidable in action, the Zulu arrangements for a pitched set-piece struggle could be predictable, as they usually used the same 3-part layout in their operations.[7]
At Isandlwana, the Zulu set-piece first lured the British into splitting their strength by diversionary actions around Magogo Hills and Mangeni Falls,[8] and then moved to take advantage of this British error in a careful approach march, using dispersed units that hid the full strength of the army. As one historian notes:
- "Meanwhile, the joint Zulu commanders, who had indeed been considering a flank march to Chelmsford's east to join with Matshana and cut the British column off from Natal, decided instead to take advantage of the general's division of forces. They detached men to reinforce Matshana, but on the same evening of 21 January and during the next they transferred the main army across the British front to the deep shelter of the Ngwebeni valley. This was truly a masterful manoeuvre. The amabutho moved rapidly in small units, mainly concealed from the Isandlwana camp nine miles away by the Nyoni Heights. The British mounted patrols that sighted some of the apparently isolated Zulu units had no inkling an entire army was on the move."[9]
The total Zulu host was then concentrated in a deep ravine near the enemy position, pre-positioned for their classic "buffalo horns" set-piece attack, but in accordance with tradition, waiting until the omens were good for an assault. Discovered by a British cavalry patrol, the entire impi sprang up as one man, and launched their attack from some 4 miles away. The advance was met by withering British rifle, rocket and artillery fire that made part of the advance falter. The British however had divided their forces- fooled in part by preliminary Zulu feints- and other errors, such as failure to base the camp on a strong central wagon or laager fortification for example[10] also contributed to fatal weaknesses in the British defences. When pressure by the maneuvering Zulu formations caused the crumbling of the redcoat line, the Zulu prongs surged through and around the gaps, annihilating the camp's defenders.[11] The liquidation of almost 1,000 European troops with modern arms by the African spearmen sparked disbelief and uproar in Britain. Aside from the losses of British regulars, and the supporting native levies, the Zulu impi killed more British officers at Isandlwana, than Napoleon killed at Waterloo.[12]
World War II
Battle of El Alamein
Battle of Caen
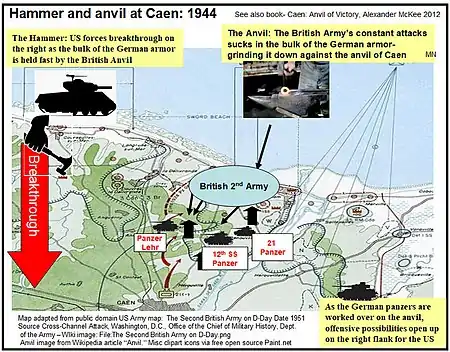
When the Allies landed at Normandy, the strategy used by the commander of the British land forces, general Bernard Montgomery, was to confront the feared German panzers with constantly attacking British armies on the eastern flank of the beachhead. The role of the British forces would be to act as a great shield for the Allied landing, constantly sucking the German armour on to that shield on the left (east), and constantly grinding it down with punishing blows from artillery, tanks and Allied aircraft.[13] As the shield held the Germans fast, this would open the way for the Americans to wield a great stroke in the west, on the right of the Allied line, breaking through the German defenses, where the Americans led by such commanders as Bradley and Patton, could run free. The British role in the set-piece would thus not be a glamorous one, but a brutal battle in a punishing cauldron of attrition, in and around the key city of Caen.[14]
The Germans had initially counterattacked the Normandy beachhead with powerful panzer and mobile forces hoping to drive to the sea by creating a wedge between the US and British armies. Failing this, they were then faced with a large, menacing British advance towards the strategic city of Caen, that threatened to collapse a great portion of their front, presenting a credible and very dangerous breakthrough threat. The British and Canadian divisions were not a secondary, defensively-oriented holding force, but aggressively sought to penetrate and destroy the German position. The Germans were thus forced to commit their strongest echelons in the theatre, the mobile panzer and SS units to avoid this peril. These were pulled deeper and deeper against the attritional anvil on the eastern flank, slowly corroding German strength and capability. The bitter confrontation tied down and weakened the Wehrmacht, thus eventually paving the way for a crushing American breakthrough in the west.
As General Montgomery signaled on 25 June 1944:
- "When the American attack went in west of St Lo at 1100 hours on 25 July, the main enemy armoured strength of six panzer and SS divisions was deployed on the eastern flank facing the British Army. This is a good dividend. The Americans are going well and I think things will now begin to move towards the plan outlined in M512."[15]
Supreme Allied Commander Dwight D. Eisenhower affirmed Montgomery's overall strategy in a message of 10 July, urging stronger efforts:
- "I am familiar with your plan for generally holding firmly with your left, attracting thereto all of the enemy armour, while your right pushes down the Peninsula and threatens the rear and flank of the forces facing the Second British Army.. It appears to me that we must use all possible energy in a determined effort to prevent a stalemate or facing the necessity of fighting a major defensive battle with the slight depth we now have in the bridgehead... please be assured that I will produce everything that is humanly possible to assist you in any plan that promises to get us the elbow room we need. The air and everything else will be available."[16]
Montgomery's overall set-piece conception of the battle eventually bore fruit, but it took two months of bitter fighting in and around the city of Caen, to come to fruition.[17]
Reenactment
Recreational battle reenactment tends to focus on pitched battles partially for the sake of ease of demonstration.
See also
References
- p. 649 Archived 2015-09-23 at the Wayback Machine, Blackwood's
- Oxford English Dictionary, Second edition 1989. battle, n. 1.b "With various qualifying attributes: … pitched battle, a battle which has been planned, and of which the ground has been chosen beforehand, by both sides ..."
- Adrian Goldsworthy, 2019. Cannae: Hannibal's Greatest Victory
- Donald Morris 1965. The Washing of the Spears
- Donald Morris, 1962. The Washing of the Spears, pp. 45–126
- Donald Morris, 1962. The Washing of the Spears, pp. 195–196
- Isandlwana 1879: The Great Zulu Victory, Ian Knight, Osprey: 2002, pp. 5–58
- John Laband. 2014. Zulu Warriors: The Battle for the South African Frontier, 229.
- Laband. 2014. Zulu Warriors: The Battle for the South African Frontier, 229.
- Ian Knight, Adrian Greaves (2006) The Who's who of the Anglo-Zulu War: The British
- Morris, p. 545-596">Morris, pp. 545–596
- Bruce Vandervort, Wars of Imperial Conquest in Africa: 1830–1914,p. 20-78
- Nigel Hamilton, 1983. Master of the Battlefield pg 628-769
- Hamilton, 1983. Master of the Battlefield pg 628-769
- Hamilton, Master of the Battlefield, p757
- Rick Atkinson. 2014. The Guns at Last Light: The War in Western Europe, 1944-1945 p 124
- Alexander McKee's Caen: Anvil of Victory, 2012.
Further reading
- "Policy of the Protectionists". Blackwood's Edinburgh Magazine. 71 (440): 645–68. June 1852. Archived from the original on 2015-09-23. Retrieved 2010-06-16.