Rifleman's rule
Rifleman's rule is a "rule of thumb" that allows a rifleman to accurately fire a rifle that has been calibrated for horizontal targets at uphill or downhill targets. The rule says that only the horizontal range should be considered when adjusting a sight or performing hold-over in order to account for bullet drop. Typically, the range of an elevated target is considered in terms of the slant range, incorporating both the horizontal distance and the elevation distance (possibly negative, i.e. downhill), as when a rangefinder is used to determine the distance to target. The slant range is not compatible with standard ballistics tables for estimating bullet drop.

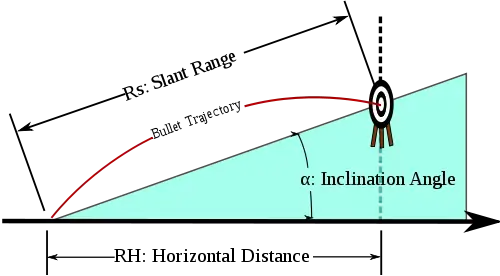
The Rifleman's rule provides an estimate of the horizontal range for engaging a target at a known slant range (the uphill or downhill distance from the rifle). For a bullet to strike a target at a slant range of and an incline of , the rifle sight must be adjusted as if the shooter were aiming at a horizontal target at a range of . Figure 1 illustrates the shooting scenario. The rule holds for inclined and declined shooting (all angles measured with respect to horizontal). Very precise computer modeling and empirical evidence suggests that the rule does appear to work with reasonable accuracy in air and with both bullets and arrows.
Background
Definitions
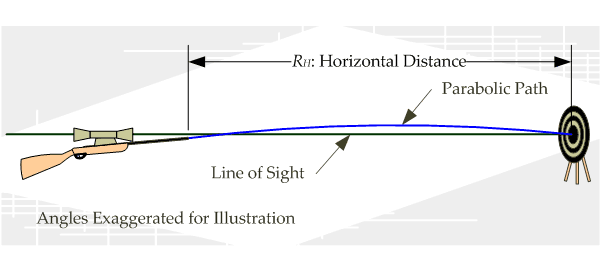
There is a device that is mounted on the rifle called a sight. While there are many forms of rifle sight, they all permit the shooter to set the angle between the bore of the rifle and the line of sight (LOS) to the target. Figure 2 illustrates the relationship between the LOS and bore angle.

This relationship between the LOS to the target and the bore angle is determined through a process called "zeroing." The bore angle is set to ensure that a bullet on a parabolic trajectory will intersect the LOS to the target at a specific range. A properly adjusted rifle barrel and sight are said to be "zeroed." Figure 3 illustrates how the LOS, bullet trajectory, and range () are related.

Procedure
In general, the shooter will have a table of bullet heights with respect to the LOS versus horizontal distance. Historically, this table has been referred to as a "drop table." The drop table can be generated empirically using data taken by the shooter at a rifle range; calculated using a ballistic simulator; or is provided by the rifle/cartridge manufacturer. The drop values are measured or calculated assuming the rifle has been zeroed at a specific range. The bullet will have a drop value of zero at the zero range. Table 1 gives a typical example of a drop table for a rifle zeroed at 100 meters.
Table 1: Example Bullet Drop Table
| Range (meters) | 0 | 100 | 200 | 300 | 400 | 500 |
| Bullet Height (cm) | -1.50 | 0.0 | -2.9 | -11.0 | -25.2 | -46.4 |
If the shooter is engaging a target on an incline and has a properly zeroed rifle, the shooter goes through the following procedure:
- Determine the slant range to the target (measurement can be performed using various forms of range finders, e.g. laser rangefinder)
- Determine the elevation angle of the target (measurement can be made using various devices, e.g. sight attached unit)
- Apply the "rifleman's rule" to determine the equivalent horizontal range ()
- Use the bullet drop table to determine the bullet drop over that equivalent horizontal range (interpolation is likely to be required)
- Compute the bore angle correction that is to be applied to the sight. The correction is computed using the equation (in radians).
- Adjust the bore angle by the angle correction.
Example
Assume a rifle is being fired that shoots with the bullet drop table given in Table 1. This means that the rifle sight setting for any range from 0 to 500 meters is available. The sight adjustment procedure can be followed step-by-step.
1. Determine the slant range to the target.
Assume that a range finder is available that determines that the target is exactly 300 meters distance.
2. Determine the elevation angle of the target.
Assume that an angle measurement tool is used that measures the target to be at an angle of with respect to horizontal.
3. Apply the rifleman's rule to determine the equivalent horizontal range.
4. Use the bullet drop table to determine the bullet drop over that equivalent horizontal range.
Linear interpolation can be used to estimate the bullet drop as follows:
5. Compute the bore angle correction that is to be applied to the sight.
6. Adjust the bore angle by the angle correction.
The gun sight is adjusted up by 0.94 mil or 3.2' in order to compensate for the bullet drop. The gunsights are usually adjustable in unit of 1⁄2 minutes, 1⁄4 minutes of angle or 0.1 milliradians.
Analysis
This section provides a detailed derivation of the rifleman's rule.
Zeroing the rifle
Let be the bore angle required to compensate for the bullet drop caused by gravity. Standard practice is for the shooter to zero their rifle at a standard range, such as 100 or 200 meters. Once the rifle is zeroed, adjustments to are made for other ranges relative to this zero setting. One can calculate using standard Newtonian dynamics as follows (for more details on this topic, see Trajectory).
Two equations can be set up that describe the bullet's flight in a vacuum, (presented for computational simplicity compared to solving equations describing trajectories in an atmosphere).
- (Equation 1)
- (Equation 2)
Solving Equation 1 for t yields Equation 3.
- (Equation 3)
Equation 3 can be substituted in Equation 2. The resulting equation can then be solved for x assuming that and , which produces Equation 4.
- (Equation 4)
where is the speed of the bullet, x is the horizontal distance, y is the vertical distance, g is the Earth's gravitational acceleration, and t is time.
When the bullet hits the target (i.e. crosses the LOS), and . Equation 4 can be simplified assuming to obtain Equation 5.
- (Equation 5)
The zero range, , is important because corrections due to elevation differences will be expressed in terms of changes to the horizontal zero range.
For most rifles, is quite small. For example, the standard 7.62 mm (0.308 in) NATO bullet is fired with a muzzle velocity of 853 m/s (2800 ft/s). For a rifle zeroed at 100 meters, this means that .
While this definition of is useful in theoretical discussions, in practice must also account for the fact that the rifle sight is actually mounted above the barrel by several centimeters. This fact is important in practice, but is not required to understand the rifleman's rule.
Inclined trajectory analysis
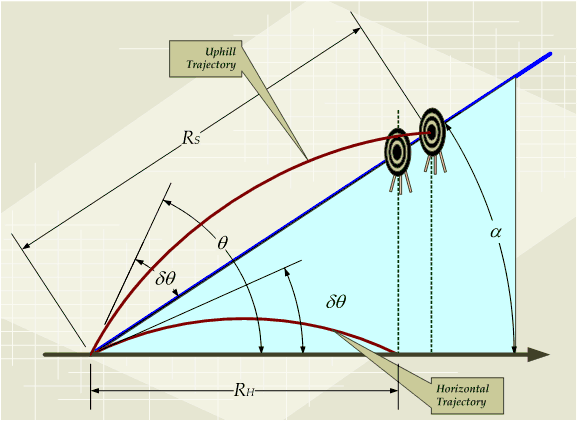
The situation of shooting on an incline is illustrated in Figure 4.

Figure 4 illustrates both the horizontal shooting situation and the inclined shooting situation. When shooting on an incline with a rifle that has been zeroed at , the bullet will impact along the incline as if it were zeroed at a longer range . Observe that if the rifleman does not make a range adjustment, his rifle will appear to hit above its intended aim point. In fact, riflemen often report their rifle "shoots high" when they engage a target on an incline and they have not applied the rifleman's rule.
Equation 6 is the exact form of the rifleman's equation. It is derived from Equation 11 in Trajectory.
- (Equation 6)
The complete derivation of Equation 6 is given below. Equation 6 is valid for all , , and . For small and , we can say that . This means we can approximate as shown in Equation 7.
- (Equation 7)
Since the , we can see that a bullet fired up an incline with a rifle that was zeroed at will impact the incline at a distance . If the rifleman wishes to adjust his rifle to strike a target at a distance instead of along an incline, he needs to adjust the bore angle of his rifle so that the bullet will strike the target at . This requires adjusting the rifle to a horizontal zero distance setting of . Equation 8 demonstrates the correctness of this assertion.
- (Equation 8)
This completes the demonstration of the rifleman's rule that is seen in routine practice. Slight variations in the rule do exist.
Derivation
Equation 6 can be obtained from the following equation, which was named equation 11 in the article Trajectory.
This expression can be expanded using the double-angle formula for the sine (see Trigonometric identity) and the definitions of tangent and cosine.
Multiply the expression in the parentheses by the front trigonometric term.
Extract the factor from the expression in parentheses.
The expression inside the parentheses is in the form of a sine difference formula. Also, multiply the resulting expression by the factor .
Factor the expression from the expression inside the parentheses. In addition, add and subtract the expression inside the parentheses.
Let .
Let (see Equation 1) and simplify the expression in parentheses.
Expand .
Distribute the factor through the expression.
Factor out the and substitute .
Factor out .
Substitute into the equation.
Substitute the definitions of , , and into the equation.
This completes the derivation of the exact form of the rifleman's rule.