Action at Sihayo's Kraal
The 12 January 1879 action at Sihayo's Kraal was an early skirmish in the Anglo-Zulu War. The day after launching an invasion of Zululand, the British General Lord Chelmsford led a reconnaissance in force against the kraal of Zulu Chief Sihayo. This was intended to secure his left flank for an advance on the Zulu capital at Ulundi and as retribution against Sihayo for the incursion of his sons into the neighbouring British Colony of Natal.
| Action at Sihayo's Kraal | |||||||
|---|---|---|---|---|---|---|---|
| Part of the Anglo-Zulu War | |||||||
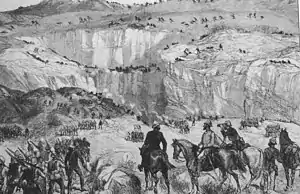 A depiction of the action, British General Lord Chelmsford observing in the centre foreground | |||||||
| |||||||
| Belligerents | |||||||
|
| Zulu Kingdom | ||||||
| Commanders and leaders | |||||||
| Mkumbikazulu kaSihayo † | ||||||
| Strength | |||||||
| 70+ warriors | ||||||
| Casualties and losses | |||||||
| 2 NNC men killed; 20 NNC men and 2 officers wounded | 30 killed, 4 wounded | ||||||
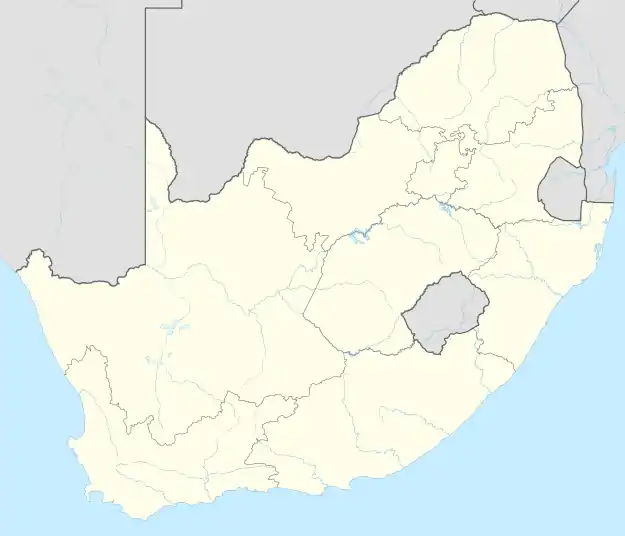 Approximate location in present-day South Africa | |||||||
En-route to the kraal the British force found a small party of Zulus in a horseshoe-shaped gorge. A frontal assault was launched by auxiliary troops from the Natal Native Contingent (NNC), supported by British regulars, while a mixed unit of mounted infantry moved onto the high ground to the rear of the Zulus. After the NNC attack faltered the regulars reinvigorated the attack and defeated the Zulus in the gorge. The mounted force engaged around sixty Zulus on the high ground and drove them off. The Zulu force suffered losses of 40 killed, 4 wounded and at least 3 captured. The British lost 2 members of the NNC killed and 22 wounded.
After their victory the British moved on Sihayo's kraal, which they found to be undefended. After burning it down they returned to their camp. The action is believed to have led Cetshwayo to attack Chelmsford's force in preference to the two other British columns operating in Zululand. Much of Chelmford's column was destroyed at the Battle of Isandlwana ten days later.
Background
In the 1870s the British government sought to extend its control over Southern Africa. Apart from the valuable naval base at the Cape of Good Hope they had previously shown little interest in the region but this changed with the discovery of valuable mineral deposits. In 1877 Sir Henry Bartle Frere was dispatched as High Commissioner for Southern Africa with a mandate to bring the existing colonies, indigenous African groups and the Boer republics under British authority.[1] Frere viewed the independent Zulu Kingdom as a possible threat to this plan and sought an excuse to declare war and annex it. He established a boundary commission to look into a dispute between Zululand and Boer Transvaal, hoping for an outcome that would enrage the Zulu king, Cetshwayo. However, when the report was produced it largely backed the Zulu claim.[2]
Frere instead seized on an incident in July 1878. Two wives of Zulu chief Sihayo kaXongo fled from his kraal (homestead) into the British colony of Natal. Two of Sihayo's sons crossed into Natal with an armed band, seized the women and returned them to Zululand where they were executed. Frere mobilised British troops on the border and requested a meeting with Cetshwayo in December, ostensibly to discuss the report of the boundary commission.[2] Frere instead presented Cetshwayo with an ultimatum. He was required to turn over Sihayo's sons to face British justice, pay a fine of cattle, turn over the chief Mbilini who had raided into British territory and admit Christian missionaries to his country.[3][4] Frere also demanded wholesale changes to the Zulu system of government including limits on the use of the death penalty, the requirement for trials, supervision by a British official and the abolition of the Zulu army and associated restrictions on marriage.[3] The ultimatum was harsh, demanding radical change in the Zulu way of life, and it was intended by Frere that Cetshwayo would reject it.[5]
On 11 January 1879 the ultimatum expired and British forces, under Lord Chelmsford entered Zululand in three columns.[6] One column operated close to the eastern coastline and one advanced from Transvaal in the west.[2] The main force, the centre column under Chelmsford, crossed the Buffalo River into Zulu territory at Rorke's Drift and made camp.[7]
Advance
.png.webp)
Chelmsford determined to attack Sihayo's kraal which lay some 8 km (5.0 mi) from his camp. He intended this to secure his left flank for the advance upon the Zulu capital of Ulundi and as a punitive measure against Sihayo.[4] Chelmsford ordered a force, commanded by Colonel Richard Glyn of the 24th Regiment of Foot, to leave the camp at 3:30 a.m. on 12 January; this was later described as a reconnaissance in force.[7][8] Glyn's command was a mixed force of men from his regiment; auxiliary troops of the Natal Native Contingent (NNC), commanded by Major Wilsone Black; and some irregular mounted infantry, commanded by Lieutenant-Colonel Russell.[9] Chelmsford also chose to accompany the force and, with Glyn, helped direct its movements.[9]
The British troops proceeded north-east from the camp keeping to a track on the right hand bank of the Bashee River.[10] After around 8 km (5.0 mi) a quantity of cattle were observed on the far side with a number of Zulus to the hills above them. Chelmsford ordered the force to cross the river and prepare for action.[10][7] Whilst Glyn and Chelmsford consulted on their battle plan, the Zulus taunted the British, shouting "Why are you waiting there? Are you looking to build kraals? Why don't you come on up?".[9]
Action
The Zulu defenders were commanded by Mkumbikazulu kaSihayo, one of Sihayo's sons involved in the Natal raid.[11] They held a horseshoe-shaped gorge on a steep hillside, with the open end of the gorge facing towards the Bashee River and the British. Chelmsford ordered Russell's mounted infantry to move to the south where the slope was climbable and to sweep around behind the Zulus on the heights to threaten them and cut off any retreat.[9][10] In the meantime three companies of the 1st battalion of the 24th Regiment and the entire 1st battalion of the 3rd Regiment of the Natal Native Contingent (under Commandant George Hamilton-Browne) were to assault the Zulus on the lower ground and attempt to seize the cattle.[7][9] The 2nd Battalion of the 3rd Natal Native Contingent (commanded by Commandant Cooper) were held in reserve.[9]
The NNC led the advance and did so enthusiastically until they came within gunshot of the Zulus who were hiding among boulders, shrubs and caves at the edges of the gorge.[7][9] At this point they were challenged by a Zulu shouting "By whose orders do you come to the land of the Zulus?".[9] A newspaper reporter with the British, Charles Norris-Newman, recorded that no reply was made but Hamilton-Browne claimed that his interpreter, Lieutenant Duncombe, replied "By the orders of the Great White Queen".[9] The Zulus then opened fire on the British right flank, their first shot striking a man of the Natal Native Contingent (NNC) and breaking his thigh bone.[9][10]
Hamilton-Browne ordered some of his companies to move into the rough ground at the edge of the gorge where the Zulus were sheltering. The NNC became pinned down and were reluctant to assault the Zulus, who fired from the rough ground. Attempts by their non-commissioned officers to force them forwards by clubbing them with rifles failed and Black, seeing the attack faltering, led men of the 24th Regiment forwards in support. This succeeded and the NNC followed Black, who led the charge with his sword in one hand and his hat waved above his head in the other. Black's hat was soon shot from his hand but he escaped unscathed despite being almost struck by a boulder thrown at him by a Zulu from above.[9]
Part of the 2nd Battalion of the NNC was also brought up in support but the action on the low ground was over by 9:00 a.m., lasting around half an hour.[9][12] At least a dozen Zulus were killed along with two NNC men, around twenty NNC men and two of their officers were wounded.[8] The companies of the 1/24th managed to work their way up the steep slopes to the high ground and drove away some fleeing Zulus.[13]
_(17318995293).jpg.webp)
When they reached the heights Russell's mounted contingent found around sixty Zulus, they dismounted and opened fire.[8] By 10:00 a.m. the fighting here also ended; outnumbered, the Zulus were driven off for the loss of ten killed.[8][14]
Burning of the kraal
After the action a force of four companies of the 2/24th and part of the 2nd Battalion of the 3rd NNC, under the overall command of Colonel Henry Degacher of the 24th Regiment was sent to Sihayo's kraal with orders to burn it to the ground.[15] The kraal was located some 6 kilometres (4 mi) further along the Bashee valley and 60 metres (200 ft) above it.[8][9][12] Degacher found the kraal, its neighbouring homesteads and mealie fields deserted aside from three old women and a young girl.[8][9][15] The settlement was burnt to the ground and the force marched back to its camp by the Buffalo River, reaching it by 4:00 p.m.[12][14][16]
Aftermath
The British commanders were reasonably pleased with the day's events and considered that the NNC had performed well in their first action.[8] The total Zulu casualties were estimated at thirty killed, including Mkumbikazulu, kaSihayo and four wounded.[17][16] In addition to the wounded, at least three unwounded Zulus were taken prisoner by an NNC officer.[13] One of the wounded prisoners was treated at the British hospital at Rorke's Drift, he was killed when the hospital burnt down during the Battle of Rorke's Drift on 22/23 January.[18] The British captured 13 horses, 413 cattle, 332 goats and 235 sheep with some of these being driven into Natal.[8][12] The British soldiers were pleased with this as they anticipated payment of prize money for the livestock.[14] Chelmsford wrote to Frere:
I am in great hope that the news of the storming of Sihayo's stronghold and the capture of so many of his cattle ... may have the salutary effect in Zululand and either bring down a large force to attack us or else produce a revolution in the country. Sihayo's men have I am told always been looked upon as the bravest in the country and certainly those who were killed today fought with great courage.[8]
Sihayo and his senior son, Mehlokazulu, escaped the action, having left the day before with the bulk of his fighting men to answer Cetshwayo's call to arms at Ulundi.[8][9] News of the attack reached the Zulu king whilst he was considering which of the three British columns to engage. The action seems to have convinced him to attack the centre column. He sent the bulk of his army against it and part of Chelmsford's force was subsequently annihilated at the Battle of Isandlwana on 22 January.[16]
The location of the action and Sihayo's kraal is not certain as records kept by the British were vague and no battlefield relics have been recovered.[19][15] The historian Keith Smith places Sihayo's kraal at Sokhexe, a settlement still occupied by Sihayo's descendants and the earlier action at a location somewhat to the south near Ngedla hill.[20]
References
Citations
- Knight 2008, p. 4.
- Knight 2008, p. 5.
- Greaves 2012, pp. 30–31.
- Smith 2014, p. 26.
- Paulin 2001, p. 70.
- Knight 2000, p. 292.
- Rothwell 1989, p. 26.
- Williams 2015, p. 67.
- Knight 1992, p. 37.
- Smith 2014, p. 27.
- Duminy & Ballard 1981, p. 102.
- Rothwell 1989, p. 27.
- Knight 1992, p. 38.
- Smith 2014, p. 30.
- Smith 2014, p. 28.
- Canwell 2004, p. 98.
- Rothwell 1989, p. 276.
- Greaves 2012, p. 120.
- Knight 1992, p. 36.
- Smith 2014, p. 31.
General sources
- Canwell, Diane (2004). Zulu Kings and their Armies. Pen and Sword. ISBN 978-1-84415-060-1.CS1 maint: ref=harv (link)
- Duminy, Andrew; Ballard, Charles (1981). The Anglo-Zulu War: New Perspectives. Pietermaritzburg, South Africa: University of Natal Press.
- Greaves, Adrian (2012). Rorke's Drift. Orion. ISBN 978-1-78022-497-8.CS1 maint: ref=harv (link)
- Knight, Ian (1992). Zulu: Isandlwana and Rorke's Drift 22nd – 23rd January 1879. Windrow & Greene. ISBN 978-1-872004-23-5.CS1 maint: ref=harv (link)
- Knight, Ian (2000). The Anglo-Zulu War, 1879. Archival Publications International. ISBN 978-1-903008-00-3.CS1 maint: ref=harv (link)
- Knight, Ian (2008). Companion to the Anglo-Zulu War. Pen and Sword. ISBN 978-1-84415-801-0.CS1 maint: ref=harv (link)
- Paulin, Christopher M. (2001). White Men's Dreams, Black Men's Blood: African Labor and British Expansionism in Southern Africa, 1877–1895. Africa World Press. ISBN 978-0-86543-929-0.CS1 maint: ref=harv (link)
- Rothwell, Captain J.S. (1989). Narrative of the Field Operations Connected with the Zulu War of 1879. London: Greenhill Books. ISBN 1-85367-041-3. OL 8980321M – via Quartermaster General's Department, Intelligence Branch, War Office.CS1 maint: ref=harv (link)
- Smith, Keith (2014). Dead Was Everything: Studies in the Anglo-Zulu War. Frontline Books. ISBN 978-1-4738-3723-2.CS1 maint: ref=harv (link)
- Williams, Paul (2015). Custer and the Sioux, Durnford and the Zulus: Parallels in the American and British Defeats at the Little Bighorn (1876) and Isandlwana (1879). McFarland. ISBN 978-0-7864-9794-2.CS1 maint: ref=harv (link)