Graduation (instrument)
A graduation is a mark used to indicate points on a visual scale.
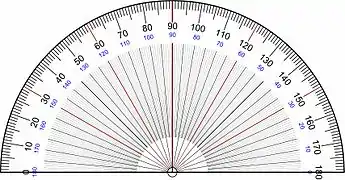
Linear graduation of a scale occurs on a linear measuring device, such as a rule or measuring tape using units such as inches or millimetres. The scale does not have to be straight; it can be curved, as on a protractor, but the graduations must be spaced at a constant length apart.
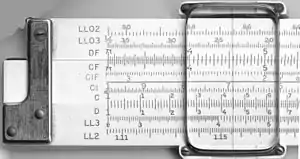
Graduations can also be spaced at non-linear intervals, such as logarithmic, where the interval between them varies. Volumetric graduations, for instance on a measuring cup, can vary in scale due to the container's conical or abstract shape.
Curved graduations
Circular graduations of a scale occur on a circular arc or limb of an instrument. In some cases, non-circular curves are graduated in instruments. A typical circular arc graduation is the division into angular measurements, such as degrees, minutes and seconds. These types of graduated markings are traditionally seen on devices ranging from compasses and clock faces to alidades found on such instruments as telescopes, theodolites, inclinometers, astrolabes, armillary spheres, and celestial spheres.
There can also be non-uniform graduations such as logarithmic or other scales such as seen on circular slide rules and graduated cylinders.


Manufacture of graduations
Graduations can be placed on an instrument by etching, scribing or engraving, painting, printing or other means. For durability and accuracy, etched or scribed marks are usually preferable to surface coatings such as paints and inks. Markings can be a combination of both physical marks such as a scribed line and a paint or other marking material. For example, it is common for black ink or paint to fill the grooves cut in a scribed rule. Inexpensive plastic devices can be molded and painted or molded with two or more colors of plastic used. Some rather high-quality devices can be manufactured with plastic and reveal high-precision graduations.
Graduations traditionally have been scribed into an instrument by hand with a sharp, hard tool.[1] Later developments in devices such as dividing engines allowed the process to be automated with greater precision. Modern devices can be stamped, cut on a milling machine or with a CNC machine. In the case of stamping, the master has the precision built into itself and the stamped device is as accurate as the stamping process allows. Similarly, molding of plastic can be as precise as the mold process. With proper concern for such effects as thermal expansion or contraction and shrinkage, the precision can be very high.
Graduation Style
Graduation style of an instrument is used by manufactures to quickly determine which types of scales are marked on the instrument.
| Graduation No. | Faces | Edges |
|---|---|---|
| 1 | front | 1/10″, 1/20″, 1/50″, 1/100″ |
| 1/12″, 1/24″, 1/48″ | ||
| reverse | 1/16″, 1/32″, 1/64″ | |
| 1/14″, 1/28″ | ||
| 2 | front | 1/10″, 1/20″, 1/50″, 1/100″ |
| 1/12″, 1/24″, 1/48″ | ||
| reverse | 1/16″, 1/32″, 1/64″ | |
| 1/8″ | ||
| 3 | front | 1/32″ |
| 1/64″ | ||
| reverse | 1/10″ | |
| 1/50″ | ||
| 4 | front | 1/32″ |
| 1/64″ | ||
| reverse | 1/8″ | |
| 1/16″ | ||
| 4-1 | front | 1/8″ |
| 1/16″ | ||
| reverse | Same as front face, but from opposite end | |
| Same as front face, but from opposite end | ||
| 5 | front | 1/32″ |
| 1/64″ | ||
| reverse | 1/10″ | |
| 1/100″ | ||
| 6-1 | front | 1/10″ |
| 1/50″ | ||
| reverse | not graduated | |
| not graduated | ||
| 6-2 | front | 1/10″ |
| 1/10″ | ||
| reverse | 1/50″ | |
| 1/50″ | ||
| 7 | front | 1/32″ (or 1/16″) |
| 1/64″ (or 1/32″) | ||
| reverse | 1/16″ (or 1/64″) | |
| 1/100″ | ||
| 9 | front | 1/16″ |
| 1/32″ | ||
| reverse | 1/64″ | |
| not graduated | ||
| 10 | front | 1/32″ |
| 1/64″ | ||
| reverse | not graduated | |
| not graduated | ||
| 11 | front | 1/100″ |
| 1/64″ | ||
| reverse | not graduated | |
| not graduated | ||
| 12 | front | 1/50″ |
| 1/100″ | ||
| reverse | not graduated | |
| not graduated | ||
| 16 | front | 1/32″ |
| 1/64″ | ||
| reverse | 1/50″ | |
| 1/100″ | ||
| M-1 | front | 1.0 mm |
| 0.5 mm | ||
| reverse | not graduated | |
| not graduated | ||
| M-2 | front | 1.0 mm (or 1.0 and 0.5 mm) |
| 1.0 mm (or 1.0 and 0.5 mm) | ||
| reverse | 1.0 mm | |
| 0.5 mm | ||
| ME-1 | front | 0.5 mm |
| 1/64″ | ||
| reverse | not graduated | |
| not graduated | ||
| ME-2 | front | 1.0 mm |
| 1/64″ (or 1/32″ and 1/64″) | ||
| reverse | 1.0 mm (or 1.0 and 0.5 mm) | |
| 1/32″ |
Other commonly recognized styles are:
- 30–1 mm, 0.5 mm
- 31–1 mm, 0.5 mm, 1/32″, 1/64″
- 34–1 mm, 0.5 mm, 1/10″, 1/50″
- 35–1 mm, 0.5 mm on both sides
- 35E—1 mm, 0.5 mm on both sides, plus mm on both ends on one side
- 36—1/32″ and 1 mm on one side; 1/64″ and 1 mm on other side
- 37–1 mm, 0.5 mm
- 37E—1 mm, 0.5 mm on both sides, plus mm on both ends on one side, Single row inch figure
- E/M—edge 1: 1/10″, edge 2: 1/100″, edge 3: 1.0 mm, edge 4: 0.5 mm
- 3R—1/64″, 1/50″, 1/32″, 1/10″
- 4R—1/64″, 1/32″, 1/16″, 1/8″
- 5R—1/100″, 1/64″, 1/32″, 1/10″
- 6R—1/32″, 1/64″, 1/10″, 1/100″
- 7R—1/100″,1/64″, 1/32″, 1/16″
- 9R—1/16″, 1/32″, 1/64″
- 10R—1/32″, 1/64″ (quick-reading)
- 10R/D—1/64″, 1/32″, Decimal Equivalency Table Graduation
- 12R—1/100″, 1/64″, 1/50″, 1/32″
- 16R—1/100″, 1/64″, 1/50″, 1/32″
Suffix key:
- R = Rapid Read (32nd & 64th graduations marked with number values)
- E = End Graduations (Graduations appear on end edge/edges)
- ME = Metric/English (Metric units in preferred position)
- E/M = English/Metric (English units in preferred position)
See also
References
- Daumas, Maurice, Scientific Instruments of the Seventeenth and Eighteenth Centuries and Their Makers, Portman Books, London 1989 ISBN 978-0-7134-0727-3
- "Federal Specification GGG-R-791H, Rules, Measuring". July 19, 1994.

