Peyote stitch
The peyote stitch, also known as the gourd stitch, is an off-loom bead weaving technique. Peyote stitch may be worked with either an even or an odd number of beads per row. Both even and odd count peyote pieces can be woven as flat strips, in a flat round shape, or as a tube. Tubular peyote is used to make pouches or to decorate objects such as bottles or fan handles.

Many cultures around the world have used peyote stitch in their beadwork. Examples of peyote stitch have been found in artifacts from Ancient Egypt, and the stitch has also been used in historic and contemporary Native American beadwork. The name "peyote stitch" derives from the use of this stitch to decorate objects used in peyote ceremonies by members of the Native American Church.[1] The name "gourd stitch" similarly derives from the use of the stitch in decorating gourd containers.
Variations on Peyote stitch
A variation of the peyote stitch is often referred to as the fast peyote stitch as its use resembles peyote, but it can be done in less time.
Much like the first two rows of a peyote stitch project, the speed stitch requires two rows be strung then worked in. It can only be done with an even number of beads but is easily done in either flat or tubular peyote.
Peyote Stitch can be done in the round, on the diagonal, flat or tubular. A versatile stitch which is a favourite of many beaders.
A new form of peyote stitch has been created by Gerlinde Linz. This is called Peyote with a twist, not bead crochet. Often abbreviated to PWAT, although Linz prefers Peytwist. This form of diagonal peyote, when worked up into a chain can form the look of a crochet rope.
The Cellini spiral was originated by seed bead masters Virginia Blakelock and Carol Perenoud who developed the tubular variation and named it after Benvenuto Cellini, a 16th-century Italian sculptor known for his Rococo architectural columns. Eventually, the flat version emerged, and both techniques are equally beautiful.
History
The peyote stitch can be found dating back to Ancient Egypt. Most notably, the tomb of King Tutankhamun contains many artifacts utilizing the stitch. The Egyptians created broad collars with the stitch with molded tubular beads. These collars are depicted on gods, kings, and others. [2]
Not only has the stitch been found in Ancient Egypt, but Native Americans have also been using it for centuries. Native American beadwork evolved with the their colonization when the Europeans brought over glass beads. The peyote stitch got its modern name from the Kiowa and Comanche Tribes in the 1800s. Modern Native American beadwork uses the peyote stitch in jewelry, objects, and traditional objects. [2]
How to
Even Count Peyote Stitch:
- Create a “stop bead” by stringing one bead onto the thread. Slide the bead down to the end of the thread, leaving a tail long enough to weave in when your project is finished. Pass your needle back through the bead from the tail end to hold the bead in place. The stop bead is a tool to prevent your beads from slipping off the end of the thread and is not included in your project.
- String an even number of beads onto your thread and drop them down to the stop bead. These beads will be rows one and two of your project.
- Pick up one bead. Working back toward the tail end of your thread, skip the first bead and pass your needle through the next bead. Repeat this step to the end of the row, skipping one bead after the bead your thread is exiting and passing through the following bead. The bead you are adding should sit beside the bead you skipped.
- Work the next row in the opposite direction. On this row, notice that every second bead sticks up above the bead on either side of it. These are the beads you will pass your thread through on this and subsequent rows.
- Repeat Steps 3 and 4 until you have reached the desired length of your project.
- Once your project has reached the desired length, you may use the thread ends to attach a clasp. After the clasp is attached weave the ends through the beads, changing directions at least twice to lock in the thread. Cut or burn the thread ends close enough to the work to prevent them from showing.
Odd Count Peyote Stitch:
- Follow steps 1 through 3 from the instructions for Even Count Peyote, except instead of picking up an even number of beads, you will pick up an odd number.
- At the end of row 3, there is no bead to pass through. Position your project with the stop bead facing away from you and pick up one bead. Pass your needle down through the last bead in row 1.
- To get to the position you need to be in to start the next row, keep your project positioned with the stop bead facing away from you. Now, pass your needle down through the last bead in row 2 and the second to last bead in row 3. Next, go up through the second to last bead in row 1, the last bead in row 2, and up through the last bead in row 1. Finally, go down through the last bead in row 3. You are now in position to start row 4. You will need to do this turn at the end of every odd numbered row. Even numbered rows are treated the same as in Even Count Peyote.
- Continue working until your project has reached the desired length. Finish the same as Even Count Peyote.
References
- Hackbarth, Emily. "Peyote Stitch Beading Class Part One". About.com: Beadwork. Retrieved 2008-06-02.
- "Knitting, Crochet, Jewelry, Beading – Instruction and Inspiration". Interweave. 2019-10-28. Retrieved 2020-11-20.
External links
- BeadJewelryMaking: Peyote Stitch Instruction: even count flat, odd count flat and Tubular peyote stitch
- Bead Wrangler - Preserving Beadwork History for the new Millennium: Peyote Samples No longer a functioning site.
- Fire Mountain Gems video tutorial
- Beadage Glossary: Peyote Stitch
| Beads | 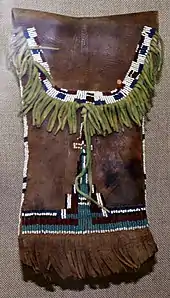 | |
|---|---|---|
| Techniques and tools | ||
| Bead artists | ||
| Related |
| |