20th Battalion (New Zealand)
The 20th Battalion was an infantry battalion of the New Zealand Military Forces, which served during the Second World War as part of the 2nd New Zealand Division. During the war it was converted to an armoured regiment.
| 20th Battalion (20th Armoured Regiment) | |
|---|---|
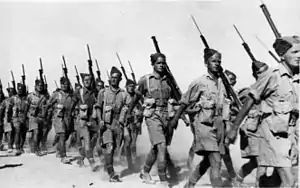 Infantry of the 20th Battalion in Baggush, Egypt, September 1941 | |
| Active | 1939–45 |
| Disbanded | 2 December 1945 |
| Country | |
| Branch | |
| Type | Infantry (1939–42) Armoured (1943–45) |
| Size | ~800 personnel[1] |
| Part of | 4th Brigade, 2nd New Zealand Division |
| Engagements | Second World War |
| Commanders | |
| Notable commanders | Howard Kippenberger James Thomas Burrows |
The 20th Battalion was formed in New Zealand in 1939 under the command of Lieutenant Colonel Howard Kippenberger. After a period of training it embarked for the Middle East and then onto Greece in 1941 as part of the 2nd New Zealand Division. It participated in the Battles of Greece and later in Crete. Evacuated from Crete, it then fought in the North African campaign. It suffered heavy losses during Operation Crusader, when it was effectively destroyed by the 15th Panzer Division. Brought back up to strength, the battalion played a key role in the breakout of the 2nd New Zealand Division from Minqar Qaim in June 1942, where it had been encircled by the 21st Panzer Division. The following month, the battalion suffered heavy casualties during the First Battle of El Alamein.
In October 1943, the battalion was converted to an armoured unit and designated 20th Armoured Regiment. To replace men lost at El Alamein, personnel were drawn from a tank brigade being formed in New Zealand. The regiment spent a year in Egypt training with Sherman tanks, before embarking for Italy in October 1943 to join the Eighth Army. It participated in the Italian campaign, fighting in actions at Orsogna and later at Cassino. The regiment finished the war in Trieste and remained there for several weeks until the large numbers of Yugoslav partisans also present in the city withdrew. Not required for service in the Pacific theatre of operations, the regiment was disestablished in late 1945.
Formation and training
Following the outbreak of the Second World War, the New Zealand Government authorised the formation of the 2nd New Zealand Expeditionary Force (2NZEF), for service at home and abroad.[2] After consulting with the British Government, it was decided that the main New Zealand contribution to the war effort would be in the form of an infantry division, the 2nd New Zealand Division, under the command of Major General Bernard Freyberg. The new division would require nine battalions of infantry[3] and consequently, several infantry battalions were formed from 1939 to 1940 with New Zealand volunteers.[2]
The 20th Battalion was the third such unit[Note 1] to be raised for the 2NZEF and was formed in Christchurch at Burnham Military Camp in early October with Lieutenant Colonel Howard Kippenberger, an experienced Territorial Force soldier and veteran of the First World War, as its commander.[5] It was the last of the three infantry battalions designated to make up the first echelon of the 2nd New Zealand Division, destined for overseas service.[6][Note 2] Its personnel, all volunteers, were from the South Island of New Zealand. They were formed into four rifle companies, designated A to D and corresponding to the Canterbury, Southland, Nelson-Marlborough-West Coast and Otago districts. A headquarters company included the specialist support troops; signallers, anti-aircraft and mortar platoons, and transport personnel.[7]
Initial training focused on basic drill and fitness along with shooting. The men of 20th Battalion also engaged in company level tactical exercises but did not have training in infantry support weapons, such as anti-tank rifles, as these were not available in New Zealand.[8] The battalion departed for the Middle East on 5 January 1940 aboard the SS Dunera as part of the 4th Infantry Brigade, 2nd New Zealand Division.[1][Note 3] The battalion arrived at its base in Maadi, Egypt on 14 February,[9] and was involved in further training, including brigade level exercises.[10] In addition, it performed garrison duty at a defensive position known as the Baggush Box, in the Western Desert and guarding the route between Alexandria and Mersa Matrush, rotating in and out with the other battalions of the 4th Brigade, for most of the next 12 months.[11]
Greece
The British Government anticipated an invasion of Greece by the Germans in 1941 and decided to send troops to support the Greeks, who were already engaged against the Italians in Albania. The 2nd New Zealand Division was one of a number of Allied units dispatched to Greece in early March.[12] The 4th Infantry Brigade was tasked with the defence of the Aliakmon Line in northern Greece, with the 20th Battalion preparing and manning the defences along the western end of the line. On 6 April, the Germans invaded Greece and their advance was so rapid that it quickly threatened the Florina Gap. The 4th Infantry Brigade was withdrawn to the Servia Pass where it manned defences that were superior to its previous positions.[13]
On 13 April, the battalion suffered its first fatality as a result of enemy action when a soldier was killed in an air raid[14] and the following day, German forces reached the Servia Pass. The brigade, temporarily under the control of the Australian 6th Division, defended its positions for three days before being withdrawn.[15] The battalion was the rearguard of the brigade as it withdrew, with Kippenberger coordinating the demolition of several bridges and avoiding contact with the advancing German armour.[16] The 4th Brigade was used to cover the withdrawal of the division from Greece, and moved to Porto Rafti, east of Athens, from where it was evacuated to Crete on 28 April.[17]
Some personnel of the battalion at a reinforcement depot in Athens ended up at the port of Kalamata, in the southwest of the country. These soldiers, along with other reinforcements, were integrated into an adhoc battalion. One of them, Sergeant Jack Hinton, was instrumental in clearing a wharf at Kalamata that had been captured by advance elements of the 5th Panzer Division. He was later awarded a Victoria Cross (VC) for his actions during this engagement, during which he was wounded and, along with most of the other personnel involved, was made a prisoner of war.[18] By the end of the campaign in Greece, the battalion had 24 personnel killed in action or died of wounds; 80 others were prisoners of war.[19]
Crete
On Crete, it became apparent that the island would be the target of German landings from the air and sea. Freyberg took over command of Creforce, tasked with the defence of Crete,[20] with the New Zealanders, temporarily commanded by Brigadier Edward Puttick in Freyberg's absence, responsible for the area around Chania and Maleme, including the airfield.[21] The 20th Battalion was detached from the 4th Infantry Brigade to form part of a new ad hoc 10th Infantry Brigade. While Kippenberger led this brigade, his nominal second-in-command, Lieutenant Colonel James Burrows, was in charge of the 20th Battalion for most of the Battle of Crete.[22] The battalion was soon detached from the 10th Brigade to serve as the divisional reserve, in anticipation of a counterattack role should the Germans land on Crete.[23]
On 20 May 1941, the opening day of the invasion of Crete, the battalion was positioned to the east of the town of Galatas[22] where it was watching the coast due to the risk of a seabourne invasion.[24] It dealt with several Fallschirmjäger (paratroopers) that landed near them.[25] On 22 May, the battalion was used in a counterattack on Maleme airfield, which had been occupied by the Germans the previous day. Puttick was reluctant to release the battalion until it had been replaced in the line; he anticipated the Germans would mount a naval landing later in the evening. The delayed arrival of the relief unit meant that the 20th Battalion was late to its starting position.[24] The counterattack, which also involved the 28th Battalion, commenced at 3:30am. After a promising start, where the C and D companies of 20th Battalion reached the perimeter of the airfield by 7:30am, they had to withdraw as their positions were too exposed in daylight hours.[26] The counterattack resulted in heavy casualties, although not as high as the Germans' own losses.[27] It also resulted in an award of a VC to Lieutenant Charles Upham for his actions during the attack on Maleme airfield.[28]
When Galatas fell to the Germans on 25 May, the 20th Battalion was in danger of being cut off. It successfully regrouped and assisted in the recapture of the town. The battalion withdrew on 26 May, which marked the beginning a retreat to Hora Sfakion, on the southwest coast of Crete, for evacuation. Kippenberger rejoined the battalion after his previous command, the 10th Brigade, was disestablished after the capture of Galatas.[29] On arrival at the evacuation beaches, it was found that there was insufficient room on the Australian destroyers that were the designated transport for all of the battalion's personnel. The bulk of the battalion departed on 30 May although Kippenberger was forced to select 40 men to stay behind and form a rearguard under the command of Burrows.[30] After manning defensive positions to prevent Germans infiltrating the cordon around the embarkation beaches, the rearguard was evacuated the following day.[31] The battalion lost 80 soldiers killed or died of wounds on Crete and nearly 90 were made prisoners of war.[19]
North Africa
The 20th Battalion was evacuated to Egypt, having lost over half its original complement of personnel during the Greece and Crete campaigns. After a short period of rest, Kippenberger set about bringing the battalion back up to strength and fighting efficiency.[32] Nearly 400 replacements joined the battalion in mid-June[33] and stragglers, separated from the battalion for various reasons during the previous two months while in Greece and Crete, continued to arrive for several weeks as they made their way across the Mediterranean by various means, including small sailboats. By mid-June, the battalion was at full strength and several weeks were then spent at the battalion's previous positions at Baggush, engaged in intensive desert training.[32] The 2nd New Zealand Division was now preparing for a role in the upcoming Libyan offensive, and several divisional and brigade level exercises were carried out.[34] By October 1941, Kippenberger felt that morale in his 20th Battalion was at a peak and it was ready for action.[35]
Operation Crusader
In November 1941, the 2nd New Zealand Division participated in Operation Crusader as part of the British Eighth Army's advance into Libya.[36] The offensive was intended to relieve Tobruk, then under siege, and force the Axis forces from the Cyrenaica region of Libya.[37] Leading the 4th Brigade on 21 November, the 20th Battalion cut the road between Bardia and Tobruk and dealt to several German trucks, one being a vehicle that had been abandoned by the New Zealanders in Greece and put into German service.[38] While the 4th Brigade continued to advance, the battalion stayed to cover the road, occasionally dealing with lightly armoured vehicles of the 21st Panzer Division, until 23 November at which time it was relieved and placed in reserve.[39]
The next day, the 20th Battalion led the 4th Brigade in linking up with the 6th Infantry Brigade, struggling to hold onto gains made at Sidi Rezegh. In doing so, the battalion, supported by several Valentine tanks, made 260 German soldiers prisoners of war and captured three 88 mm guns. At one stage, Kippenberger had to intervene to prevent the tanks from withdrawing after they came under fire.[40] On the night of 25 November, along with the 18th Battalion, it was tasked with the night-time capture of Belhamed, a hill adjacent to Sidi Rezegh. The units advanced to their objective, bayonets fixed, with the 20th Battalion on the left. Instructed by Kippenberger to take no prisoners, Belhamed was quickly seized with minimal losses.[41] As he moved forward, Kippenberger made a navigational error which resulted in his headquarters company becoming separated from the other companies of the battalion. It took him until daylight for him to reestablish contact with the remainder of the battalion. Shortly after his arrival, he was wounded by machine gun fire and evacuated.[42][Note 4]
The battalion consolidated its hold on Belhamed, but was exposed to German mortar and artillery fire from the south.[44] Unable to excavate much cover, the New Zealanders could only move about freely at night. In the meantime, a corridor had been opened to Tobruk although there were still pockets of German resistance. Despite the protests of Captain R. Agar, the acting commander, the 20th Battalion was ordered to deal with one such pocket. An attack, made in daylight and without artillery support, failed with heavy casualties incurred on an already depleted battalion.[45] It remained in position on Belhamed for three days before it was destroyed by elements of the 15th Panzer Division attacking from Sidi Rezegh,[46] which had been overrun the previous day.[47] Only one man managed to escape capture.[48]
Rebuilding
A number of the 20th Battalion's personnel had not been involved in Operation Crusader, most of whom were unfit, recovering from injuries, on leave or attending training courses. These men, numbering about 137, formed the nucleus of the reformed battalion at Baggush in early December. Other personnel who had been temporarily deployed elsewhere also returned to the battalion during December.[49] By the end of the month, the battalion, now under the command of Burrows due to Kippenberger's promotion to brigadier and posting to command of the 5th Infantry Brigade, was brought back up to strength with 600 reinforcements.[50][51] For the next two months, Burrows oversaw training of his new command while it was based at Baggush and then later at Maadi. In February 1942, the battalion moved, with the rest of the 2nd New Zealand Division, to Syria to defend against a possible attack through Turkey on the Middle East oilfields by the Germans.[52][53]
.jpg.webp)
In Syria, the battalion prepared defences in its assigned sector around Djedeide Fortress, digging weapons pits as well as undergoing further training.[54] Following the attack on the Eighth Army's Gazala Line by Panzer Army Africa, the 2nd New Zealand Division was recalled to Libya. On 17 June, the battalion left for Mersa Matruh, a 320-kilometre (200 mi) journey that took four days to complete.[55] Much of the Eighth Army was in retreat resulting in traffic congestion as the New Zealanders made their way to Mersa Matruh, a neglected fortified position to the west of the town, surrounded by minefields.[56] Freyberg, the divisional commander, disliked the plan for his command to be based at Mersa Matruh, regarding it as a trap.[57] After a period of indecision as to where the division was to be best used, it moved to Minqar Qaim with the 20th Battalion remaining behind at Matruh for two days to act as security for engineers laying minefields before joining up with the division.[58][59]
At Minqar Qaim, the division was to hold and delay the advance of the Panzer Army Africa for as long as it could while remaining intact.[60] By the middle of the afternoon of 27 June, the division had been encircled by the 21st Panzer Division. German tanks and infantry approached the 2nd New Zealand Division's positions, including the 20th Battalion's sector on the northern side of the Minqar Qaim escarpment, and were successfully beaten off. Upham, who had the received the VC for his actions at Maleme in Crete, was prominent during this time, directing the supporting anti-tank guns and deliberately drawing fire from German machine guns so that they could be targeted. The battalion's mortars were used to harry enemy infantry trying to clear the mines guarding its position.[61] The New Zealanders broke out that evening with the 4th Brigade breaching the German lines and the 20th Battalion brearing the brunt of the fighting on the northern flank of the chosen withdrawal route.[62][63] During the action at Minqar Qaim and the subsequent breakout, the battalion's casualties were light, with thirteen men killed[64] and it reached the El Alamein line by 28 June.[65]
El Alamein
Despite the events of Minqar Qaim, the 2nd New Zealand Division was one of the most complete divisions of the Eighth Army still able to be employed along the El Alamein line.[66] The area was subject to further offensives by Panzer Army Afrika and on 14 and 15 July 1942, during the First Battle of El Alamein, the battalion was involved in an effort to assist 30 Corps, by being part in what would be known as the Battle of Ruweisat Ridge.[67][68] By this time the battalion was commanded by Major I. Manson as Burrows had taken over command of the 4th Infantry Brigade following the death of its leader in a bombing raid.[69]
The Italian Brescia and Pavia divisions, along with elements of the 15th Panzer Division, held Ruweisat Ridge, which was in the centre of the El Alamein line, and dominated the surrounding area. The 4th Brigade was to take the western end of the ridge, with Kippenberger's 5th Brigade tasked with the capture of the centre of the ridge. The 5th Indian Brigade was allocated to deal with the eastern end. British tanks, in the form of two armoured brigades, were to protect the flanks and be in support to deal with the expected counterattack. However, little thought was given to communication and liaison between the infantry and armoured brigades, nor was a clear chain of command established. This would have implications for the outcome of the battle.[70][67]
After a night-time advance, the 20th Battalion was positioned on the ridge in reserve behind the 18th and 19th Battalions. The advance had routed much of the Italian defences although, on daybreak, it was discovered that numerous strong points had been bypassed, leaving the German line in front of the ridge largely intact. Upham again was heavily involved; he was sent forward to link up with 18th and 19th Battalions, Burrows having lost contact with them. After making his report, Upham was wounded in the elbow but remained forward with his company.[71][72] The 5th Brigade was also on the ridge but was widely dispersed. Its advance had skirted a regiment of panzers, which in the early hours of the morning of 15 July routed the flanking battalion of the 5th Brigade. This left the battalions of the 4th Brigade even more exposed and receiving fire from the enemy.[73][74] The Indians were likewise in position having secured their objective.[75]
However, the supporting British armour was nowhere to be seen and the supporting artillery and anti-tank units were unable to break through, leaving the brigades exposed on the ridge. Kippenberger had difficulty with his radio communications and made a dash through enemy lines to make contact with the British armour. On reaching one of the British brigades, its commanding officer resisted Kippenberger's entreaties to advance and it was not until a passing British general authorised the move that the British mounted up.[76] The tanks moved forward but halted still short of Ruweisat Ridge. A liaison officer from the 4th Brigade made contact and urged them to advance closer but his entreaties were ignored.[77]
A counterattack by elements of the 15th and 21st Panzer Divisions was launched in the afternoon of 15 July. The limited number of anti-tank guns present were exposed and quickly immobilised or had to withdraw. This left the infantry of the 4th Brigade to be surrounded and large numbers were forced to surrender. Some soldiers made it to the positions of 19th Battalion, but it too became surrounded. By nightfall, the brigade had been overrun and 1,100 soldiers, nearly 200 of them from 20th Battalion, were taken prisoner. The British tanks belatedly moved forward and although this drove off the German armour, the other infantry brigades withdrew from Ruweisat Ridge later in the evening.[78][79] Upham was among the prisoners of war; for his actions at Minqar Qaim and at Ruweisat Ridge he was later awarded a Bar to the VC he had won on Crete.[80]
Conversion to armour
About half of the 20th Battalion had been wounded, killed or captured during the Battle of Ruweisat Ridge and it, along with the rest of the 4th Brigade, was withdrawn to Maadi to be brought back up to strength.[81][82] It had previously been decided to form an armoured brigade to provide tank support to the 2nd New Zealand Division and as a result, the 1st New Zealand Army Tank Brigade was formed. This brigade was still undergoing training in New Zealand in September when it was decided to convert the 4th Brigade to armour instead. Personnel were transferred from the tank brigade in New Zealand to bring the 4th Brigade back up to strength. As one of the constituent units of the brigade, the 20th Battalion was officially re-designated the 20th Armoured Regiment on 5 October 1942.[83]
The regiment, with three squadrons of tanks, would spend the next year in training, learning to use the signalling equipment and guns of the tanks it was expected to use. One squadron was to be equipped with Crusaders with the other two squadrons operating Shermans.[84] However, the mechanically unreliable Crusaders were later replaced with Shermans. Burrows initially oversaw the transition to armour until he returned to New Zealand on furlough in May 1943 and was replaced by Lieutenant Colonel J. W. McKergow.[85]
With the close of the North African campaign in May 1943, attention then turned to the European theater of operations. Despite a preference amongst some sections of the New Zealand government for the 2nd New Zealand Division to be redeployed in the Pacific theater, it was decided that the division, having served with the Eighth Army throughout the desert campaign, would remain in Europe. Accordingly, in October, the division moved to join the Eighth Army in Italy.[86]
Italy
The men of the 20th Armoured Regiment disembarked at Taranto on 22 October 1943.[87] After spending a fortnight near Galese, they moved to San Bartolommeo, near Galdo.[88] The tanks, which had been shipped separately to Bari, were transported to San Bartolommeo tob be reunited with their crews.[89] The regiment then gradually travelled up Italy towards the Sangro River, which it duly crossed on 3 December.[90]
Orsogna
In the following weeks, the 4th Armoured Brigade was involved in a supporting role in the 5th and 6th Infantry Brigades' attack on Orsogna, as part of the Moro River Campaign. Although the infantry made some gains, the German defences were too strong and the attack soon faded into a stalemate, with a number of back and forth actions.[91] On 15 December, three squadrons of the regiment was brought in to reinforce the 18th Armoured Regiment, which had lost several tanks in an advance, and had insufficient numbers to exploit a potential opening to Orsogna. Later in the afternoon, one squadron pushed forward but encountered German Panzer IV tanks and was beaten back having lost five of its 13 tanks.[92]
Two more squadrons of the regiment were involved in a major engagement the next day, when it was committed to spearhead a drive to Orsogna. German artillery fire scattered the supporting infantry, leaving the tanks exposed as they advanced. Seven tanks were destroyed and another abandoned as a result of anti-tank fire. Kippenberger, as commander of the 5th Infantry Brigade and in overall charge of the attack, called off the advance.[93] The regiment was involved in a further attack on 24 December, supporting the 28th Infantry Battalion and consolidating some initial gains. The advance was brought to a halt by stubborn German defence.[94] Although the 20th Armoured Regiment lost 15 tanks in the fighting around Orsogna, generally it had acquitted itself well and was withdrawn from the line the following month. One major issue identified was communication with the infantry; the aerial for the wireless of the tanks were found to have been incorrectly installed.[95][96] McKergow had been wounded at Orsogna, and Lieutenant Colonel H. A. Purcell took over command of the regiment.[97]
Cassino
Following its withdrawal from the area around Orsogna, the 2nd New Zealand Division was one of a number of divisions that was transferred from the Eighth Army to the Fifth Army, then engaged on the western side of the Apennines. This was part of an overall strategy to breach the Gustav Line and break an otherwise deadlocked Italian front. Together with the 4th Indian Division and supporting British and American artillery, the division formed the New Zealand Corps, under the command of Freyberg. The corps moved to Cassino, the defenders of which had resisted American forces for several weeks. The town was in a valley dominated by mountains, with one topped by the monastery Monte Cassino.[91][98]
As at Orsogna, the 20th Armoured Regiment was to play a supporting role for the infantry in the forthcoming Cassino attack.[99] An earlier attempt by the New Zealanders in February to take Cassino had failed.[100] By this time, the regiment was under the command of Lieutenant Colonel J. Ferguson, who had previously led the 18th Armoured Regiment; Purcell had been sent to Egypt as commander of the Armoured Corps training depot there.[101] When a renewed attack began on 15 March, the regiment was initially held as a reserve, ready to exploit any breakthrough by the infantry but this did not eventuate. The infantry struggled to make progress in the face of determined resistance.[99] Over the next week, some of the squadrons of the regiment became involved in small scale raid actions,[102] the first of which was on 19 March. This involved a squadron of 16 Shermans, along with over 30 other armoured vehicles from United States and Indian units, advancing to the Monte Cassino monastery via a trail up the slopes of the mountain. Although the German defenders lacked anti-tank guns, they were well dug in and supported by artillery and mortars. Without infantry support, the advance along the trail came to a halt. Soft ground stripped some tanks of their tracks and nine of the squadron's tanks were disabled or destroyed. The armour withdrew in the afternoon when it was noticed that the Germans appeared to be preparing a counterattack.[103][104]
On 24 March, the regiment moved into the area of Cassino controlled by the New Zealand infantry to relieve the 19th Armoured Regiment. Once in position in the town, its tanks essentially became pillboxes.[105][106] The tanks were vulnerable to artillery and German patrols and the troops of the various squadrons of the regiment were rotated in and out of the town in two day shifts. While the New Zealand infantry had been relieved by the Guards Brigade in early April, the 20th Armoured Regiment stayed in the line. Unable to move the tanks, their crews had to remain in them during daylight hours, only coming out at night. The regiment was kept in the town until the end of the month.[107][108] The operations at Cassino resulted in 20 men killed or who later died of their wounds.[109]
After the New Zealand Corps was disbanded, a period of rest and training in the Volturno valley followed for the 20th Armoured Regiment before it returned to action in May. Back under the command of Purcell, who had returned from Egypt, it was temporarily split from the 4th Brigade and its various squadrons detached in support of separate operations being conducted by 5th and 6th Brigades in advances to Avezzano.[110][111] Following the Normandy landings, the Italian campaign was reduced to a sideshow, although one which still had considerable value in tying down German forces that could otherwise be used elsewhere. The regiment, now rejoined with the 4th Brigade, supported the infantry brigades as they advanced to Florence.[112] Carrying infantry of the 23rd Battalion, one of the regiment's squadron of Shermans were the first New Zealanders to enter Florence itself on 4 August.[113] After being withdrawn for a rest, the 2nd New Zealand Division was transferred in September to the I Canadian Corps, then on the Adriatic coast, and advanced up to Rimini.[112][114] Here the B Squadron of the regiment supported an attack by a Greek mountain brigade towards Rimini on 14 September.[115]
After the 2nd New Zealand Division advanced to and crossed the Fiumicino River,[116] the 4th Armoured Brigade was involved in its first action as a brigade on 19 October, This was an attack towards the Savio River, with the 20th Armoured Regiment on the left flank, and was primarily a tank action, in contrast to previous battles in which the armour supported the infantry. Small groups of German paratroopers and panzergrenadiers were dealt with and the regiment reached the Savio the next day, having advanced 7 miles (11 km) to complete its objectives.[117][118] The regiment then supported the 2nd Canadian Infantry Brigade in making its own attack across the river on the evening of 21 October. The regiment's Shermans fired an hour-long barrage of high explosive shells along their front to create a diversion, under the cover of which the Canadians made their own landings on the far bank of the Savio.[119] Soon after this action, the regiment's tanks were replaced with the Sherman Firefly, which had a superior main gun to that previously used.[120]
In late 1944, the 20th Armoured Regiment crossed the Lamone River and its squadrons supported the infantry battalions of the 6th Brigade in attacks in and around the town of Faenza in December. The regiment then wintered along the Senio River.[121] It would be involved in supporting infantry on the front lines until early February 1945 when it was rested.[122] During this time, the regiment's manpower was reduced by the equivalent of a squadron when the division was reorganised to add another infantry brigade.[123] Along with many of the regiment's experienced personnel, Purcell returned to New Zealand on furlough and was replaced by Lieutenant Colonel H. Robinson, who had served with the Divisional Cavalry.[124]
Advance to Trieste
After a period of rest, the 20th Armoured Regiment returned to the front lines in early April.[125] Along with the 19th Armoured Regiment, on the night of 10 April, it supported the New Zealand infantry's crossing of the Santerno River,[126] the first of a series of advances against the retreating German rearguard. On 2 May, the regiment's A Company was the leading element of the 2nd New Zealand Division and entered Trieste. While most of the German garrison quickly surrendered, it was necessary to deal with some diehard elements who refused to surrender to either the New Zealanders or the Yugoslav partisans also present in the city. In fact, the partisans were reluctant to allow Germans to surrender to the New Zealanders at all.[127]
The regiment, along with the rest of the 2nd New Zealand Division, remained in and around Trieste for several weeks to counter the presence of the partisans, who had laid claim to the city.[128] At one point, the regiment was involved with a standoff with Yugoslav tanks, that ended with the partisans leaving.[129] It was not until mid-June that the partisans withdrew from the city. It would be several more weeks before it was determined by the New Zealand Government that the division would not be needed for service in the Pacific theatre of operations. However, the longest serving men of the regiment had been steadily returning to New Zealand on furlough since early 1944, and most were not required to come back to active service. By the end of August, the last elements of the regiment had withdrawn from Trieste to wintering positions near Florence.[128] In mid-September, it was decided to send the latest reinforcement drafts, then assembling in New Zealand, intended for the division to Japan instead to serve as an occupation force known as Jayforce. The men of 20th Armoured Regiment would not be required for duty in Japan and this accelerated the demobilisation process. The regiment was officially disbanded on 2 December 1945.[130]
During the war, the 20th Battalion and its successor, the 20th Armoured Regiment, lost 366 officers and men either killed in action or who later died of their wounds, including 30 men who died as prisoners of war. Nearly 750 personnel were made prisoners of war.[19]
Honours
Some of the personnel of the 20th Battalion were highly decorated,[131] including Upham and Hinton, both of C Company, who were awarded three VCs between them.[132] Six members of the battalion, including some of its commanders,[Note 5] were awarded the Distinguished Service Order while four other personnel were appointed Members of the Order of the British Empire.[133] One of these was the regimental chaplain for his efforts in organising and evacuating wounded infantry while the regiment wintered along the Senio River in Italy.[122] Several other awards for gallantry were also made; nine Military Crosses were awarded to officers of the battalion, four non-commissioned officers received the Distinguished Conduct Medal (DCM), and 13 other soldiers were awarded the Military Medal.[133] The British Empire Medal was awarded to a staff sergeant and two personnel received foreign awards; one, an officer, received the Greek Military Cross[134] and the other, John Denvir, a non-commissioned officer who was already a recipient of the DCM, was awarded the Soviet Medal for Valour.[135]
The 20th Battalion and its successor, the 20th Armoured Regiment, was awarded the following battle honours:
Mount Olympus, Servia Pass, Olympus Pass, Molos, Greece 1941, Crete, Maleme, Galatas, 42nd Street, Withdrawal to Sphakia, Middle East 1941–44, Tobruk 1941, Sidi Rezegh 1941, Sidi Azeiz, Belhamed, Zemla, Alam Hamza, Mersa Matruh, Minqar Qaim, Defence of Alamein Line, Ruweisat Ridge, El Mreir, Alam el Halfa, North Africa 1940–42, Orsogna, Cassino I, Advance to Florence, San Michele, Paula Line, Faenza Pocket, Rio Fontanaccia, St. Angelo in Salute, Pisciatello, The Senio, Santerno Crossing, Bologna, Sillaro Crossing, Idice Bridgehead, Italy 1943–45.[136][Note 6]
Commanding officers
The following served as commanding officers of the 20th Battalion/20th Armoured Regiment:[134]
- Lieutenant Colonel H. K. Kippenberger (September 1939 – April 1941);[Note 7]
- Lieutenant Colonel J. T. Burrows (April–May 1941; December 1941 – July 1942; August 1942 – June 1943);[Note 8]
- Major I. O. Manson (July 1942);
- Lieutenant Colonel D. J. Fountaine (July–August 1942);
- Lieutenant Colonel J. W. McKergow (September 1942; November 1942; June–December 1943);
- Lieutenant Colonel H. A. Purcell (December 1943 – January 1944; May–December 1944; January–March 1945);
- Lieutenant Colonel J. B. Ferguson (January–May 1944);
- Major P. A. Barton (December 1944 – January 1945);
- Lieutenant Colonel H. A. Robinson (March–October 1945);
- Major W. H. Ryan (October–December 1945).
Notes
Footnotes
- The numbering of the battalions raised for the 2NZEF followed that of the existing 17 infantry battalions of the Territorial Force. Thus, the first battalion formed for the 2NZEF was the 18th Battalion.[4]
- The other two infantry battalions were the 18th and 19th.[6]
- The other two brigades of the division were the 5th and 6th Brigades. The 1st, 2nd and 3rd Brigades were Territorial Force formations.[4]
- The medical station treating Kippenberger was captured by the Germans but he was able to escape and make his way back to Allied lines.[43]
- Kippenberger, Burrows, Purcell and Robinson.[133]
- The battle honours awarded for its work as an infantry battalion were entrusted to the Canterbury Regiment, Otago Regiment, Southland Regiment, and The Nelson, Marlborough and West Coast Regiment. Those awarded to the 20th Armoured Regiment are entrusted to the 3rd Armoured Regiment.[136]
- Kippenberger later achieved the rank of major general and briefly commanded the 2nd New Zealand Division before being wounded.[137]
- Burrows later achieved the rank of brigadier.[138]
Citations
- Pringle & Glue 1957, p. 11.
- Pugsley 2014, p. 16.
- Pugsley 2014, p. 19.
- Pugsley 2014, p. 21.
- Pringle & Glue 1957, p. 1.
- Pugsley 2014, p. 22.
- Pringle & Glue 1957, pp. 1–2.
- Pugsley 2014, p. 36.
- Pringle & Glue 1957, p. 17.
- Pugsley 2014, pp. 43–44.
- Pugsley 2014, pp. 49–53.
- McClymont 1959, p. 103.
- Pringle & Glue 1957, p. 49.
- Pugsley 2014, p. 83.
- Pugsley 2014, pp. 91–92.
- Pugsley 2014, p. 93.
- Pugsley 2014, pp. 106–107.
- Pugsley 2014, pp. 108–109.
- Pringle & Glue 1957, p. 613.
- Pugsley 2014, pp. 115–116.
- Pugsley 2014, p. 121.
- Pringle & Glue 1957, p. 99.
- Pugsley 2014, p. 122.
- Pugsley 2014, p. 159.
- Pugsley 2014, p. 145.
- Pugsley 2014, pp. 161–163.
- Pringle & Glue 1957, p. 128.
- Pugsley 2014, p. 162.
- Pringle & Glue 1957, pp. 135–137.
- Pringle & Glue 1957, pp. 143–145.
- Pringle & Glue 1957, p. 146.
- McLean 2008, pp. 191–193.
- Pringle & Glue 1957, p. 153.
- Pugsley 2014, p. 197.
- Kippenberger 1949, p. 81.
- Pugsley 2014, p. 205.
- Pugsley 2014, p. 199.
- Pringle & Glue 1957, pp. 168–169.
- Pugsley 2014, p. 209.
- Pugsley 2014, pp. 222–223.
- Pugsley 2014, p. 227.
- McLean 2008, pp. 202–203.
- Pugsley 2014, p. 251.
- Pugsley 2014, p. 228.
- Pugsley 2014, pp. 230–231.
- Pugsley 2014, pp. 246–247.
- Pugsley 2014, pp. 244–245.
- Pringle & Glue 1957, p. 212.
- Pringle & Glue 1957, pp. 214–215.
- Scoullar 1955, p. 9.
- Pugsley 2014, p. 254.
- Pringle & Glue 1957, pp. 216–217.
- Pugsley 2014, p. 260.
- Pringle & Glue 1957, pp. 221–222.
- Pringle & Glue 1957, p. 228.
- Scoullar 1955, pp. 52–54.
- Scoullar 1955, pp. 55–56.
- Pringle & Glue 1957, p. 230.
- Scoullar 1955, pp. 62–63.
- Pugsley 2014, p. 269.
- Pugsley 2014, pp. 270–271.
- Scoullar 1955, pp. 106–107.
- Pugsley 2014, p. 276.
- Pringle & Glue 1957, p. 243.
- Scoullar 1955, p. 120.
- Pugsley 2014, p. 282.
- Harper 2000, pp. 124–126.
- Pugsley 2014, p. 293.
- Pringle & Glue 1957, pp. 249–250.
- Pugsley 2014, p. 294.
- Harper 2000, p. 127.
- Pugsley 2014, pp. 297–299.
- Scoullar 1955, pp. 269–270.
- Pugsley 2014, p. 300.
- Pugsley 2014, p. 302.
- Harper 2000, pp. 127–128.
- Pugsley 2014, pp. 304–305.
- Scoullar 1955, pp. 288–290.
- Pugsley 2014, pp. 306–308.
- Pugsley 2014, p. 299.
- Pringle & Glue 1957, p. 279.
- Pugsley 2014, p. 330.
- Pringle & Glue 1957, p. 290.
- Pringle & Glue 1957, p. 297.
- Pringle & Glue 1957, p. 303.
- McGibbon 2000, p. 248.
- Pringle & Glue 1957, pp. 308–309.
- Pringle & Glue 1957, p. 311.
- Pringle & Glue 1957, p. 314.
- Pringle & Glue 1957, p. 321.
- McGibbon 2000, p. 249.
- Phillips 1957, pp. 125–126.
- Phillips 1957, pp. 131–132.
- Phillips 1957, pp. 144–146.
- Pringle & Glue 1957, pp. 361–364.
- Pugsley 2014, p. 417.
- Pringle & Glue 1957, pp. 349–350.
- Pugsley 2014, pp. 421–423.
- Pringle & Glue 1957, p. 381.
- Pugsley 2014, p. 442.
- Pringle & Glue 1957, p. 367.
- Pringle & Glue 1957, p. 396.
- Pugsley 2014, pp. 463–464.
- Phillips 1957, pp. 310–312.
- Pringle & Glue 1957, p. 401.
- Phillips 1957, p. 336.
- Pringle & Glue 1957, pp. 407–409.
- Kay 1967, p. 22.
- Phillips 1957, p. 356.
- Pringle & Glue 1957, pp. 419–421.
- Kay 1967, p. 54.
- McGibbon 2000, p. 251.
- Pugsley 2014, pp. 495–496.
- Pugsley 2014, pp. 499–500.
- Kay 1967, p. 222.
- Pugsley 2014, pp. 504–505.
- Pringle & Glue 1957, pp. 513–517.
- Pugsley 2014, p. 505.
- Kay 1967, p. 278.
- Pugsley 2014, p. 508.
- Pringle & Glue 1957, pp. 529–530.
- Pringle & Glue 1957, p. 532.
- Pugsley 2014, pp. 517–518.
- Pringle & Glue 1957, p. 550.
- Pringle & Glue 1957, p. 553.
- Pugsley 2014, p. 527.
- Pringle & Glue 1957, pp. 589–591.
- Pringle & Glue 1957, pp. 597–599.
- Pugsley 2014, p. 542.
- Pringle & Glue 1957, pp. 601–602.
- Pringle & Glue 1957, pp. 614–615.
- Kippenberger 1949, p. 80.
- Pringle & Glue 1957, p. 614.
- Pringle & Glue 1957, p. 615.
- Pringle & Glue 1957, p. 88.
- Mills, T.F. "20th Armoured Regiment, 2NZEF". www.regiments.org. Archived from the original on 9 November 2007. Retrieved 14 February 2016.
- McGibbon 2000, pp. 263–265.
- McGibbon 2000, p. 74.
References
- Harper, Glyn (2000). "From Darkness to Light: Kippenberger and a Tale of Two Battles". In Crawford, John (ed.). Kia Kaha: New Zealand in the Second World War. Auckland: Oxford University Press. pp. 123–139. ISBN 0-19-558438-4.
- Kay, Robin (1967). Italy Volume II: From Cassino to Trieste. Official History of New Zealand in the Second World War 1939–45. Wellington, New Zealand: Historical Publications Branch. OCLC 173284646.
- Kippenberger, Howard (1949). Infantry Brigadier. London: Oxford University Press. OCLC 1047844805.CS1 maint: ref=harv (link)
- McClymont, W. G. (1959). To Greece. Official History of New Zealand in the Second World War 1939–45. Wellington, New Zealand: War History Branch. OCLC 4373298.
- McGibbon, Ian, ed. (2000). The Oxford Companion to New Zealand Military History. Auckland, New Zealand: Oxford University Press. ISBN 0-19-558376-0.
- McLean, Denis (2008). Howard Kippenberger: Dauntless Spirit. Auckland, New Zealand: Random House. ISBN 978-1-86979-026-4.
- Phillips, N. C. (1957). Italy Volume I: The Sangro to Cassino. Official History of New Zealand in the Second World War 1939–45. Wellington, New Zealand: War History Branch. OCLC 493709177.
- Pringle, D. J. C.; Glue, W. A. (1957). 20 Battalion and Armoured Regiment. Official History of New Zealand in the Second World War 1939–45. Wellington, New Zealand: War History Branch. OCLC 4373441.
- Pugsley, Christopher (2014). A Bloody Road Home: World War Two and New Zealand's Heroic Second Division. Auckland, New Zealand: Penguin Books. ISBN 978-0-143-57189-6.
- Scoullar, J. L. (1955). Battle for Egypt: The Summer of 1942. Official History of New Zealand in the Second World War 1939–45. Wellington, New Zealand: War History Branch. OCLC 2999615.