Hamilcar's victory with Naravas
The battle following the defection of Numidian chieftain Naravas to Hamilcar Barca was fought between Carthaginian forces commanded by Hamilcar Barca and part of the combined forces of Carthage's former mercenary armies during the Mercenary War, which Carthage had formerly employed during the First Punic War, and those of rebelling Libyan cities supporting the mercenaries.
| Defection of Naravas | |||||||
|---|---|---|---|---|---|---|---|
| Part of the Mercenary War | |||||||
| |||||||
| Belligerents | |||||||
| Carthage | Rebels | ||||||
| Commanders and leaders | |||||||
| Hamilcar Barca |
Spendius Naravas Autaritus | ||||||
| Strength | |||||||
| 15,000–20,000 | 20,000–40,000 | ||||||
| Casualties and losses | |||||||
| Unknown |
10,000 killed 4,000 captured | ||||||
A rebel army under the command of Spendius, which included a contingent of Gauls under Autharitus and a group of Numidians under Naravas, shadowed Hamilcar’s army. Spendius managed to trap the Carthaginians in a valley mountain after some time. The defection of Naravas allowed Hamilcar to escape the trap. Spendius then chose to engage the Carthaginian army, and in a hard fought battle Hamilcar emerged victorious.
Background
.png.webp)
The First Punic War was fought between Carthage and Rome, the two main powers of the western Mediterranean in the 3rd century BC, and lasted for 23 years, from 264 to 241 BC. The two powers struggled for supremacy primarily on the Mediterranean island of Sicily and its surrounding waters, and also in North Africa.[1] While the war with Rome was being fought on Sicily, the Carthaginian general Hanno was leading a series of campaigns which greatly increased the area of Africa controlled by Carthage. He extended its control to Theveste (modern Tébessa, Algeria) 300 km (190 mi) south-west of their capital.[2][3] Hanno was rigorous in squeezing taxes out of the newly conquered territory in order to pay for both the war with Rome and his own campaigns.[3] Half of all agricultural output was taken as war tax, and the tribute previously due from all towns and cities was doubled. These exactions were harshly enforced, causing extreme hardship in many areas.[4][5]
After immense material and human losses on both sides during the First Punic War, the Carthaginians were defeated.[6][7] The Carthaginian Senate ordered the commander of its forces on Sicily, Hamilcar Barca, to negotiate a peace treaty on whatever terms he could; convinced that the surrender was unnecessary he left Sicily in a rage delegating negotiations to his deputy Gisco.[6][7][8] The Treaty of Lutatius was agreed and brought the First Punic War to an end.[9]
Mutiny
The post-war evacuation of the Carthaginian army of 20,000 men from Sicily was left in the hands of Gisco. He split the army into small detachments based on their regions of origin and sent these back to Carthage one at a time. He anticipated they would be promptly paid the several years back pay they were owed and hurried on their way home.[10] The Carthaginian authorities decided instead to wait until all of the troops had arrived and then attempt to negotiate a settlement at a lower rate. They despatched the returning troops to Sicca Veneria (modern El Kef), 180 km (110 mi) away.[11]
Freed of their long period of military discipline and with nothing to do, the men grumbled among themselves and refused all attempts by the Carthaginians to pay them less than the full amount due. Frustrated by the Carthaginian negotiators' attempts to haggle, all 20,000 troops marched to Tunis, 16 km (10 mi) from Carthage. Panicking, the Senate agreed to payment in full. The mutinous troops responded by demanding even more. Gisco, who had a good reputation with the army, was brought over from Sicily in late 241 BC and despatched to the camp with enough money to pay most of what was owed. He started to disburse this, with promises that the balance would be paid as soon as it could be raised, when discipline broke down. Several soldiers insisted that no deal with Carthage was acceptable, a riot broke out, men who stayed loyal to Carthage were stoned to death, Gisco and his staff were taken prisoner, and his treasury was seized.[12][13][14]
The rebels declared Spendius, an escaped Roman slave who faced death by torture if he were recaptured, and Mathos, a Berber dissatisfied with Hanno's attitude towards tax raising from Carthage's African possessions, their generals. The news of a formed, experienced, anti-Carthaginian army in the heart of its territory spread rapidly and many cities and towns rose in rebellion. Provisions, money and reinforcements poured in; eventually an additional 70,000 men according to the ancient Roman historian Polybius, although many would have been tied down in garrisoning their home towns against Carthaginian retribution.[12][13][14][15] The pay dispute had become a full-scale revolt. The three years of war that followed are known as the Mercenary War and threatened Carthage's existence as a state.[16][17]
Opposing armies
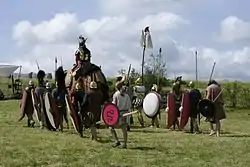
Carthaginian armies were nearly always composed of foreigners; citizens only served in the army if there was a direct threat to the city of Carthage. Roman sources refer to these foreign fighters derogatively as "mercenaries", but the modern historian Adrian Goldsworthy describes to this as "a gross oversimplification".[18] They served under a variety of arrangements; for example, some were the regular troops of allied cities or kingdoms seconded to Carthage as part of formal arrangements.[18] The majority of these foreigners were from North Africa.[16]
Libyans provided close-order infantry equipped with large shields, helmets, short swords and long thrusting spears; as well as close-order shock cavalry carrying spears[note 1] (also known as "heavy cavalry") – both were noted for their discipline and staying power. Numidians provided light cavalry who threw javelins from a distance and avoided close combat, and javelin-armed light infantry skirmishers.[20][21] Both Spain and Gaul provided experienced infantry; unarmoured troops who would charge ferociously, but had a reputation for breaking off if a combat was protracted.[20] Specialist slingers were recruited from the Balearic Islands.[20][22] The close order Libyan infantry and the citizen militia would fight in a tightly-packed formation known as a phalanx.[21] Sicilians and Italians had also joined up during the war to fill the ranks.[23] The Carthaginians frequently employed war elephants; North Africa had indigenous African forest elephants at the time.[note 2] Both armies are likely to have been composed of similar types and proportions of troops, except that the rebels were weaker in cavalry and lacked elephants.[26]
Prelude
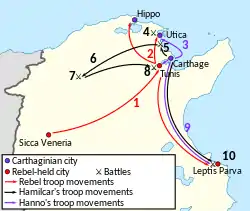
The numeral "7" represents the Battle of the Saw, although the location is extremely approximate
Mathos ordered two groups of rebels north to blockade the two main cities – other than Carthage – that had not already come over: the major ports of Utica and Hippo (modern Bizerte).[27] Hanno, as the commander of Carthage's African army, took the field with an army of 8,000–10,000 men and 100 war elephants.[23] Most of the Africans in his force remained loyal; they were accustomed to acting against their fellow Africans. His non-African contingent also remained loyal. An unknown number of Carthaginian citizens were incorporated into this army.[28]
In early 240 BC Hanno was defeated while attempting to raise the siege of Utica at the Battle of Utica.[29] For the rest of the year Hanno skirmished with the rebel force, repeatedly missing opportunities to bring it to battle or to place it at a disadvantage; the military historian Nigel Bagnall writes of Hanno's "incompetence as a field commander".[30][31] At some point during 240 BC the Carthaginians raised another army, of approximately 10,000. It included deserters from the rebels, newly hired mercenaries, citizen militia, 2,000 cavalry, and 70 elephants, and was placed under the command of Hamilcar Barca,[note 3] who had previously led the Carthaginian forces on Sicily.[30] Hamilcar would need to force a crossing if he were to gain access to open country where he could manoeuvre. He did so by a stratagem, and Spendius was reinforced by an additional 15,000 men drawn from the force laying siege to Utica, which the rebels had renewed. The rebel army of 25,000 moved to attack Hamilcar in the Battle of the Bagradas River. What happened next is unclear: it seems Hamilcar feigned a retreat, the rebels broke ranks to pursue, the Carthaginians turned in good order and counter-attacked, routing the rebels, who suffered losses of 8,000 men.[16][33][34]
Hamilcar was appointed joint commander of the Carthaginian army, alongside Hanno, but there was no cooperation between the two.[35] While Hanno manoeuvred against Mathos to the north near Hippo, Hamilcar confronted various towns and cities which had gone over to the rebels, bringing them back to Carthaginian allegiance with varying mixtures of diplomacy and force. He was shadowed by a superior-sized rebel force, which kept to rough ground for fear of Hamilcar's cavalry and elephants, and harried his foragers and scouts.[36][37]
The army commanded by Spendius was probably larger than the Hamilcar’s army, although it had no elephants. Numidian cavalry gave Spendius a range of options. The rebels' army followed Hamilcar’s army, Spendius chose not to take the towns that had changed sides, but focused on keeping to the high ground, away from the cavalry and elephants of the Carthaginians, refused open combat and continually raided the Carthaginian soldiers. A war of attrition worked for the rebels, with their superior numbers they could take more losses than the Carthaginians could. Spendius probably also awaited reinforcements and a favourable condition to engage Hamilcar’s army.[38]
Engagement
It is not known what measures Hamilcar employed to counter the harassment tactics of Spendius, or the exact path Hamilcar took since his victory over Spendius at Bagradas River. However, his army was on the move, helping to expand the sphere of Carthaginian control along the Bagradas River. In the course of his march, Hamilcar entered a mountain valley and encamped against the advice of his staff.[39] Spendius blocked the valley exit with his Libyan contingent, threatened the camp with his main body, while the Numidians took position on the Carthaginian rear.[40] Hamilcar’s army was trapped with no hope of relief. Cut off from provisions, Spendius only had to wait until hunger drove Hamilcar into desperate measures. The exact location of this mountain valley is not known, it is speculated to be either near the town of Nepehris,[41] or at some location further to the south or southwest.
Navaras defects to Hamilcar
Navaras was a Numidian chieftain[42] commanding 2,000 horsemen and guarding the path through which Hamilcar Barca’s army had entered the valley. He had family ties with Carthaginians and decided to switch sides. Navaras approached the Carthaginian camp undetected with a small escort, signaled for a parley and entered the camp unarmed and alone. He won Hamilcar’s trust and was promised the hand of Hamilcar’s daughter in exchange for his help. Navaras returned to his army, and deserted to the Carthaginians at the agreed upon time and before the rebel army could take action.[43] Hamilcar exited the trap unopposed and regained his freedom of maneuver.
Soon after Hamilcar’s army escaped the trap and was joined by Navaras, Spendius gave up his harassing tactics and decided to give battle. It is not known what brought about this change in tactics, but Hamilcar engaged the rebels in battle. Little is known of the numbers involved or formations used, except that the battle was hotly contested and the Carthaginians ultimately emerged victorious. Rebel losses were 10,000 killed and 4,000 captured.[44] Spendius and Autaritus escaped the battle and made for Hippo. Carthaginian losses are not known.
Truceless War
Since leaving Carthage, Hamilcar had treated rebels he had captured well and offered them a choice of joining his army or free passage home. He made the same offer to the 4,000 captives from the recent battle.[45] Spendius perceived this generous treatment as the motivation behind Naravas's defection and feared the disintegration of his army; he was aware that such generous terms would not be extended to the rebel leaders. Encouraged by his senior subordinates, notably the Gaul Autaritus, to remove the possibility of any goodwill between the sides, he had 700 Carthaginian prisoners tortured to death: they had their hands cut off, were castrated, their legs broken and were thrown into a pit and buried alive.[46][47] The Carthaginians, in turn, killed their prisoners. From this point, neither side showed any mercy, and the unusual ferocity of the fighting caused Polybius to term it the "Truceless War".[46][47] Any further prisoners taken by the Carthaginians were trampled to death by elephants.[48][49]
Aftermath
Hamilcar then marched on Tunis and laid siege to it in late 238 BC. Hamilcar occupied a position to the south with half the army, and his deputy Hannibal[note 4] was to the north with the balance. The rebel leaders taken captive prior to the Saw were crucified in full view of the city. Mathos ordered a large-scale night attack, which surprised the Carthaginians, who suffered many casualties. Hannibal and a delegation of 30 Carthaginian notables who were visiting the army were captured. They were tortured and then nailed to the crosses previously occupied by Spendius and his colleagues. Hamilcar abandoned the siege and withdrew to the north.[50][51]
Mathos led the rebel army 160 km (100 mi) south to the wealthy port city of Leptis Parva (just south of the modern city of Monastir, Tunisia).[50] Hanno and Hamilcar marched after the rebels and at the ensuing Battle of Leptis Parva the rebels were crushed, with few losses to the Carthaginians.[52][53] In an act of mercy captives were sold into slavery,[54] except for Mathos who was dragged through the streets of Carthage and tortured to death by its citizens.[55]
Most of the towns and cities which had not already come to terms with Carthage now did so, with the exceptions of Utica and Hippo, whose inhabitants feared vengeance for their massacre of Carthaginians. They attempted to hold out, but Polybius says that they too "quickly" surrendered, probably in late 238 BC or very early 237 BC.[56] The surrendered towns and cities were treated leniently, although Carthaginian governors were imposed on them.[57]
Notes, citations and sources
Notes
- "Shock" troops are those trained and used to close rapidly with an opponent, with the intention of breaking them before or immediately upon contact.[19]
- These were typically about 2.5-metre-high (8 ft) at the shoulder, and should not be confused with the larger African bush elephant.[24] The sources are not clear as to whether they carried towers containing fighting men.[25]
- Father of Hannibal Barca, who won fame during the Second Punic War by crossing the Alps to invade Roman Italy.[32]
- Not to be confused with Hannibal Barca, of Second Punic War fame.
Citations
- Goldsworthy 2006, p. 82.
- Bagnall 1999, p. 99.
- Hoyos 2015, p. 205.
- Bagnall 1999, p. 114.
- Eckstein 2017, p. 6.
- Lazenby 1996, p. 157.
- Bagnall 1999, p. 97.
- Hoyos 2015, p. 206.
- Miles 2011, p. 196.
- Goldsworthy 2006, p. 133.
- Bagnall 1999, p. 112.
- Bagnall 1999, pp. 112–114.
- Goldsworthy 2006, pp. 133–134.
- Hoyos 2000, p. 371.
- Hoyos 2007, p. 94.
- Scullard 2006, p. 567.
- Miles 2011, p. 204.
- Goldsworthy 2006, p. 33.
- Jones 1987, p. 1.
- Goldsworthy 2006, p. 32.
- Koon 2015, p. 80.
- Bagnall 1999, p. 8.
- Hoyos 2015, p. 207.
- Miles 2011, p. 240.
- Scullard 1974, pp. 240–245.
- Hoyos 2007, pp. 201–202.
- Warmington 1993, p. 188.
- Hoyos 2007, p. 88.
- Hoyos 2000, p. 373.
- Bagnall 1999, p. 115.
- Hoyos 2007, pp. 92–93.
- Miles 2011, pp. 240, 263–265.
- Miles 2011, p. 207.
- Bagnall 1999, pp. 115–117.
- Miles 2011, p. 209.
- Bagnall 1999, p. 117.
- Miles 2011, pp. 207–208.
- Bagnall, Nigel, The Punic Wars, pp117
- Polybius 1.78.5
- Bagnall, Nigel, The Punic Wars, p117
- Lancel, Serge, Hannibal, p17
- Hoyos, Dexter, The Truceless War, pp146-pp150
- Polybius 1.78.9
- Polybius 1.78.13
- Bagnall 1999, p. 118.
- Miles 2011, p. 208.
- Eckstein 2017, p. 7.
- Miles 2011, p. 210.
- Goldsworthy 2006, p. 135.
- Bagnall 1999, p. 122.
- Hoyos 2007, pp. 220–223.
- Scullard 2006, p. 568.
- Hoyos 2007, p. 241.
- Hoyos 2007, pp. 241–242.
- Miles 2011, p. 211.
- Hoyos 2000, p. 377.
- Hoyos 2015, p. 210.
Sources
- Bagnall, Nigel (1999). The Punic Wars: Rome, Carthage and the Struggle for the Mediterranean. London: Pimlico. ISBN 978-0-7126-6608-4.
- Eckstein, Arthur (2017). "The First Punic War and After, 264–237 BC". The First Punic War and After, 264–237 BC. Wiley Online Library. pp. 1–14. doi:10.1002/9781119099000.wbabat0270. ISBN 9781405186452.
- Goldsworthy, Adrian (2006). The Fall of Carthage: The Punic Wars 265–146 BC. London: Phoenix. ISBN 978-0-304-36642-2.
- Hoyos, Dexter (2000). "Towards a Chronology of the 'Truceless War', 241–237 B.C.". Rheinisches Museum für Philologie. 143 (3/4): 369–380. JSTOR 41234468.
- Hoyos, Dexter (2007). Truceless War: Carthage's Fight for Survival, 241 to 237 BC. Leiden ; Boston: Brill. ISBN 978-90-474-2192-4.
- Hoyos, Dexter (2015) [2011]. "Carthage in Africa and Spain, 241–218". In Hoyos, Dexter (ed.). A Companion to the Punic Wars. Chichester, West Sussex: John Wiley. pp. 204–222. ISBN 978-1-1190-2550-4.
- Koon, Sam (2015) [2011]. "Phalanx and Legion: the "Face" of Punic War Battle". In Hoyos, Dexter (ed.). A Companion to the Punic Wars. Chichester, West Sussex: John Wiley. pp. 77–94. ISBN 978-1-1190-2550-4.
- Jones, Archer (1987). The Art of War in the Western World. Urbana: University of Illinois Press. ISBN 978-0-252-01380-5.
- Lazenby, John (1996). The First Punic War: A Military History. Stanford, California: Stanford University Press. ISBN 978-0-8047-2673-3.
- Miles, Richard (2011). Carthage Must be Destroyed. London: Penguin. ISBN 978-0-141-01809-6.
- Scullard, H. H. (1974). The Elephant in the Greek and Roman World. London: Thames and Hudson. ISBN 978-0-500-40025-8.
- Scullard, H. H. (2006) [1989]. "Carthage and Rome". In Walbank, F. W.; Astin, A. E.; Frederiksen, M. W. & Ogilvie, R. M. (eds.). Cambridge Ancient History: Volume 7, Part 2, 2nd Edition. Cambridge: Cambridge University Press. pp. 486–569. ISBN 0-521-23446-8.
- Warmington, Brian (1993) [1960]. Carthage. New York: Barnes & Noble, Inc. ISBN 978-1-56619-210-1.