Order of battle at the Battle of Trafalgar
The Order of battle at the Battle of Trafalgar is a presentation of data such as is known concerning the commanders and the ships that shaped the Battle of Trafalgar on 21 October 1805. Included are tabular presentations of the fleets that participated in the battle, the order in which they sailed and attacked, and a graph of the percentage of casualties plotted for each ship along the three battle columns.
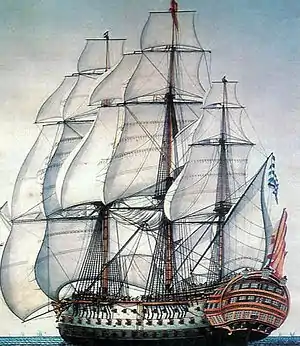
The Battle of Trafalgar was fought by sailing vessels and therefore cannot be understood in substance except as the manoeuvring of sailing vessels according to the principles of sailing. Without understanding the importance of wind and weather, especially wind direction, the modern can make no sense of the manoeuvring. Once those principles are understood, the plan of battle unfolds in a transparent fashion. The plan is included here as well as its general applicability to real events.
Real battles do not always develop according to plan, or exactly according to plan. Commanding officers usually are empowered to respond to the battlefield situation as it develops. Such concepts as "sailing order" and "battle order" are constructs. In a column of ships sailing anywhere the first ship forward was Number 1, the second, Number 2, etc. The battle order was based on planned order of attack. Ships were assigned places in these orders by the commander, sometimes temporarily or even extemporaneously.
Nelson used the order that was best momentarily. In stormy weather or other adverse conditions the commanders might not be able to control the order. The very term, "Nelson's fleet", was a construct. Ships were continually joining or leaving his fleet for various reasons. The complements of the ships also were variable. The early historians of the battle were not sure of what they were, nor did they know exactly what the casualties were. The roster lists of the ships before sailing were generally used. Afterward there were plenty of reports.
The numbers and orders of this article are based on the figures of modern scholars for the most part. There is general disagreement on the exact order and the exact numbers, but, on the whole, the different estimates are close to each other and can probably be taken as accurate within a few per cent. An effort is made to keep consistency between the tables and the graph.
The plan of battle from a sailor's point of view
The constraints of sailing and sailing vessels
The combined French-Spanish fleet left Cadiz Harbour in a loose line and turned to the south along the coast of Andalusia, headed for Naples through the Straits of Gibraltar. They were taking advantage of the north-westerly wind which was blowing on the starboard (right) rear quarter, nearly amidships, pushing them along at a slow rate and causing a swell (waves) perpendicular to the wind direction. It struck the ships from the side, causing them to roll and ruining their stability as gun platforms. The column had a predetermined order, which was necessary for sailing, to prevent some ships from getting between the wind and other ships, "stealing" their wind and running the risk of collision.
The same wind that was moving the French and Spanish south was also bringing the British north. A sail is basically an airfoil. When full it is curved in such a way as to create a sideways "lift," or force perpendicular to its surface, one component of which is actually against the general direction of the wind. A sailing vessel can thus sail "into the wind." A keel prevents the ship from "slipping," or sliding sideways along the wind. The sails "are full;" that is, fully curved, only at certain angles to the wind direction. The angle is adjustable via "sheets," or lines, which generally have to be winched from the deck. The force required is high,[3] giving rise to the idea that one is "hauling" the ship into the wind, and therefore the ship is "close-hauled." When not full, the sails flap uselessly in the wind, or "luff." The sailors must then change the angle, or "trim the sails," until they fill.
A square rigged ship cannot sail within 6 points (67.5 degrees) either side of the wind. If the wind is coming from the north, the closest it could sail would be ENE or WNW. In order to travel in that direction, it must "fall off," or move to an angle with the wind on one side or the other, a "tack." A ship tacks back and forth against the wind, or "beats," each tack earning it some "headway". However, because of the huge distance a square-rigger had to travel before it could fill its sails again, tacking would only be done in a dire emergency; where speed of manoeuvre outweighed the enormous risk of being caught in irons. By far the most common way of working to windward was wearing round (gybing).
In addition, sailing with the wind directly aft ("abaft") or directly on either side ("abeam") was difficult and inefficient. Sails with the wind in those directions do not fill. The wind must be allowed only from the quarters. At those angles the sails fill and there is a component of force in the desired direction. If the wind is directly abeam, the ship must fall off or close up. The ship may sail on either side of a wind directly astern. A manoeuvre similar to coming about is used to move the wind from one side to another: wearing. The helm is put over, the sails go limp, they are adjusted to fill on the other side. The ship does not have to rotate as far, so the manoeuvre is less disruptive.
Wind is everything to a sailing vessel. It cannot move anywhere without it (is "becalmed"). If the wind is too great the sails may have to be shortened to present less area, a procedure call "reefing." In a storm the ship must sail close to the wind or have it close astern. As the waves are generally coming in with the wind, a ship sailing close into the wind generally cuts them perpendicularly and only pitches; i.e., drops into the troughs and rises on the crests. A ship with the storm wind abeam is struck longitudinally and rolls treacherously, running a risk of capsizing. To avoid that risk the captain must run before the wind. All directions are evaluated with regard to the wind. The side of a ship toward the wind is called the "weather" or "upwind" side; away, the "lee" or "downwind" side (refer to Windward and leeward).
Much has been made of the tactics of various great sailing captains, but the greatest constraints come from wind direction and relative position. The captain of a steam vessel has considerably more freedom to take his ship where he wishes to take it, but the tactics of a sailing captain are to a large extent already predetermined by nature. To get to any point the sailing captain must plot a course taking wind direction into consideration. He must have judgement and skill, and is evaluated by the men on that skill.
Nelson's plan of battle
Nelson's battle plan is revealed on a surviving "memorandum" to his captains scrawled on a sheet of paper. The memorandum was meant to be official, as it is signed "Nelson and Bronte"[lower-alpha 1] and dated "Victory, off Cadiz, 9th October, 1805," which was 12 days before the battle on the 21st.[4] Nelson and his fleet were patrolling off Cadiz, waiting the exit of a combined French and Spanish fleet. He knew better than to attack a heavily fortified harbour, the most heavily fortified in Spain. Meanwhile Nelson was staying out of sight and out of reach.
Sailing ships were not amenable, compared to modern ships, to this type of combat. There were no blitzkriegs of sailing vessels, no sudden marches behind enemy lines to strike from unexpected quarters at unanticipated locations. They moved in slow motion at the mercy of wind and wave. The days of weather analysis and radio reports were far ahead. A fleet of ships could deliver the most fire when it was sailing broadside in a line to the enemy, hence the designation "ship-of-the-line" for heavy ships of 50 or more guns. In variable weather, the manoeuvring required to set up a line could cost "... such a loss of time that the opportunity would probably be lost ...." While the attackers were manoeuvring, the targets might escape. Nelson therefore, had his fleet sail in order of battle.
In order "to make the business decisive," Nelson would attack on sight, going directly for the enemy line. This tactic was not standard, but neither was it new or unusual. It did have a drawback. Only the front of the attacking column could engage. Nelson's 27 ships-of-the-line would attack in two columns. If they succeeded in breaking the enemy line, they could then take on the enemy piecemeal.
The general orders from Nelson were to "make the attack upon the enemy, and to follow up the blow until they are captured or destroyed." If individual ships were momentarily lost in the confusion, they could do no better, said Nelson, than to pull alongside an enemy and fight broadside.
Once the enemy was in sight, the British fleet would form two columns. The double column would be sailing with the wind on one side, the windward or weather side. The columns were thus described as the "weather column" or the "lee column." Nelson would take command of the weather column while his "second-in-command" would take the other. The second could act independently. However, at that time Nelson did not know which side would be the weather side. That detail could not be decided until they were on the expected final approach. At that time the second half of the single line would sail along the leeward side of the first.
As they sailed, the wind could be anywhere on the weather side, from bow to stern. It could not be from a disallowed direction. If, reasoned Nelson, the enemy fleet was first seen to windward, it was probably extended so that the van (front) could not help whatever was behind it. Such a scenario implies the enemy stretched across Nelson’s port bow quarter moving anticlockwise, but he did not know where the wind would be. His column would either be able to fetch[lower-alpha 2] the enemy column or not. If not, the opportunity was lost; they would have to fall off to leeward, wear, and come up on the other side, by which time the hoped-for battle would be only a pursuit.
If they could fetch the enemy on the current tack, they were to turn to port perpendicular to the enemy column (or near it). The lee column would now be facing the enemy’s rear. Taking a bearing on the 12th ship from the end, they were to sail through to it, while the weather column sailed through to the centre. The 20 ships to the front were to be ignored. Nelson hoped to destroy all the ships to the rear before the enemy's van could wear round. They were hoping to capture Villeneuve, whom they supposed to be in the centre. If the enemy van tacked or wore in an effort to stage a rescue, the British fleet would station itself between them and the captured and disabled ships, and defeat them in further battle.
If on the other hand the enemy fleet was first seen off the lee side; that is, off the starboard bow, the British would be in the strongest position. Turning to starboard they could glide downwind to the enemy and strike him wherever they pleased. Nelson seems to have believed the enemy line would have the same direction of travel, anticlockwise around the British line. Thus the lee line would act by the same instructions, turning to starboard, sail through to the 12th ship from the end.
As luck would have it, in the real battle, the enemy appeared to the lee. However, they were sailing clockwise around the British fleet, forcing the weather column to attack their rear. The real situation changed rapidly as the enemy column reacted but the direct attack on the centre and doubling of the column were planned and resulted in victory.
Matching the plan to the real battle
The French and Spanish were crowded into Cadiz Harbour, protected by shore batteries. Nelson entertained briefly a proposal to sail up to the entrance to the harbour and saturate it with the new Congreve Rocket, setting the enemy ships on fire. That is exactly what Villeneuve was hoping they would do. He believed the combined fire of shore and ship was the best chance of destroying Nelson. He delayed, hoping to exploit any impetuosity and impatience the younger commander might evidence.
Nelson's link to the enemy was an unobtrusive line of spy ships. The enemy saw only the first in line observing them at a distance. That ship was in signal range of another, which was in range of another, all the way back to Nelson, wherever he happened to be.
Higher-level decisions were being made by Napoleon, who could not wait indefinitely for the opportunity to invade Britain, and who had switched his attention to war on the continent, especially Austria and Italy. He needed Villeneuve in the Mediterranean and issued an order to sail out of Cadiz immediately.
Napoleon however, was not as skilled in naval matters and imagined that a fleet of 40 or so large vessels could leave port in an instant. It could take a considerable time for that many ships to get out of port, even under the best conditions. Moreover, they could not do so without favourable winds. If the winds were fickle, progress would be even slower and if the winds were contrary, the whole operation would be impossible.
Ship tables
Table notes:
- Named officers marked † were killed in action.
- Named officers marked (DOW) were not killed immediately but died after of their wounds.[5]
- Named officers marked (WIA) were wounded in the action but did not die of those wounds.
Table of the British fleet
The table below shows the British vessels as they were deployed at a hypothetical moment just prior to engagement. HMS Africa, somewhat detached to the north due to a combination of weather and a missed signal during the night, was supposed to have been fourth from last, in the lee column. The rest of the ships-of-the-line were divided into two columns, with the weather column forming the northern flank and the lee column the southern flank. The enemy line had been sailing north to south in front of the wind. Just as the battle was beginning they turned individually anticlockwise, wore ship, and came into the wind, hoping to bear down on Nelson. The order of British ships in the table is the one of that moment. Prior to closing with the enemy, they were in a single line, and after engagement, the ships manoeuvred to assume the best firing positions. The British fleet of the battle consisted of 33 warships, 27 of which were ships of the line.[6] During the battle the frigates and smaller vessels acted in support but did not engage.
| Ship | Type | Guns | Fleet | Const- ruction |
Commanded by | Complement | Casualties | |||
|---|---|---|---|---|---|---|---|---|---|---|
| Killed | Wounded | Total | % | |||||||
| Attacking the Head of the Franco-Spanish Fleet | ||||||||||
| Africa[7] | 2-decker | 64 | Capt Henry Digby | 498[8] | 8[9] | 44 | 52 | 10% | ||
| Weather Column | ||||||||||
| Victory[10] | 3-decker | 104 | Vice-Admiral Lord Nelson (DOW) Capt Thomas Masterman Hardy |
821[11] nominal 850 |
57 | 102 | 159 | 19% | ||
| Téméraire [12] | 3-decker | 98 | Capt Eliab Harvey | 718[13] nominal 750 |
47 | 76 | 123 | 17% | ||
| Neptune[14] | 3-decker | 98 | Capt Thomas Francis Fremantle | 741[15] | 10 | 34 | 44 | 6% | ||
| Leviathan[16] | 2-decker | 74 | Capt Henry William Bayntun | 623[17] | 4 | 22 | 26 | 4% | ||
| Conqueror[18] | 2-decker | 74 | Capt Israel Pellew | 573[19] | 3 | 9 | 12 | 2% | ||
| Britannia[20] | 3-decker | 100 | Rear-Admiral The Rt Hon. Earl of Northesk Capt Charles Bullen |
854[21] | 10 | 42 | 52 | 6% | ||
| Agamemnon[22] | 2-decker | 64 | Capt Sir Edward Berry | 498[23] | 2 | 8 | 10 | 2% | ||
| Ajax[24] | 2-decker | 74 | Lieut John Pilford (acting captain) | 702[25] | 2 | 10 | 12 | 2% | ||
| Orion[26] | 2-decker | 74 | Capt Edward Codrington | 541[27] | 1 | 23 | 24 | 4% | ||
| Minotaur[28] | 2-decker | 74 | Capt Charles John Moore Mansfield | 625[29] | 3 | 22 | 25 | 4% | ||
| Spartiate[30] | 2-decker | 74 | Capt Sir Francis Laforey | 620[31] | 3 | 22 | 25 | 4% | ||
| Lee Column | ||||||||||
| Royal Sovereign[32] | 3-decker | 100 | Vice-Admiral Cuthbert Collingwood Capt Edward Rotheram |
826[33] | 47 | 94 | 141 | 17% | ||
| Belleisle[34] | 2-decker | 74 | Capt William Hargood | 728[35] | 33 | 94 | 127 | 17% | ||
| Mars[36] | 2-decker | 74 | Capt George Duff † Lieut William Hennah |
615[37] | 27 | 71 | 98 | 16% | ||
| Tonnant[38] | 2-decker | 80 | Capt Charles Tyler | 688[39] | 26 | 50 | 76 | 11% | ||
| Bellerophon[40] | 2-decker | 74 | Capt John Cooke † Lieut William Pryce Cumby |
522[41] | 28 | 127 | 155 | 30% | ||
| Colossus[42] | 2-decker | 74 | Capt James Nicoll Morris | 571[43] | 40 | 160 | 200 | 35% | ||
| Achille[44] | 2-decker | 74 | Capt Richard King | 619[45] | 13 | 59 | 72 | 12% | ||
| Revenge[46] | 2-decker | 74 | Capt Robert Moorsom | 598[47] | 28 | 51 | 79 | 13% | ||
| Polyphemus[48] | 2-decker | 64 | Capt Robert Redmill | 484[49] | 2 | 4 | 6 | 1% | ||
| Swiftsure[50] | 2-decker | 74 | Capt William Gordon Rutherfurd | 570[51] | 9 | 8 | 17 | 3% | ||
| Dreadnought[52] | 3-decker | 98 | Capt John Conn | 725[53] | 7 | 26 | 33 | 5% | ||
| Defiance[54] | 2-decker | 74 | Capt Philip Charles Durham | 577[55] | 17 | 53 | 70 | 12% | ||
| Thunderer[56] | 2-decker | 74 | Lieut John Stockham (acting captain) | 611[57] | 4 | 12 | 16 | 3% | ||
| Defence[58] | 2-decker | 74 | Capt George Hope | 599[59] | 7 | 29 | 36 | 6% | ||
| Prince[60] | 3-decker | 98 | Capt Richard Grindall | 735[61] | 0 | 0 | 0 | 0% | ||
| Attached | ||||||||||
| Euryalus[62] | Frigate | 36 | Capt Hon Henry Blackwood | 262[63] | 0 | 0 | 0 | 0% | ||
| Naiad[64] | Frigate | 38 | Capt Thomas Dundas | 333[65] | 0 | 0 | 0 | 0% | ||
| Phoebe[66] | Frigate | 36 | Capt Hon Thomas Bladen Capel[67] | 256[68] | 0 | 0 | 0 | 0% | ||
| Sirius[69] | Frigate | 36 | Capt William Prowse | 273[70] | 0 | 0 | 0 | 0% | ||
| Pickle[71] | Schooner | 8 | Lieut John Richards La Penotière | 42[72] | 0 | 0 | 0 | 0% | ||
| Entreprenante[73] | Cutter | 10 | Lieut Robert Benjamin Young | 41[72] | 0 | 0 | 0 | 0% | ||
Table of the French-Spanish fleet
The following listing shows the French and Spanish ships of the line at some hypothetical moment just before engagement. Prior to then they had been sailing north to south. After wearing, the order of sailing was reversed, so that the former head was now the rear. During the battle itself the entire line broke into small units and individual ships. The combined fleet consisted of 40 vessels with 18 French ships of the line and 15 Spanish ships of the line.[74]
| Ship | Type | Guns | Fleet | Const- ruction |
Commanded by | Complement | Casualties | Fate | Killed in wreck | |||
|---|---|---|---|---|---|---|---|---|---|---|---|---|
| Killed | Wounded | Total | % | |||||||||
| Neptuno[75] | 2-decker | 80 | Capt Don H. Cayetano Valdés y Flores | 800[76] | 37[77] | 47 | 84 | 11% | Captured 21 Oct Recaptured 23 Oct Foundered 23 Oct |
few | ||
| Scipion[78] | 2-decker | 74 | Capt Charles Berrenger[79] | 755 | 17 | 22 | 39 | 5% | Escaped Captured 4 Nov |
|||
| Rayo[80] | 3-decker | 100 | Commodore Don Enrique MacDonnell | 830 | 4 | 14 | 18 | 2% | Escaped Surrendered 23 Oct (to HMS Donegal) Foundered 26 Oct |
many | ||
| Formidable[81] | 2-decker | 80 | Rear-Admiral Pierre Dumanoir Le Pelley Capt Jean-Marie Letellier[79] |
840[82] | 22 | 45 | 67 | 8% | Escaped Captured 4 Nov |
|||
| Duguay Trouin[83] | 2-decker | 74 | Capt Claude Touffet[79] | 755[84] | 20[85] | 24 | 44 | 6% | Escaped Captured 4 Nov |
|||
| Mont Blanc[86] | 2-decker | 74 | Capt Guillaume-Jean-Noël de Lavillegris[79] | 755 | 20 | 20 | 40 | 5% | Escaped Captured 4 Nov |
|||
| San Francisco de Asis[87] | 2-decker | 74 | Capt Don Luis de Florès | 657[88] | 5 | 12 | 17 | 3% | Escaped, wrecked 23 Oct | none | ||
| San Agustin[89] | 2-decker | 74 | Capt Don Felipe Jado Cagigal | 711[90] | 181[91] | 201 | 382 | 54% | Captured 21 Oct Abandoned and burnt 28 Oct |
|||
| Héros[92] | 2-decker | 74 | Cmdr Jean-Baptiste-Joseph-René Poulain (DOW)[93] | 690[94] | 12 | 24 | 36 | 5% | Escaped | |||
| Nuestra Señora de la Santísima Trinidad[95] | 4-decker | 136 | Rear-Admiral Báltasar Hidalgo de Cisneros Capt Francisco Javier de Uriarte y Borja |
1048[96] | 216 | 116[97] | 332 | 32% | Captured 21 Oct Foundered 23 Oct |
few | ||
| Bucentaure[98] | 2-decker | 80 | Vice-Admiral Pierre-Charles Villeneuve Capt Jean-Jacques Magendie |
888[99] | 197 | 85 | 282 | 32% | Captured 21 Oct Recaptured 23 Oct Wrecked 23 Oct |
400 on Indomptable | ||
| Neptune[100] | 2-decker | 80 | Commodore Esprit-Tranquille Maistral[79] | 888[101] | 15 | 39 | 54 | 6% | Escaped | |||
| Redoutable[102] | 2-decker | 74 | Capt Jean Jacques Etienne Lucas | 643 (nominal 550-600) | 300[103] | 222 | 522 | 81% | Captured 21 Oct Foundered 23 Oct |
many 172 ? | ||
| San Leandro[104] | 2-decker | 64 | Capt Don José Quevedo | 606 | 8 | 22 | 30 | 5% | Escaped | |||
| San Justo[105] | 2-decker | 74 | Capt Don Francisco Javier Garstón | 694 | 0 | 7 | 7 | 1% | Escaped | |||
| Santa Ana[106] | 3-decker | 112 | Vice-Admiral Ignacio María de Álava y Navarrete Capt Don José de Gardoqui |
1189[107] 1053 nominal |
95[108] | 137 | 232 | 20% | Captured 21 Oct Recaptured 23 Oct |
|||
| Indomptable[109] | 2-decker | 80 | Capt Jean Joseph Hubert † | 887 | 20 | 30 | 50 [110] | 6% | Escaped Wrecked 24 Oct[111] |
657 | ||
| Fougueux[112] | 2-decker | 74 | Capt Louis Alexis Baudoin † | 755[113] | 60 | 75 | 135[114] | 18% | Captured 21 Oct Wrecked 22 Oct |
502 (84% casualties) | ||
| Intrépide[115] | 2-decker | 74 | Capt Louis-Antoine-Cyprien Infernet | 745[78] | 80 | 162 | 242[116] | 32% | Captured 21 Oct Evacuated, blown up 24 Oct |
|||
| Monarca[117] | 2-decker | 74 | Capt Don Teodoro de Argumosa | 667[118] | 101 | 154 | 255 | 38% | Captured 21 Oct Burnt 26 Oct |
|||
| Pluton[119] | 2-decker | 74 | Commodore Julien Cosmao-Kerjulien | 755[120] | 60 | 132 | 192 | 25% | Escaped | |||
| Bahama [121] | 2-decker | 74 | Commodore Dionisio Alcalá Galiano † | 690 | 75 | 66 | 141 | 20% | Captured 21 Oct | |||
| Aigle [122] | 2-decker | 74 | Capt Pierre-Paulin Gourrège[79] † | 755[123] | 70 | 100 | 170[124] | 23% | Captured 21 Oct Wrecked 23 Oct |
330 | ||
| Montañés[125] | 2-decker | 74 | Capt Francisco Alcedo y Bustamante | 715 | 20 | 29 | 49 | 7% | Escaped | |||
| Algésiras[126] | 2-decker | 74 | Rear-Admiral Charles-René Magon de Médine † Cmdr Laurent Tourneur[79] |
755[127] | 77 | 142 | 219 | 29% | Captured 21 Oct Recaptured 23 Oct |
|||
| Argonauta[128] | 2-decker | 80 | Capt Don Antonio Pareja (WIA) | 798[129] | 100 | 203 | 303 | 38% | Captured, scuttled 21 Oct | |||
| Swiftsure[130] | 2-decker | 74 | Capt Charles-Eusèbe Lhospitalier de la Villemadrin[79] | 755[131] | 68 | 123 | 191 | 25% | Captured 21 Oct | |||
| Argonaute[132] | 2-decker | 74 | Capt Jacques Épron-Desjardins[79] | 755[133] | 55 | 132 | 187 | 25% | Escaped | |||
| San Ildefonso[134] | 2-decker | 74 | Capt Don Jose Ramón de Vargas y Varáez | 716 [135] | 34 | 148 [136] | 182 | 25% | Captured 21 Oct | |||
| Achille [137] | 2-decker | 74 | Capt Louis-Gabriel Deniéport † | 755[138] | 480 | ? | 480 | 64% | Surrendered, blew up 21 Oct | |||
| Principe de Asturias[139] | 3-decker | 112 | Admiral Don Federico Carlos Gravina (DOW)[140] Rear-Admiral Don Antonio de Escaño Commodore Rafael de Hore |
1113 | 54 | 109 [141] | 163 | 15% | Escaped | |||
| Berwick[142] | 2-decker | 74 | Capt Jean-Gilles Filhol de Camas[79] † | 755[143] | 75 | 125 | 200[144] | 26% | Captured 21 Oct Foundered 22 Oct |
622 | ||
| San Juan Nepomuceno[145] | 2-decker | 74 | Commodore Don Cosmé Damián Churruca y Elorza † | 693[146] | 103 | 151[147] | 254 | 37% | Captured 21 Oct | |||
| Attached | ||||||||||||
| Cornélie[148] | Frigate | 40 | Capt André-Jules-François de Martineng[79] | ? | 0 | 0 | 0 | 0% | Escaped | |||
| Hermione[149] | Frigate | 40 | Capt Jean-Michel Mahé[79] | ? | 0 | 0 | 0 | 0% | Escaped | |||
| Hortense[150] | Frigate | 40 | Capt Louis-Charles-Auguste Delamarre de Lamellerie[79] | ? | 0 | 0 | 0 | 0% | Escaped | |||
| Rhin[151] | Frigate | 40 | Capt Michel Chesneau | ? | 0 | 0 | 0 | 0% | Escaped | |||
| Thémis[152] | Frigate | 40 | Capt Nicolas-Joseph-Pierre Jugan[79] | ? | 0 | 0 | 0 | 0% | Escaped | |||
| Furet[153] | Brig | 18 | Lieut Pierre-Antoine-Toussaint Dumay | 130 | 0 | 0 | 0 | 0% | Escaped | |||
| Argus[154] | Brig | 16 | Lieut Yves-Francois Taillard[155] | 110 | 0 | 0 | 0 | 0% | Escaped | |||
Graph of losses
Below is a graph of the percentage of casualties plotted for each ship along the three battle columns. The graph is a construct only. The losses were incurred throughout the entire battle and after, most while the ships were not actually in that order. The order in the graph is shown as a convenience.
Three columns and a separate ship are shown on the horizontal axis, which represents units of conventional distance between ship positions. All units are assumed to be the same. There are three origin points, one for the beginning of each column and the Africa, which was not in the three.
The vertical axis shows percentage of casualties per ship. For example, casualties for the Victory are plotted at 20%. A casualty is someone who was known to have been wounded, someone who was known to have been killed, or someone missing in action and presumed drowned. The percentage is the ratio of casualties to ship's complement multiplied by 100. Casualties continued over the next few weeks as enemy crews rebelled, retook their ships, and were subdued. The graph covers only the main battle on the first day.
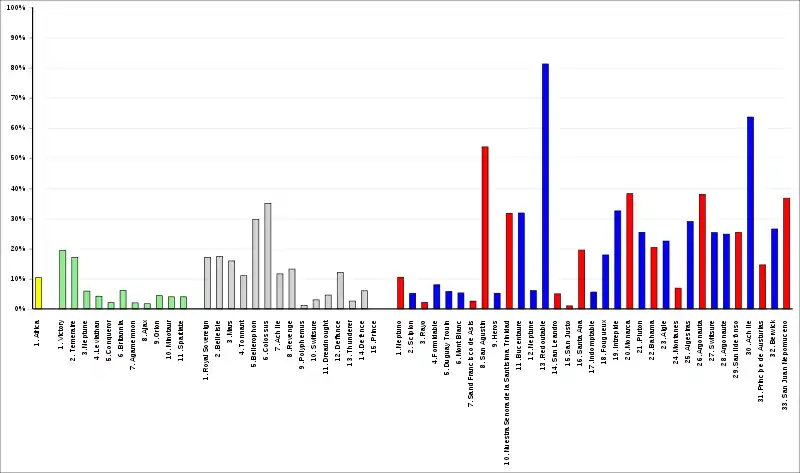
Yellow = HMS Africa
Green = British Weather Column, led by Nelson
Grey = British Lee Column, led by Collingwood
The number is the order in the column.
Blue = French
Red = Spanish
The number is the order in the line.
Data for this chart are from the above table.
.
Notes
- Nelson was the Duke of Bronte; he signed much of his official correspondence with this conceit.
- Bring it within the allowed angles for close-hauling.
References
- This map was improved or created by the Wikigraphists of the Graphic Lab (fr). The author, R.S. Hall, based the design of the map on an illustration of unknown authorship included in Nofi, Al (1981). "Nelson's Last Victory: The Battle of Trafalgar, Oct. 21, 1805". Strategies and Tactics Magazine (84).. As to a possible source of the configuration, except for colour and orientation, the map is identical to Map GREN 4B/10 in the Grenville Collection of the National Maritime Museum, Greenwich, London. Hand-drawn with a hand-written battle order, it is dated to 1805.
- This map is a faithful reproduction of Weller, F.S. (1892). "Battle of Trafalgar, 21st October, 1805". In Gardiner, Samuel Rawson (ed.). A School Atlas of English History. London and New York: Longmans, Green and Co. p. 84.. Gardiner says in the "Preface," however, that No. 84 was taken from another work, Johnston, Alexander Keith (1850). Alison, M.R. (ed.). Atlas to Alison's History of Europe. Edinburgh and London: William Blackwood and Sons. p. 34.
- Mortlock 2017, p. 32 "the sailing of these vessels was a constant manual labour with skilled work that required balance, timing, and strength"
- "Nelson's Trafalgar Memorandum". Learning English Timeline. British Library. Retrieved 12 December 2019.
- Mortlock 2017, p. 32 "Many men who survived amputation succumbed later to bacterial infections.... Complicated surgical procedures on abdominal wounds were impossible ... Infections were almost inevitable."
- "The Battle of Trafalgar 1805". Royal Navy. Retrieved 16 December 2019.
- Goodwin 2005, pp. 115-122
- Adkin 2005, p. 315
- Broadside 2012, Battle of Trafalgar Casualty List and Adkin 2005 claim a "killed" of 18.
- Goodwin 2005, pp. 21-32, Broadside 2012, Clash of Steel 2007a
- Adkin 2005, p. 307 has a crew size of 823.
- Goodwin 2005, pp. 41-46, Broadside 2012
- Adkin 2005, p. 310 has 755.
- Goodwin 2005, pp. 38-41, Broadside 2012
- Adkin 2005, p. 311
- Goodwin 2005, pp. 86-90, Broadside 2012
- Adkin 2005, p. 312
- Goodwin 2005, pp. 75-78, Broadside 2012
- Adkin 2005, p. 313
- Goodwin 2005, pp. 12-15, Broadside 2012
- Adkin 2005, p. 314
- Goodwin 2005, pp. 122-131, Broadside 2012
- Adkin 2005, p. 317
- Goodwin 2005, pp. 58-62, Broadside 2012
- Adkin 2005, p. 316
- Goodwin 2005, pp. 98-102, Broadside 2012
- Adkin 2005, p. 320
- Goodwin 2005, pp. 94-98, Broadside 2012
- Adkin 2005, p. 321
- Goodwin 2005, pp. 106-109, Broadside 2012
- Adkin 2005, p. 322
- Goodwin 2005, pp. 16-21, Broadside 2012
- Adkin 2005, p. 323
- Goodwin 2005, pp. 62-65. Broadside 2012 claims 33 killed, 93 wounded
- Adkin 2005, p. 326
- Goodwin 2005, pp. 90-94. Broadside 2012 claims 29 killed, 69 wounded
- Adkin 2005, p. 327
- Goodwin 2005, pp. 50-54, Broadside 2012
- Adkin 2005, p. 330
- Goodwin 2005, pp. 66-72. Broadside 2012 claims 27 killed, 123 wounded
- Adkin 2005, p. 331
- Goodwin 2005, pp. 72-75. Broadside 2012 claims 46 killed, 160 wounded
- Adkin 2005, p. 332
- Goodwin 2005, pp. 55-58, Broadside 2012
- Adkin 2005, p. 333
- Goodwin 2005, pp. 102-105, Broadside 2012
- Adkin 2005, p. 334
- Goodwin 2005, pp. 131-133, Broadside 2012
- Adkin 2005, p. 338
- Goodwin 2005, pp. 109-112, Broadside 2012
- Adkin 2005, p. 336
- Goodwin 2005, pp. 34-38, Broadside 2012
- Adkin 2005, p. 337
- Goodwin 2005, pp. 83-86, Broadside 2012
- Adkin 2005, p. 335
- Goodwin 2005, pp. 112-115, Broadside 2012
- Adkin 2005, p. 339
- Goodwin 2005, pp. 78-92, Broadside 2012
- Adkin 2005, p. 340
- Goodwin 2005, pp. 46-50, Broadside 2012
- Adkin 2005, p. 341
- Goodwin 2005, pp. 140-144, Broadside 2012
- Adkin 2005, p. 342
- Goodwin 2005, pp. 135-139, Broadside 2012
- Adkin 2005, p. 346
- Goodwin 2005, pp. 145-149, Broadside 2012
- Goodwin (previous reference) spells the captain's name: Capell
- Adkin 2005, p. 347
- Goodwin 2005, pp. 150-153, Broadside 2012
- Adkin 2005, p. 343
- Goodwin 2005, pp. 154-159, Broadside 2012
- Adkin 2005, p. 348
- Goodwin 2005, pp. 159-161, Broadside 2012
- https://www.royalnavy.mod.uk/news-and-latest-activity/features/trafalgar-day/battle-of-trafalgar
- Goodwin 2005, pp. 208-9, 222-3
- Adkin 2005, p. 349
- Adkin 2005, p. 349 has 42.
- Adkin 2005, p. 351
- Dictionnaire des capitaines de vaisseau de Napoléon, Danielle & Bernard Quintin, SPM, 2003, ISBN 2-901952-42-9
- Goodwin 2005, pp. 208-9, 217-9
- Goodwin 2005, pp. 163-4, 167-9
- Adkin 2005, p. 352
- Goodwin 2005, pp. 163-4, 181-7
- Adkin 2005, p. 354
- Adkin 2005, p. 354 has 12.
- Adkin 2005, p. 353
- Goodwin 2005, pp. 208-9, 227
- Adkin 2005, p. 356
- Goodwin 2005, pp. 208-9, 226-7
- Adkin 2005, p. 357
- Adkin 2005, p. 357 has 184.
- Goodwin 2005, pp. 163-4, 188-9
- Fond Marine, p.331
- Adkin 2005, p. 358
- Goodwin 2005, pp. 208-212
- Adkin 2005, p. 359
- Adkin 2005, p. 315 has 205 killed and 108 wounded
- Goodwin 2005, pp. 163-7
- Adkin 2005, p. 362
- Goodwin 2005, pp. 163-4, 171-2
- Adkin 2005, p. 369
- Goodwin 2005, pp. 163-4, 193-5
- Adkin 2005, p. 363 has 487 dead and 81 wounded from battle and storm.
- Goodwin 2005, pp. 208-9, 233-4
- Goodwin 2005, pp. 208-9, 232-3
- Goodwin 2005, pp. 208-9, 214-7
- Adkin 2005, p. 372
- Adkin 2005, p. 372 has 97 dead and 141 wounded.
- Adkin 2005, p. 371
- Estimated. Adkin 2005, p. 522 has 657 drowned when ship sank in storm.
- ~1050 killed in wreck including survivors of Bucentaure who had been rescued by Indomptable
- Goodwin 2005, pp. 163-4, 187-9
- Adkin 2005, p. 373
- Est. 502 more drowned after battle: Adkin 2005, p. 522
- Goodwin 2005, pp. 163-4, 189-90
- killed and wounded are estimated, as only numbers hit is given in Adkin 2005, pp. 351, 522
- Goodwin 2005, pp. 208-9, 225-6
- Adkin 2005, p. 376
- Goodwin 2005, pp. 163-4, 192-3
- Adkin 2005, p. 377
- (or 100k 150w) p208-9, 23-5, Goodwin The Ships of Trafalgar, the British, French and Spanish Fleets October 1805
- p163-4, 174-5, Goodwin The Ships of Trafalgar, the British, French and Spanish Fleets October 1805
Clash of Steel Archived 2007-10-27 at the Wayback Machine - Adkin 2005, p. 380
- Estimated. Around 330 drowned on 23 October: Adkin 2005, p. 523
- Goodwin 2005, pp. 208-9, 220-1
- Goodwin 2005, pp. 163-4, 175-6
- Adkin 2005, p. 378
- Goodwin 2005, pp. 208-9, 219-20
- Adkin 2005, p. 386
- Goodwin 2005, pp. 163-4, 197-200
- p384 Adkin The Trafalgar Companion
- Goodwin 2005, pp. 163-4, 176
- p385 Adkin The Trafalgar Companion
- Goodwin 2005, pp. 208-9, 228-30
- p387 Adkin The Trafalgar Companion
- 126 wounded according to p387 Adkin The Trafalgar Companion
- p163-4, 172-3, Goodwin The Ships of Trafalgar, the British, French and Spanish Fleets October 1805
Clash of Steel Archived 2007-10-27 at the Wayback Machine - p390 Adkin The Trafalgar Companion
- Goodwin 2005, pp. 208-9, 212-4
- Gravina died on 9 March 1806 due to wounds received in the battle from which he never recovered.
hnelson.iespana.es Battle of Trafalgar - Federico Carlos Gravina y Nápoli Archived 2010-03-27 at the Wayback Machine
p355 & 384, Schom, Alan, Trafalgar, Countdown to Battle, 1803-1805 describes Gravina as mortally wounded.
p113, Harbron, John D, Trafalgar and the Spanish Navy - describes Gravina in March 1806 as dying of wounds received at the battle of Trafalgar. - Adkin 2005, p. 391 has 52 dead, 110 wounded.
- Goodwin 2005, pp. 163-4, 177-81
- Adkin 2005, p. 392
- Estimated. Only 58 survived foundering of ship 22 October. Adkin 2005, p. 522
- Goodwin 2005, pp. 208-9, 230-2
- Adkin 2005, p. 393
- Adkin 2005, p. 393 has 131.
- Goodwin 2005, pp. 163-4, 201
- Goodwin 2005, pp. 163-4, 202
- Goodwin 2005, pp. 163-4, 202-3
- Goodwin 2005, pp. 163-4, 203-5
- Goodwin 2005, pp. 163-4, 205-6
- Goodwin 2005, pp. 163-4, 206-7
- Goodwin 2005, pp. 163-4, 207
- "Yves-Francois Taillard". Three Decks Forum. 2020.
Reference bibliography
- Adkin, Mark (2005). The Trafalgar Companion: A Guide to History's Most Famous Sea Battle and the Life of Admiral Lord Nelson. London: Aurum Press. ISBN 1-84513-018-9.CS1 maint: ref=harv (link)
- Broadside (2012). "The Battle of Trafalgar". Archived from the original on 27 April 2007.CS1 maint: ref=harv (link)
- Clash of Steel (2007a). "Order of Battle: The British Fleet". Archived from the original on 27 October 2007.CS1 maint: ref=harv (link)
- Goodwin, P. (2005). The ships of Trafalgar: the British, French and Spanish fleets, October 1805. Annapolis, MD.: Naval Institute Press.CS1 maint: ref=harv (link)
- Mortlock, Stephen (2017). "A Life on The Ocean Wave: Death and Disease in Nelson's Navy" (PDF). The Biomedical Scientist (28): 28–32.CS1 maint: ref=harv (link)
External links
| Wikimedia Commons has media related to Maps of the Battle of Trafalgar. |
- Drake, Nelson and Napoleon at Project Gutenberg by Walter Runciman