Exposing to the right
In digital photography, exposing to the right (ETTR) is the technique of adjusting the exposure of an image as high as possible at base ISO (without causing unwanted saturation) to collect the maximum amount of light and thus get the optimum performance out of the digital image sensor.[1][2][3][4]


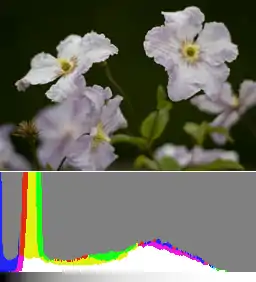
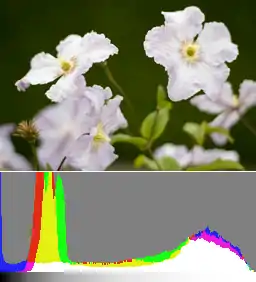
The name derives from the resulting image histogram which, according to this technique, should be placed close to the right of its display. Advantages include greater tonal range in dark areas, greater signal-to-noise ratio (SNR),[5] fuller use of the colour gamut and greater latitude during post-production.
The direction of the relative adjustment to the camera's meter reading depends on the dynamic range (or contrast ratio) of the scene. Typically, with low-contrast scenes, an increase in exposure over that indicated by the camera's meter will be required. When attempting a single-exposure of a high dynamic-range scene, a reduction in exposure from the meter's reading may be needed. In the final analysis, however, the camera's meter is irrelevant to ETTR since the ETTR exposure is established, not by a meter reading, but by the camera's exposure indicators, the histogram and/or the highlight-clipping indicators (blinkies/zebras).
ETTR images requiring increased exposure may appear to be overexposed (too bright) when taken and must be correctly processed (normalized) to produce a photograph as envisaged. Care must be taken to avoid clipping within any colour channel, other than acceptable areas such as specular highlights.
The principle is also applied in film photography in order to maximize the negative's latitude and density and achieve richer blacks when the image is printed slightly down.
With high-dynamic-range scenes
With the advancement of digital image sensors, the same ETTR technique may be applicable to scenes with a relatively high dynamic range (HDR) (high contrast within both bright highlights and dark shades in harshly lit scenes), previously in the domain of HDR techniques involving multiple exposures. As of 2015, the better of the recent photographic imaging sensors of the 35 mm "full-frame" format can accommodate up to about 14 stops of engineering DR or 11.5 stops of useful photographic DR in the raw shooting mode.[6][7][8]
A complication to using ETTR with higher DR is the fact that the vast majority of photographic cameras can only display a histogram produced by its JPG processing engine. In-camera JPG engines tend to have a narrowed DR than the sensor and does not faithfully represent the underlying raw data. Also, the histogram of the JPG image produced in-camera, highly depends on the camera settings, and is therefore a rather inexact indication of the exposure of the raw image data; the right edge of the raw histogram is not displayed. Several approaches may be used for practicing ETTR in this situation.
- Specific software, for instance RawDigger, FastRawViewer, Histogrammar or the discontinued Photobola Rawnalyze, can be used to compute the raw histogram. If a computer is not available for analysis when shooting, it may be used to pick best exposure from an exposure-bracketing sequence of images.
- An in-camera approximation of the raw histogram is provided by a few cameras, such as Leica M8 and M9, and by Magic Lantern, the unofficial firmware "hack" for Canon DSLR cameras (which also includes an automatic ETTR option).
- Some recent cameras offer settings for the JPG processing engine with higher DR which is somewhat closer to the sensor DR (for instance, S-Log2 gamma[9][10] of Sony, Flat picture control[11] of Nikon).
- With other cameras, an workaround approach known as "UniWB" [12][13][14] may be used. One should be careful when using rough in-camera histogram approximations, particularly with live histograms, because they may fail to display small highlights areas.
In cases where the scene DR is within the sensor DR but much wider than the DR of the JPG engine, ETTR results in the JPG preview image exposed for the highlights and appearing dark, because the midtones range of the scene is recorded in the shadows range of the JPG preview, and the shadows range of the scene is not recorded in the JPG preview. Wide-DR-capable raw processing external software is required (e.g., Adobe Camera Raw / Adobe Photoshop Lightroom, DxO OpticsPro, Capture One, Raw Therapee).
When facing higher-DR scenes, metering on most cameras tends to aim for the midtones, often clipping both extreme highlights and shadows of the JPG preview image (seen as spikes at the right and left edge of the JPG histogram, respectively). One might expect that this would automatically lead towards a raw histogram in which the right (highlights) range is neatly occupied as with ETTR. Unfortunately, metering algorithms in different cameras may produce very different results in such conditions. It is not uncommon that when shooting a scene with DR within the sensor DR, the default camera metering results in a raw image with blown highlights and ample empty space at the left side of the histogram. In such case, the ETTR principle of maximizing exposure to the point where the raw histogram is aligned to its right edge, requires a seemingly counterintuitive negative exposure compensation. This may be explained with the ETTR principle: to make best use of the additional DR, available with wide-DR sensors, the extra DR is used to expand the shadows end of the recording range, without increasing the raw highlight headroom.
If the resulting shadows are unable to be processed to acceptable noise or tonal range, one has simply encountered a situation that cannot be taken with a single shot, and consideration could be given to HDR (High Dynamic Range) techniques requiring multiple exposures. If the latter is infeasible due to scene or camera motion, on may revert to the technique of exposing to the important highlights (abbr. ETTIH), which is in fact just a slight generalization of ETTR. With ETTR, exposure is maximized up to the constraint of preserving all highlights at the right edge of the histogram (a constraint implied by the hard saturation of the digital sensor). With ETTIH, exposure is maximized a bit further; the constraint is relaxed so that only the highlights deemed important are preserved before the right edge of the histogram, and the highlights deemed unimportant may fall into the saturation zone of the sensor. Typical examples of unimportant highlights include the sun, other very bright light-sources, and sharp-edged specular highlights like chrome car bumpers in the sun; however, one should avoid blowing areas with smooth luminosity gradients, for instance the sky around the sun, because these likely lead to visible sensor saturation artefacts (banding). Many cameras have over-exposure "blinkies", showing the location of blown highlights which is not evident from the histogram. Some cameras also have under-exposure "blinkies" as an exposure aid. Mirror-less cameras often have "preview zebras", which is another aid for being aware of and correcting over-exposure.
Raw processing software may feature "highlights reconstruction" algorithms [15] (currently unavailable in-camera) which are able to partially mitigate the negative visual impact of digital hard saturation of the three color channels, thus extending the range of blow-able unimportant highlights slightly.[16][17]
In general, whether one is dealing with a high-DR scene or a low-DR scene, both the process and aim of ETTR are the same: exposure is adjusted (forgetting the meter) until only dispensable highlights are clipping, thereby resulting in an image with the greatest signal-to-noise (and therefore the greatest image quality). In both cases, the practice of ETTR does not use or depend on the camera's meter. Rather, it uses and depends on the exposure indicators, either the histograms and/or the highlight indictors (blinkies/zebras), which, ideally, have been set to reflect as well as possible the maximal values of the underlying raw data.
Background

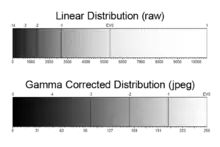
ETTR was initially espoused in 2003 by Michael Reichmann on his website, after purportedly having a discussion with software engineer Thomas Knoll, the original author of Adobe Photoshop and developer of the Camera Raw plug-in.[1] Their rationale was based on the linearity of CCD and CMOS sensors, whereby the electric charge accumulated by each subpixel is proportional to the amount of light it is exposed to (plus electronic noise). Although a camera may have a dynamic range of 5 or more stops, when image data is recorded digitally the highest (brightest) stop uses fully half of the discrete tonal values.
This is because a difference of 1 stop represents a doubling or halving of exposure. The next highest stop uses half of the remaining values, the next uses half of what is left and so on, such that the lowest stop uses only a small fraction of the tonal values available.[18][19] This may result in a loss of tonal detail in the dark areas of a photograph and posterization during post-production. By deliberately exposing to the right and then stopping down afterwards (during processing) the maximum amount of information is retained.
Limitations
The ETTR exposure is, by its very nature, established with a camera ISO setting that allows the exposure indicators (right edge of histogram or blinkies/zebras) to indicate when the sensor is at or near saturation for desired highlights. Most people will find this to be the camera's base (lowest, not false) ISO. However, depth of field requirements may demand such a high f-ratio, and motion-blur/camera-shake issues may demand such a fast shutter speed, that ETTR is not possible at this ISO setting. When this happens, one retains the spirit of ETTR (maximizing signal-to-noise) by making the exposure as high as possible subject to the shooting conditions. ISO may then be increased to bring the image up to a desired brightness. But, since increasing ISO does not actually increase sensor exposure (instead the sensor's signal gain is increased), it should be applied only after the actual exposure (set by the f-ratio and shutter speed) has been made as large as possible subject to shooting constraints.
Live histograms and highlight-clipping indicators, which are almost always based on the processed JPEG rather than on the raw data, might indicate highlights are blown when in fact they are not and could be recoverable from a raw file. Therefore, it can be difficult to expose properly to the right without risking inadvertently blown highlights.[19] This problem can often be mitigated by using camera tonal settings that allow the JPEG histograms and highlight-clipping indictors to best reflect the underlying raw data.
See also
References
- Reichmann, Michael (2003-07-31). "Expose (to the) Right – Maximizing S/N Ratio in Digital Photography". The Luminous Landscape. Archived from the original on 2015-02-09. Retrieved 2016-07-05.
- Reichmann, Michael (August 2011). "Optimizing Exposure – Why Do Camera Makers Give Us 19th Century Exposures With Our 21st Century Cameras?". The Luminous Landscape. Archived from the original on 2015-02-13. Retrieved 2016-07-07.
- Carnathan, Bryan. "Exposure Basics".
- "Digital Exposure Techniques".
- Martinec, Emil (2008). "Noise, Dynamic Range and Bit Depth in Digital SLRs". Retrieved 4 February 2014.
- "Photonstophotons PDR chart".
- "Sensorgen digital camera sensor data".
- "Home page". DxOMark.
- Orpeza, Claire. "Sony's S-Log2 and Dynamic Range Percentages". AbelCine.
- Chapman, Alister. "Exposing and Using S-Log2 on the Sony A7s. Part One: Gamma and Exposure". XDCAM-USER.
- "Seven types of Picture Control: Flat". Nikon.
- Luijk, Guillermo. "UniWB".
- Kasson, Jim. "Using in-camera histograms for ETTR".
- "Introduction to UniWB". malch.com.
- "Raw Therapee – RawPedia: Exposure / Highlights Reconstruction". Archived from the original on 2014-11-12. Retrieved 2016-01-10.
- Diallo, Amadou. "Raw Converter Showdown: Capture One Pro 7, DxO Optics Pro 8 and Lightroom 4". Digital Photography Review.
- "Nikon D7200 Review: Real-world Raw Dynamic Range". Digital Photography Review.
- Hook, Elliot. "Exposing to the Right".
- Fraser, Bruce. "Raw Capture, Linear Gamma, and Exposure" (PDF).