Operation Cockpit
Operation Cockpit was an attack against the Japanese-held island of Sabang on 19 April 1944. It was conducted by aircraft flying from British and American aircraft carriers, which targeted Japanese shipping and airfields. A small number of Japanese ships and aircraft were destroyed, and one American aircraft was lost. While the attack was successful tactically, it failed to divert Japanese forces from other fronts as had been hoped.
| Operation Cockpit | |||||||
|---|---|---|---|---|---|---|---|
| Part of the South-East Asian theatre of World War II | |||||||
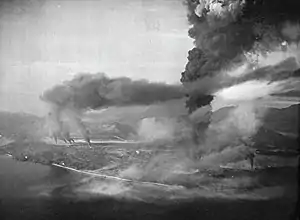 Sabang under attack on 19 April 1944 | |||||||
| |||||||
| Belligerents | |||||||
|
|
| ||||||
| Commanders and leaders | |||||||
|
|
| ||||||
| Strength | |||||||
|
2 aircraft carriers 3 battleships 1 battlecruiser 6 cruisers 15 destroyers 1 submarine |
Anti-aircraft batteries 3 torpedo bombers | ||||||
| Casualties and losses | |||||||
| 1 aircraft destroyed |
1 merchant vessel sunk 1 merchant vessel beached Up to 28 aircraft destroyed on the ground 3 aircraft shot down | ||||||
The attack on Sabang was the first of several carrier raids conducted by the British-led Eastern Fleet during 1944 and 1945. It was undertaken in an attempt to prevent the Japanese from transferring forces in the area to contest a planned American landing in New Guinea. The attack force encountered little opposition, as Sabang's defenders were taken by surprise. The Japanese did not react to the operation as the Eastern Fleet was not seen as a serious threat and their forces in the area were being preserved for use against an expected major American offensive in the Central Pacific. Nevertheless, the Allies were pleased with the results of the attack, including as it provided useful experience in carrier tactics for the British.
Background
At the Cairo Conference held during November 1943, the Allied leadership agreed that "the main effort against Japan should be made in the Pacific", and that the Indian Ocean would be a subsidiary theatre. It was also decided that any offensive operations, including carrier raids, in the theatre would have the goals of "maintaining pressure on the enemy, forcing dispersion of his forces, and attaining the maximum attrition of his air and naval forces and shipping".[1]
In January 1944 the Admiralty, the British Government institution responsible for administering the Royal Navy, decided to substantially reinforce the Eastern Fleet in the Indian Ocean. At this time the fleet, which was headed by Admiral James Somerville, was a weak force capable only of protecting Allied shipping in the area. The reinforcements which were scheduled to arrive over the next four months comprised 146 warships, which included three battleships, two aircraft carriers, fourteen cruisers and larger numbers of destroyers and other escort vessels. The first substantial group of reinforcements reached the Eastern Fleet's base at Ceylon on 27 January; these included the aircraft carrier HMS Illustrious, battleships HMS Queen Elizabeth and Valiant and battlecruiser HMS Renown.[2]
Also in early 1944, the Japanese military transferred its main naval striking force, the Combined Fleet, to Singapore. This change was made to evacuate the fleet from its bases in the central Pacific, which were now vulnerable to American attacks, and concentrate it at a location with good naval repair facilities and ready access to fuel. The Japanese did not intend to undertake any large-scale attacks into the Indian Ocean. Somerville believed that his force would be unable to counter the Combined Fleet if it entered the Indian Ocean, and additional air units were dispatched to protect Ceylon.[3] The United States Navy also agreed to temporarily transfer the aircraft carrier USS Saratoga and three destroyers from the Pacific to augment the Eastern Fleet; this was done to prevent the British from having to cancel the planned Operation Tungsten carrier raid on the German battleship Tirpitz in Norway in order to free up reinforcements for the Eastern Fleet.[4][5]
Sabang island lies off the northern end of Sumatra. The island was used as a base by the Imperial Japanese Navy (IJN) during the Japanese occupation of the Dutch East Indies.[6] Its location at the northern entrance of the Strait of Malacca made it strategically important.[7] The IJN's 9th Base Force was the main unit stationed at Sabang, and was commanded by Rear Admiral Hirose Sueto from February 1944.[8] The British believed that the island's garrison comprised 9,000 personnel.[9]
Prelude
In late March the main body of the Eastern Fleet, including Illustrious, Renown, Queen Elizabeth and Valiant, sortied into the Indian Ocean. The main goals of this operation, which was designated Operation Diplomat, were to search for Japanese ships following a raid in the area conducted by three cruisers and link up with Saratoga. The operation was also undertaken to practice operating the ships together and refuelling at sea ahead of the fleet beginning offensive operations. The British ships departed Ceylon on 21 March, refuelled from tankers between 24 and 26 March and rendezvoused with Saratoga on 27 March. Aircraft flying from the carriers exercised together during the return voyage, and the fleet arrived back at Ceylon on 2 April.[10]
The decision to attack Sabang was made in response to a request from the head of the US Navy, Admiral Ernest King. King asked that the Eastern Fleet undertake a raid in mid-April to prevent the Japanese from dispatching naval aircraft stationed in southern Malaya to attack the large Allied naval forces which were scheduled to conduct an amphibious landing at Hollandia in New Guinea on 22 April.[10] At a meeting on 12 April, the Eastern Fleet's senior officers decided to conduct a carrier raid on Sabang. They considered using surface ships to bombard Sabang in conjunction with the air attack, but decided against doing so.[11] During the first two weeks of April, the Eastern Fleet finalised its plans for the attack on Sabang and rehearsed the operation.[12] This attack was to be the first aircraft carrier raid attempted by the Eastern Fleet.[13]
The Allies had little intelligence on the Japanese forces at Sabang, with holdings being limited to small numbers of aerial reconnaissance photographs.[6] It was believed that the island was strongly defended, with the Japanese having a radar station and an airfield there.[7] Somerville decided against ordering further reconnaissance flights over the island due to the risk that they would alert the Japanese to the impending raid.[6]
Despite the Allied intentions, the Japanese had little interest in engaging the Eastern Fleet. The IJN was aware that the fleet was too weak to pose a significant threat, and were preserving their forces, including the aircraft in southern Malaya, to contest the American advance through the central Pacific. The Combined Fleet was under orders to only engage the Eastern Fleet if it mounted a large scale attack.[14]
Attack
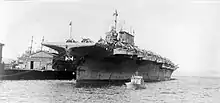
The attack force sailed from the Eastern Fleet's main base at Trincomalee on 16 April, and was led personally by Sommerville from Queen Elizabeth.[15] It comprised 27 warships from six navies; the historian H.P. Willmott has observed that Operation Cockpit was "perhaps the most cosmopolitan naval operation of the war".[12][16] The Royal Navy contributed Illustrious, two battleships, one battlecruiser, four cruisers and seven destroyers. The American contingent comprised Saratoga and three destroyers. Other elements of the force included the recently-arrived French battleship Richelieu, Dutch cruiser HNLMS Tromp and a Dutch destroyer, the New Zealand cruiser HMNZS Gambia and four Australian destroyers.[15] The Allied ships were organised into two task forces; Task Force 69 was a battleship covering force comprising the three battleships, two cruisers and nine destroyers. Task Force 70 comprised both aircraft carriers, Renown, two cruisers and six destroyers.[6] The submarine HMS Tactician was also stationed near Sabang to rescue any airmen who were forced down during the attack.[13]
Illustrious's air group comprised two squadrons equipped with 14 Vought F4U Corsair fighters each and two squadrons operating a total of 21 Fairey Barracuda torpedo and dive bombers. Saratoga embarked a squadron with 26 Grumman F6F Hellcat fighters, a squadron with 24 Douglas SBD Dauntless dive bombers and a squadron operating 18 Grumman TBF Avenger torpedo bombers, as well as a single Hellcat used by the Air Group Leader.[17]
.jpg.webp)
After an uneventful journey, and without being detected by the Japanese, the Allied force arrived at the carriers' flying off point 100 miles (160 km) south-west of Sabang in the early hours of 19 April. The strike force began to be launched at 5:30 am; Illustrious dispatched 17 Baracudas and 13 Corsairs and Saratoga 24 Hellcats, 18 Dauntlesses and 11 Avengers.[15] Of the Hellcats, 16 were to escort the strike force and 8 attack Lho Nga airfield in northern Sumatra. A combat air patrol comprising four Corsairs and eight Hellcats was maintained over the Allied fleet throughout the raid.[6]
The attack on Sebang began at 7 a.m. Saratoga's aircraft arrived over the island at that time, and Illustrious' began their attack from a different direction only a minute later.[15] The Allied bombers concentrated on attacking oil storage tanks, shipping and harbour installations. The fighters attacked Sabang's airfield and Lho Nga airfield. Three of Sabang's four oil tanks were set on fire and the harbour installations were badly damaged. Few ships were in the area, though a merchant vessel was sunk and another driven aground. The fighter pilots claimed to have destroyed 25 Japanese aircraft at Sabang airfield and another three at Lho Nga.[13] The British pilots failed to engage a number of worthwhile targets of opportunity.[18]
The Japanese garrison at Sabang was taken by surprise. Anti-aircraft guns only began firing on the Allied aircraft after the attack had commenced, and no Japanese fighters were encountered in the air. A Hellcat was shot down, and its pilot was rescued by Tactician while under fire from Japanese coastal artillery.[12][19][20] Eleven other American aircraft were damaged.[20]
As the Allied fleet withdrew, it was approached by three Japanese Mitsubishi G4M torpedo bombers. All three were shot down by Hellcats about 50 miles (80 km) to the north-east of the ships.[12][20] The attack force returned to Ceylon on 21 April.[20]
Aftermath
The Allied forces were satisfied with the results of Operation Cockpit.[13] While it did not inflict heavy casualties on the Japanese, the Royal Navy learned useful lessons from the raid.[21] The attack had no effect on Japan's military strategy or deployments. The aircraft in southern Malaya remained there, and no changes were made to the plans to resist the Allied landings at Hollandia.[15][22]
Shortly after the attack force reached Ceylon, Saratoga received orders to return to the United States for a refit. On Admiral King's suggestion, she and most of the other ships involved in Operation Cockpit conducted an attack on Soerabaya on her return journey. This raid, which was designated Operation Transom, was unsuccessful as the attack on 17 May caused little damage.[23][24] The Eastern Fleet conducted several other carrier raids over 1944, including a second attack on Sabang on 25 July which was designated Operation Crimson.[25]
References
Citations
- Roskill 1960, p. 346.
- Roskill 1960, p. 347.
- Roskill 1960, pp. 347–348.
- Roskill 1960, p. 348.
- Hinsley 1984, p. 271.
- Hobbs 2011, p. 39.
- Kirby 1962, p. 380.
- Hackett & Kingsepp 2016.
- Willmott 1996, p. 23.
- Roskill 1960, p. 354.
- Gill 1968, p. 401.
- Brown 2009, p. 80.
- Roskill 1960, p. 356.
- Roskill 1960, pp. 354–355.
- Roskill 1960, p. 355.
- Willmott 1996, p. 64.
- Brown 2009, p. 83.
- Willmott 1996, p. 136.
- Roskill 1960, pp. 355–356.
- Gill 1968, p. 402.
- Hobbs 2011, pp. 39–41.
- Hobbs 2011, p. 41.
- Roskill 1960, pp. 356–357.
- Brown 2009, p. 81.
- Faulkner 2012, p. 221.
Works consulted
- Brown, David (2009). Hobbs, David (ed.). Carrier Operations in World War II. Barnsley, Yorkshire: Frontline. ISBN 9781848320420.
- Faulkner, Marcus (2012). War at Sea: A Naval Atlas, 1939–1945. Annapolis, Maryland: Naval Institute Press. ISBN 9781591145608.
- Gill, G. Hermon (1968). Royal Australian Navy, 1942–1945. Australia in the War of 1939–1945. Series 2 – Navy. Volume II. Canberra: Australian War Memorial. OCLC 65475.
- Hackett, Bob; Kingsepp, Sander (2016). "Imperial Japanese Navy Submarine, Air Base and Marine Oil Terminal at Sabang, Sumatra". combinedfleet.com. Retrieved 19 July 2020.
- Hinsley, F.H.; et al. (1984). British Intelligence in the Second World War: Its Influence on Strategy and Operations. Volume Three, Part I. London: Her Majesty's Stationery Office. ISBN 0116309350.
- Hobbs, David (2011). The British Pacific Fleet: The Royal Navy's Most Powerful Strike Force. Annapolis, Maryland: Naval Institute Press. ISBN 9781591140443.
- Kirby, S. Woodburn (1962). The War against Japan. History of the Second World War. Volume III: The Decisive Battles. London: HMSO. OCLC 632441219.
- Roskill, S.W. (1960). The War at Sea 1939–1945. Volume III: The Offensive Part I. History of the Second World War. London: Her Majesty's Stationery Office. OCLC 58588186.
- Willmott, H.P. (1996). Grave of a Dozen Schemes: British Naval Planning and the War Against Japan, 1943-1945. Annapolis, Maryland: Naval Institute Press. ISBN 9781557509161.
Further reading
| Wikimedia Commons has media related to Operation Cockpit. |
- Waters, S.D. (1956). The Royal New Zealand Navy. Official History of New Zealand in the Second World War 1939–45. Wellington: Historical Publications Branch. OCLC 568681359.