Battle of Bir Hakeim
The Battle of Bir Hakeim (Arabic pronunciation: [biʔr ħaˈkiːm]) took place at Bir Hakeim, an oasis in the Libyan desert south and west of Tobruk, during the Battle of Gazala (26 May – 21 June 1942). The 1st Free French Brigade under Général de brigade Marie-Pierre Kœnig defended the position from 26 May – 11 June against much larger Axis forces of Panzerarmee Afrika/Armata Corazzata Africa commanded by Generaloberst Erwin Rommel. The Panzerarmee captured Tobruk ten days later but the delay imposed on the Axis offensive by the defence of the fortress influenced the cancellation of Operation Herkules, a plan for an Axis invasion of Malta. Rommel continued to advance and invaded Egypt, slowed by British delaying actions until the First Battle of El Alamein in July, where the Axis advance was stopped. Both sides used the battle for propaganda, Winston Churchill renamed the Free French as the Fighting French and Hitler called the French the second best fighters after the Germans.
| Battle of Bir Hakeim | |||||||
|---|---|---|---|---|---|---|---|
| Part of the Battle of Gazala during the Second World War | |||||||
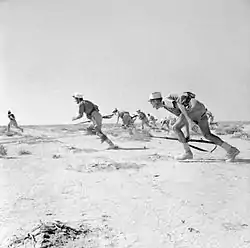 Free French Foreign Legionnaires wearing distinctive kepi hats "leap up from the desert to rush an enemy strong point" | |||||||
| |||||||
| Belligerents | |||||||
|
| |||||||
| Commanders and leaders | |||||||
|
|
| ||||||
| Strength | |||||||
| 3,703 men | 37,000 Axis troops | ||||||
| Casualties and losses | |||||||
|
141 killed 229 wounded 814 captured 53 guns 50 vehicles 110 aircraft |
3,300 killed or wounded 227–845 captured 164 vehicles 49 aircraft | ||||||
| Bir Hakeim was first attacked by the Ariete Division early in the Battle of Gazala, then by a mixed force of the Trieste and 90th Light divisions | |||||||
 Location within Libya  Battle of Bir Hakeim (Mediterranean) | |||||||
Background
Eighth Army
At the beginning of 1942, after its defeat in western Cyrenaica during Unternehmen Theseus, the British Eighth Army under Lieutenant-General Neil Ritchie faced the Axis troops in Libya roughly 48 km (30 mi) west of the port of Tobruk, along a line running from the coast at Gazala, southwards for about 48 km (30 mi). Both sides accumulated supplies for an offensive to forestall their opponent and General Claude Auchinleck, Commander in Chief of Middle East Command, hoped for the Eighth Army to be ready by May. British code-breakers tracked the dispatch of convoys to Libya as the British offensive on Axis shipping to North Africa was neutralised by Axis bombing of Malta and forecast that the Axis would attack first.[1]
As the Eighth Army was not ready to take the offensive, Ritchie planned to fight a defensive battle on the Gazala line.[2] Auchinleck's appreciation of the situation to Ritchie in mid-May anticipated either a frontal attack in the centre of the Gazala line followed by an advance on Tobruk or a flanking move to the south, looping around the Gazala line towards Tobruk.[3] Auchinleck saw the former as more likely (with a feint on the flank to draw away the Eighth Army tanks) while Ritchie favoured the latter. Auchinleck suggested that British armour be concentrated near El Adem, where it would be well placed to meet either threat.[3]
Since Operation Crusader in late 1941, the Eighth Army had received American built M3 Grant medium tanks with a 37mm gun in a turret and a 75mm gun in a hull sponson, which could penetrate the armour of the opposing Panzer III Ausf. H and J and the Panzer IV tank models at 590–780 m (650–850 yd). The frontal armour of the Grant was thick enough to withstand the 50 mm Pak 38 anti-tank gun at 910 m (1,000 yd) and the short-barrelled 50 mm KwK 38 gun of the Panzer III at 230 m (250 yd). The first 112 of the new British 6-pounder (57 mm) anti-tank guns had arrived and been allotted to the motor brigades of the armoured divisions.[4]
Panzerarmee Afrika/Armata Corazzata Africa
At the meeting of Axis leaders at Berchtesgaden on 1 May, it was agreed that Rommel should attack at the end of the month to capture Tobruk. The Panzerarmee Afrika/Armata Corazzata Africa ("Panzer Army Africa") was to pause at the Egyptian border, while the Axis captured Malta in Operation Herkules and then Rommel was to invade Egypt.[5] The Panzerarmee had finished converting to the up-armoured Panzer III Ausf. H variant and had received nineteen Panzer III Ausf. J (known as Mark III Specials), with long-barrelled 5 cm KwK 39 guns. Four Panzer IV Ausf. G (Mark IV Specials) with long-barrelled 7.5 cm KwK 40 guns had also arrived.[6] The Abwehr (German military intelligence) had broken some British military codes and in late 1941 penetrated Black, the code used by Bonner Fellers, a US military attaché in Egypt. The British divulged much tactical information to Fellers, who unwittingly reported it to the Axis as well as the US government.[7]
Air attacks by the Luftwaffe and Regia Aeronautica on Malta reduced its offensive capacity and supply convoys from Italy reached the Axis forces in Africa with fewer losses.[8] Until May, Axis monthly deliveries to Libya averaged 60,963 tonnes (60,000 long tons), fewer than a smaller Axis force received from June–October 1941 but sufficient for an offensive. The 1,448 km (900 mi) advance to Gazala succeeded because the port of Benghazi was open, reducing the transport distance for about 33 percent of the supplies of the Panzerarmee to 451 km (280 mi). The capture of Malta would not alter the constraints of port capacity and distance; protecting convoys and the use of a large port close to the front would still be necessary.[9]
Unternehmen Venezia (Operation Venice), the Axis plan of attack, was for tanks to make a flanking advance around the brigade forming the Bir Hakeim "box" at the southern extremity of the Gazala line. On the left side of the manoeuvre, the Italian 132nd Armoured Division Ariete would neutralise the Bir Hakeim box itself. Further south, the 21st Panzer Division and 15th Panzer Division would advance through the desert further south, moving east, then turning north behind the Gazala line to destroy the British armour and cut off the infantry divisions in the line. The most southerly part of the attacking formation, a kampfgruppe (battle group) of the 90th Leichtes Afrika Division (Generalmajor Ulrich Kleemann) was to advance to El Adem south of Tobruk, cut the supply routes from the port to the Gazala line and hold British troops at Tobruk by a ruse; aircraft-engines mounted on trucks were to raise dust, simulating the presence of a big armoured force.[8]
The rest of the Italian XX Motorised Corps, the 101st Motorized Division Trieste, would open a gap in the minefield north of Bir Hakeim, near the Sidi Muftah box, to create a supply route to the panzers. Rommel anticipated that having dealt with the British tanks, he would have captured El Adem, Ed Duda and Sidi Rezegh by nightfall and later the Knightsbridge defensive box, about 40 km (25 mi) north-east of Bir Hakeim. The Axis tanks would be in a position next day to thrust westwards against the Eighth Army defensive boxes between Gazala and Alem Hamza, meeting the eastwards attack by the Italian X and XXI corps. By late May, the Axis forces comprised 90,000 men, 560 tanks and 542 aircraft.[10]
Prelude
Gazala line
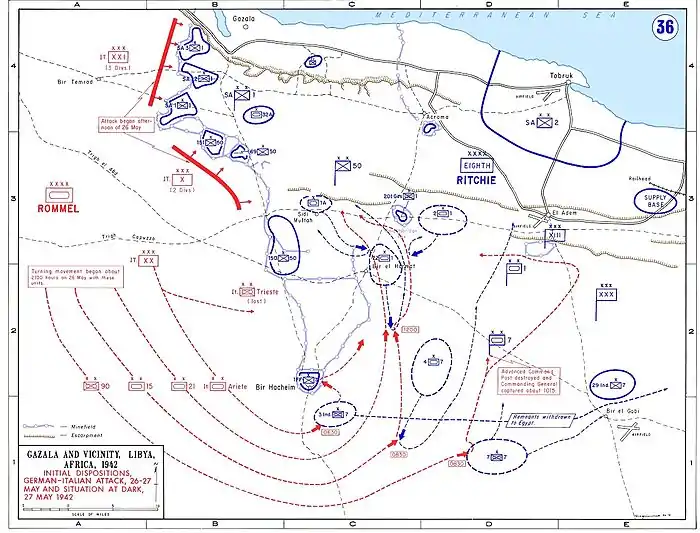
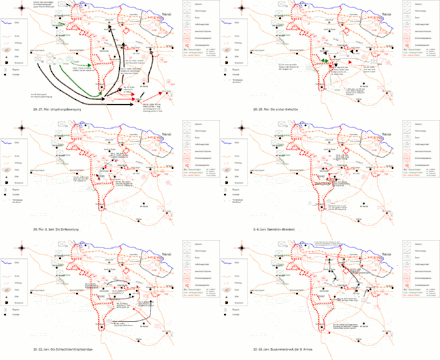
Between Gazala and Timimi (just west of Tobruk), the Eighth Army was able to concentrate its forces sufficiently to turn and fight. By 4 February, the Axis advance had been halted and the front line had been stabilised, from Gazala on the coast 48 km (30 mi) west of Tobruk, to the old Ottoman fortress of Bir Hakeim, 80 km (50 mi) to the south. The Gazala line was a series of defensive boxes accommodating a brigade each, laid out across the desert behind minefields and wire, watched by regular patrols between the boxes. The Free French were in the south at the Bir Hakeim box, 21 km (13 mi) south of the 150th Infantry Brigade box, which was 10 kilometres (6 mi) south of the 69th Infantry Brigade box. The line was not evenly manned, with a greater number of troops covering the coast road, leaving the south less protected but deep minefields had been laid in front of the boxes.[11]
The longer line made an attack around the southern flank harder to supply. Behind the Gazala line were the Commonwealth Keep, Acroma, Knightsbridge and El Adem boxes, sited to block tracks and junctions. The box at Retma was finished just before the Axis offensive but work on the Point 171 and Bir el Gubi boxes did not begin until 25 May.[12] By late May, the 1st South African Division was dug in nearest the coast, with the 50th (Northumbrian) Infantry Division to the south and 1st Free French Brigade furthest left at Bir Hakeim. The British 1st and 7th Armoured divisions waited behind the main line as a mobile counter-attack force, the 2nd South African Division garrisoned Tobruk and 5th Indian Infantry Division was in reserve. The British had 110,000 men, 843 tanks and 604 aircraft.[10]
Bir Hakeim
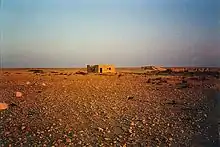
The fortress at Bir Hakeim (Old Man's Well) had been built by the Ottomans and later used as a station by the Italian Meharist (camel corps) to control movement at the crossroads of two Bedouin paths. The wells had long been dry and had been abandoned but Indian troops re-occupied the site to build a strongpoint surrounded by 50,000 mines.[13] The fortification was a rough pentagon pointing north, about 4 km × 5 km (2.5 mi × 3 mi) wide.[14] On 14 February, the 150th Infantry Brigade was relieved at the box by the 1st Free French Brigade (Général Marie Pierre Kœnig), part of XXX Corps (Lieutenant-General Willoughby Norrie).[15][16] With a fighting strength of 3,000 men and a rear echelon of about 600 men based 24 km (15 mi) to the east behind the line, the brigade was composed of the 13th Demi-Brigade of the Foreign Legion (DBLE), the Bataillon de Marche de I'Oubangui Chari and the Bataillon du Pacifique. The Legion comprised the 2nd and 3rd battalions of the 13th DBLE. By mid-May the perimeter and central areas were honeycombed with 1,200 entrenchments, foxholes, gun emplacements and underground bunkers, deep camouflaged hides for vehicles and supply dumps.[17] The interior of the fort was divided into zones, each the responsibility of a unit, with Kœnig's headquarters near the centre, at the crossroads. The V-shaped anti-tank and anti-personnel minefields were patrolled by the 3rd Foreign Legion Battalion (Lamaze), manning sixty-three Bren Gun Carriers divided into three squadrons. The patrols moved along lanes in the minefields, paying particular attention to the area north to the Sidi Muftah box at Got el Ualeb, held by the 150th Brigade.[14]
Battle of Gazala
At 2:00 p.m. on 26 May, the Italian X and XXI Corps began a frontal attack on the central Gazala line. A few elements of the Afrika Korps and the Italian XX Motorised Corps participated and during the day the bulk of the Afrika Korps moved north, to give the impression that it was the main attack. After dark, the armoured formations turned south in a sweeping move around the southern end of the Gazala line. Early on 27 May, the main force of Panzerarmee Afrika, the Afrika Korps, XX Motorised Corps and the 90th Light Division, went round the southern end of the Gazala line, using the British minefields to protect the Axis flank and rear. The Ariete Division was held up for about an hour by the 3rd Indian Motor Brigade (7th Armoured Division), dug in about 6 km (3.7 mi) south-east of Bir Hakeim.[18]
The 15th Panzer Division engaged the 4th Armoured Brigade, which had come south to support the 3rd Indian and 7th Motorised brigades. The Germans were surprised by the range and power of the 75 mm guns on the new M3 Grants but by late morning, the 4th Armoured Brigade had withdrawn toward El Adem and Axis armoured units had advanced more than 40 km (25 mi) north. Their advance was stopped around noon by the 1st Armoured Division, in mutually costly fighting.[19] On the right, the 90th Light Division forced the 7th Motorised Brigade out of Retma eastwards on Bir el Gubi. Advancing toward El Adem at mid-morning, armoured cars of the 90th Light Division overran and scattered the advanced HQ of the 7th Armoured Division (Major-General Frank Messervy), near Bir Beuid. Messervy was captured and removed his insignia, persuading the Germans that he was a batman; he escaped with several other men to rejoin the division. The 90th Light Division reached the El Adem area by mid-morning and captured several supply bases. The following day, the 4th Armoured Brigade moved on El Adem and forced the 90th Light Division to retire to the south-west.[20]
Siege
27 May
.jpg.webp)
The 15th and 21st Panzer divisions, the rest of the 90th Light Division and the Ariete Division began their large encircling move south of Bir Hakeim as planned. The 3rd Indian Motor Brigade was surprised at 6:30 a.m. on 27 May and overrun at Point 171, 6.5 km (4 mi) south-east of Bir Hakeim, by the 132nd Tank Infantry Regiment of the Ariete Division and some German tanks, losing about 440 men and most of its equipment. The 7th Motor Brigade was then attacked at Retma and forced back to Bir el Gubi. The 4th Armoured Brigade advanced in support and collided with the 15th Panzer Division; the 8th Hussars were destroyed and the 3rd Royal Tank Regiment (3rd RTR) lost many tanks. The British inflicted considerable losses in return but then retired to El Adem.[19]
After over-running the 3rd Indian Motor Brigade, the VIII, IX, and X Medium Tank battalions of the 132nd Tank Infantry Regiment moved to the north-east of Bir Hakeim and the IX Battalion (Colonel Prestisimone) with sixty tanks, changed direction towards the fort.[21][22][23] The IX Battalion arrived before the Bir Hakeim minefield and barbed wire at 8:15 a.m., charged and lost 31 tanks and a Semovente self-propelled gun. Ten tanks got through the minefield and were knocked out by 75 mm anti-tank guns, causing 124 Italian casualties.[24] The remnants of the IX Battalion retired on the main body of the Ariete Division, which moved north towards Bir el Harmat around noon, following Rommel's original plan.[25]
28–30 May
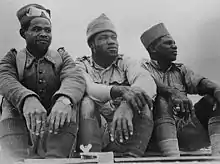
On 28 May, the Desert Air Force (DAF) made a maximum effort to attack Axis columns around El Adem and Bir Hakeim but in the poor visibility, bombed Bir Hakeim and its surroundings, misled by the Italian tank wrecks around the position and Kœnig sent a detachment to destroy the wrecks to avoid any more mistakes.[26] A French column was sent to make contact with the 150th Infantry Brigade, stationed further to the north. After a few hours, Italian artillery forced them to retire but the French column destroyed seven half-tracks. On 29 May, the detachment of Capitaine Gabriel de Sairigné destroyed three German tanks, British air attacks intercepted two raids by Junkers Ju 87 Stuka dive-bombers and fighter-bombers attacked Axis supply lines south and east of Bir Hakeim.[26] On 30 May, 620 soldiers from the 3rd Indian Motor Brigade, captured by the Axis and then released in the desert, reached the fort and added to the 243 prisoners already there, making the water shortage worse. The detachment of Capitaine Lamaze, at the request of the 7th British Armoured Division, sealed off the breach opened the day before by the Axis tanks in the minefields. Led by Colonel Dimitri Amilakhvari, the legionnaires were ambushed but managed to retreat with the help of the Bren carriers of the 9th Company Messmer.[27]
31 May–1 June
On 31 May, during a two-day sandstorm, fifty supply trucks of the 101st Motorised Company (Captaine Dulau), reached Bir Hakeim with water and took the Indians, prisoners and seriously wounded back to the British lines. A raid by the detachments Messmer, de Roux and de Sairigné, led by Amilakhvari, destroyed five tanks and an armoured vehicle repair workshop. The Panzerarmee had been forced to retreat westwards, to an area north of Bir Hakeim, which became known as the Cauldron, having attacked the 150th Infantry Brigade box since 28 May. During the day, the DAF lost sixteen aircraft (fifteen fighters and a bomber), fifteen in combat with Axis fighters and one to flak, the worst daily loss of the battle; the Luftwaffe lost nine aircraft.[28] On the west side of the Cauldron, the 150th Infantry Brigade was overrun late on 1 June despite British relief attempts. The Axis troops that had been trapped gained a supply route through the Eighth Army minefields north of Bir Hakeim and next morning the encirclement of the fort was resumed by the 90th Light Division, Trieste Division and three armoured reconnaissance regiments from the 17th Infantry Division Pavia. At 8:00 a.m. German troops approached from the south and Italian forces advanced from the north. Two Italian officers presented themselves at 10:30 a.m. to the 2nd Foreign Legion Battalion lines, asking for the capitulation of the fort, which Kœnig refused.[29]
2–4 June
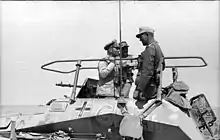
From 10:00 a.m. on 2 June, both sides exchanged artillery-fire but the French field guns were out-ranged by German medium artillery and the fort was bombed by German and Italian aircraft. Stukas raided Bir Hakeim more than twenty times but the French positions were so well built as to be almost invulnerable. The British were unable to reinforce the French, who repulsed the Ariete Division attack but on 2 June, the DAF had an easily observed bomb line around the fort and concentrated on the area with fighter patrols and fighter-bomber attacks. The sight of scores of burning vehicles helped to maintain the morale of the defenders, who harassed Axis communications around the fort, as did the 7th Motor Brigade and the 29th Indian Infantry Brigade in the vicinity. On 4 June, DAF fighters and fighter-bombers disrupted Stuka attacks and bombed Axis vehicles, setting off an ammunition wagon in view of the French but losing seven aircraft.[30][28] Kœnig signalled Air Vice-Marshal Arthur Coningham: "Bravo! Merci pour la R.A.F." which brought the reply "Merci pour le sport".[31][32]
5–7 June
From 5–6 June, the DAF flew fewer sorties at Bir Hakeim, concentrating on the Knightsbridge Box and around 11:00 a.m. on 6 June, the 90th Light Division attacked with the support of pioneers to try to clear a passage through the minefield.[33] The pioneers got within 800 m (900 yd) of the fort, having breached the outer minefield and during the night they managed to clear several passages into the inner perimeter. German infantry gained a foothold but the French troops in fox holes, dug outs and blockhouses, maintained a great volume of small-arms fire, which forced the Germans under cover. Operation Aberdeen, an attempt to destroy Axis forces in the Cauldron, which had begun on the night of 4/5 June, was a disastrous failure. Ritchie considered withdrawing the French from the fort to release the 7th Motor Brigade but decided to keep possession and on 7 June, four DAF raids were made against the Germans in the minefields. That night, a last convoy approached the fort and Aspirant Bellec got through the German lines, in thick fog to guide the convoy in. The Germans used the fog to prepare a final assault; tanks, 88 mm guns and Colonel Hecker's pioneers formed up in front of the fort.[34][35]
8–9 June
On the morning of 8 June, after the defeat of Operation Aberdeen released part of the 15th Panzer Division and Group Hecker for the siege, Rommel commanded an attack from the north, approaching as close as possible in thick fog, with artillery firing directly against the fortifications.[36] The Luftwaffe made constant attacks, including a raid by forty-five Ju 87 Stukas, three Junkers Ju 88 bombers and ten Messerschmitt Me 110 twin-engined fighters escorted by fifty-four fighters. Just before 10:00 a.m. the attack began, aiming at a low rise which would overlook the French defences. The Chadian and Congolese defenders held on despite many casualties and in the afternoon, another sixty Stukas bombed the perimeter and an attack was made all round the northern defences. An ammunition dump was blown up and the perimeter forced back. Kœnig reported that the garrison was exhausted, had suffered many casualties and was down to its reserve supplies; he asked for more air support and a relief operation. The DAF made another maximum effort, flew a record 478 sorties and during the night, Hawker Hurricane fighters and Douglas Boston bombers dropped supplies to the garrison.[36][34] The DAF lost eight fighters (three to Italian Macchi C.202 fighters) and two bombers, while the Luftwaffe lost two aircraft and the Regia Aeronautica one.[28]
On the morning of 9 June, twenty Ju 88s and forty Ju 87 Stukas escorted by fifty Me 110 and Bf 109 fighters, attacked Bir Hakeim. The Germans waited for the rest of the 15th Panzer Division to arrive as German artillery and aircraft bombarded the fort. Then a two-prong attack struck the perimeter. Italian infantry fought alongside Kampfgruppe Wolz, the German and native infantry of Sonderverband 288 (Special Commando 288) from the 90th Light Division, elements of the reconnaissance and infantry units of 15th and 21st Panzer Divisions and Kampfgruppe Kiehl a company of 11 tanks. The objective was Point 186, the top of a gentle rise in the ground which acted as a fire-control position for the garrison. A few skirmishes occurred between the 66th Infantry Regiment of the Trieste Division and the men of Lieutenant Bourgoin, whose unit was down only to hand grenades. The Bataillon de Marche made a determined defence but was forced back, despite reinforcements of the 22nd North African Company. In the afternoon, to the south near the old fort, Oberstleutnant Ernst-Günther Baade led two battalions of Rifle Regiment 115 into the assault and in a costly advance, they established themselves within 200 m (200 yd) of the fort by nightfall.[37] At 1:00 p.m., as 130 aircraft bombed the north face of the fort, the German infantry and the 15th Panzer Division attacked behind an artillery barrage. The attackers breached the 9th Company lines and the central position of Aspirant Morvan but the situation was restored with a Bren Carrier counter-attack. Many DAF aircraft were unserviceable and the effort for the day was much reduced but two Hurricanes dropped medical supplies; diversions attempted by columns from the 7th Motor Brigade and the 29th Indian Infantry Brigade were too small to have much effect.[34] In the afternoon, Messervy, the commander of the 7th Armoured Division, signalled that a break-out might be necessary and Kœnig asked for DAF protection, for an evacuation at 11:00 p.m. that night. The request was made at too short notice and the garrison had to wait until the night of 10 June for a rendezvous to be arranged by the British to the south.[38]
Retreat, 10–11 June
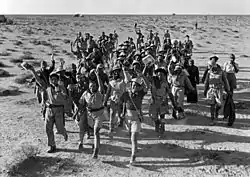
During 10 June, the French hung on and suffered many casualties; with only two hundred 75 mm rounds and seven hundred mortar rounds left, another attack on the northern sector against the Oubangui-Chari and 3rd Foreign Legion Battalion lines was contained by a counter-attack by the Messmer and Lamaze units, supported by Bren Gun Carriers and the last mortar rounds. In the afternoon, the biggest air attack of the siege, a raid by 100 Stukas dropped 130 long tons (132 t) of bombs. The last rounds of ammunition were issued and bodies searched for spare cartridges; Rommel predicted that Bir Hakeim would fall the next day but resisted pressure to attack with tanks, fearing that many would be lost in the minefields.[39]
As darkness fell, sappers began to clear mines from the western face of the fortress, heavy equipment was prepared for demolition and two companies were detailed to stay behind to disguise the retirement. A rendezvous was arranged with the 7th Motorized Brigade, which ran a convoy of lorries and ambulances to a point 7 km (4.5 mi) south of the fort. Mine clearance by the sappers took longer than expected and they were only able to clear a narrow passage, rather than a 200 m (200 yd) corridor. Vehicles went astray and the ambulances and walking-wounded left the perimeter 75 minutes late at 8:30 p.m. Kœnig put the fort under the command of Amilakhvari, the Foreign Legion commander and left the fort at the head of the column in his Ford, driven by Miss Susan Travers, an English woman, the only female member of French Foreign Legion.[40]
A flare rose, the Axis troops nearby began to fire, the guide of the HQ column got lost and was blown up three times by mines. When Kœnig caught up with the main column, it was blocked by troops of the 90th Light Division and he ordered a rush, regardless of the mines; Lamaze, Captain Charles Bricogne and Lieutenant Dewey were killed in the mêlée.[41] The reception was organised by 550 Company Royal Army Service Corps (RASC) which drove lorries and guided field ambulances with inexperienced rear-area crews, escorted by the 2nd King's Royal Rifle Corps (KRRC) and the 2nd Rifle Brigade on either side. The ambulances became separated in the dark but were found and guided to the rendezvous.[42] The commander the 3rd Battalion was captured but most of the brigade managed to break out, reach Bir el Gubi, then withdraw to Gasr-el-Arid by 7:00 a.m. on 11 June. About 2,700 men of the original 3,600 men escaped, including 200 wounded; during the day British patrols picked up stragglers.[39]
Aftermath
Analysis
The Free French occupation of Bir Hakeim had lengthened the Axis supply route around the south end of the Gazala line, caused them losses and gave the British more time to recover in the wake of their defeat at the Cauldron. From 2–10 June the DAF had flown about 1,500 sorties and lost 19 fighters over the fort, against about 1,400 Axis sorties in which 15 German and five Italian aircraft were shot down; the 7th Motor Brigade ran four supply convoys into Bir Hakeim from 31 May – 7 June.[43] Free French morale was raised by its performance in the battle; a victory had been badly needed to show the Allies that the army of the French was a serious force, that could contribute to the war against Germany. The term Free French was replaced by "Fighting French", after the battle had shown the world that a revival after the defeat in 1940 was under way; De Gaulle used it to undermine co-operation with the Vichy regime. In 1960, the British official historian I. S. O. Playfair wrote
At the outset it had made longer and more difficult the enemy's temporary supply route; it had caused him many casualties and it gave the British a chance to recover from their defeat in the Cauldron. General Kœnig's brigade made a great impression upon the enemy by their courageous and enterprising resistance and their success gave a well-won fillip to the pride of the Free French, who, for the first time in the Middle East, had fought the Germans and Italians in a complete formation on their own.
— I. S. O. Playfair[39]
and Auchinleck said on 12 June 1942, "The United Nations need to be filled with admiration and gratitude in respect of these French troops and their brave General Kœnig".[44] After the war, Generalmajor Friedrich von Mellenthin wrote, "In the whole course of the desert war, we never encountered a more heroic and well-sustained defence".[45]
Casualties
Buell in 2002 and Ford in 2008 wrote of 141 French dead, 229 wounded and 814 men taken prisoner, with the loss of 53 guns and fifty vehicles.[46][47] The British lost 86 aircraft shot down by aircraft and 24 by flak.[28] Axis losses were 3,300 dead or wounded, 227 captured, 164 vehicles destroyed and 49 aircraft shot down. The Regia Aeronautica lost 21 aeroplanes, eight in air fighting.[48] In 2004, Porch recorded that the Axis took 845 prisoners at Bir Hakeim, only ten percent of whom were French and that Hitler had ordered that captured German political refugees were to be killed, which Rommel ignored.[49]
Order of battle
1st Free French Brigade
Infantry[14]
- 13e Demi-Brigade de Légion Étrangère (Colonel Dimitri Amilakvari)
- 2nd Bataillon (II/13e DBLE)
- 3rd Bataillon (III/13e DBLE) (63 × Bren Gun Carriers)
- 2nd Colonial Demi-Brigade (Lieutenant-Colonel Roux)
- 2nd Bataillon de marche de l'Oubanghi
- 1st Bataillon du Pacifique (Lieutenant-Colonel Broche)
- 1st Bataillon d'infanterie de Marine (Coloniale) (Major Jacques Savey)
- 22nd North African Company (Captain Lequesne)
- 2nd Anti-tank Company (Captain Jacquin)
- Signal, engineer and medical companies
Artillery
- 1st Artillery Regiment (Colonel Laurent-Champrosay)[14]
- 24 × 75 mm guns (30 × used as anti-tank guns)[13][14]
- 7 × 47 mm APX anti-tank gun[13]
- 18 × 25 mm Hotchkiss anti-tank gun[13]
- 46 × Boys anti-tank rifles (British-supplied)[13]
- 18 × Bofors 40 mm gun anti-aircraft guns[13]
- 44 × 81 mm (3.19 in) and 90 mm (3.54 in) mortars[13]
- 72 × Hotchkiss machine guns[14]
- 8 × heavy anti-aircraft machine-guns[14]
Anti-aircraft
- 1 Bataillon de Fusiliers Marins (Commander Hubert Amyot d'Inville)[14]
- 12 × Bofors guns[14]
- D Troop, 43rd Battery, 11th City of London Yeomanry (Rough Riders) Light Anti-Aircraft Regiment RA, 84 gunners[13]
- 6 × Bofors guns[13]
- 2 × 25-pounder guns[13]
Ammunition
Citations
- Hinsley 1994, pp. 206–207.
- Playfair 2004, p. 216.
- Playfair 2004, p. 218.
- Carver 2002, pp. 68–69.
- Playfair 2004, p. 219.
- Carver 2002, p. 69.
- Latimer 2003, pp. 44–45.
- Playfair 2004, pp. 219–223.
- Creveld 1977, pp. 193–195.
- Carver 1964, p. 167.
- Playfair 2004, pp. 197–198.
- Playfair 2004, pp. 216–217.
- Walker 2003, p. 116.
- LePage 2008, p. 149.
- Bimberg 2002, pp. 109, 101.
- Playfair 2004, p. 413.
- Windrow 1976, p. 41.
- Playfair 2004, p. 223.
- Playfair 2004, pp. 223–224.
- Playfair 2004, pp. 224–225.
- Montanari 1993, pp. 209–211.
- Ford 2008, p. 35.
- Greene & Massignani 1999, p. 156.
- Montanari 1993, p. 212.
- Greene & Massignani 1999, p. 157.
- Richards & Saunders 1975, p. 199.
- Liardet 2012, p. 2.
- Palermo 2014, pp. 255–264.
- Playfair 2004, pp. 227–231.
- Boillot 1945, p. 24.
- Playfair 2004, pp. 230–231.
- Richards & Saunders 1975, pp. 200–201.
- Richards & Saunders 1975, p. 201.
- Playfair 2004, p. 236.
- Liardet 2012, p. 3.
- Pitt 1980, p. 220.
- Windrow 1976, p. 46.
- Pitt 1980, p. 221.
- Playfair 2004, p. 237.
- Pitt 1980, p. 222.
- Pitt 1980, pp. 222–223.
- Neillands 2005, pp. 124–125.
- Playfair 2004, pp. 237–238.
- De Gaulle 2000, p. 260.
- Pitt 1980, p. 223.
- Buell 2002, p. 169.
- Ford 2008, p. 64.
- Palermo 2014, pp. 263–268.
- Porch 2005, p. 272.
References
Books
- Bimberg, Edward L. (2002). Tricolor over the Sahara. Contributions in Military Studies. Westport, CN: Greenwood Press. ISBN 978-0-313-31654-8.
- Boillot, Félix François (1945). Bir Hakeim: 26 mai – 10 juin, 1942 [Bir Hakeim: 26 May – 10 June 1942] (2nd, rev. ed.). Paris: Presses universitaires de France. OCLC 11585533.
- Buell, Thomas B.; Bradley, John N.; Griess, Thomas E.; Dice, Jack W.; Bradley, John H. (2002). The Second World War: Europe and the Mediterranean. The West Point Military History Series. New York: Square One. ISBN 978-0-7570-0160-4.
- Carver, M. (1964). Tobruk (Pan Books ed.). London: Batsford. ISBN 978-0-330-23376-7.
- Carver, M. (2002) [1986]. Dilemmas of the Desert War: The Libyan Campaign 1940–1942 (Spellmount ed.). Staplehurst: Batsford. ISBN 978-1-86227-153-1.
- Creveld, M. van (1977). Supplying War: Logistics from Wallenstein to Patton. Cambridge: Cambridge University Press. ISBN 978-0-521-29793-6.
- de Gaulle, Charles (2000) [1954]. Guyard, Marius-François; Barré, Jean-Luc (eds.). Mémoires de guerre [War Memoirs]. Bib. La Pléiade (in French). Paris: Gallimard. ISBN 978-2-07011-583-9.
- Ford, Ken (2008). Gazala 1942: Rommel's Greatest Victory. Oxford: Osprey. ISBN 978-1-84603-264-6.
- Greene, Jack; Massignani, Alessandro (1999) [1994]. Rommel's North Africa Campaign: September 1940 – November 1942. Cambridge, MA: Da Capo. ISBN 978-1-58097-018-1.
- Hinsley, H. (1994) [1993]. British Intelligence in the Second World War (abridged). History of the Second World War (2nd rev. ed.). London: HMSO. ISBN 978-0-11-630961-7.
- Latimer, Jon (2003) [2002]. Alamein. London: John Murray. ISBN 978-0-7195-6213-6.
- LePage, Jean-Denis G. G. (2008). The French Foreign Legion: An Illustrated History. Jefferson, NC: McFarlane. ISBN 978-0-7864-3239-4.
- Montanari, Mario (1993). El Alamein (gennaio – novembre 1942) [El Alamein (January–November 1942)]. Le operazioni in Africa Settentrionale. III (2nd ed.). Roma: Stato Maggiore dell'esercito, Ufficio Storico, SME. OCLC 313319483.
- Neillands, R. (2005) [1991]. The Desert Rats: 7th Armoured Division 1940–45 (Aurum Press ed.). London: Widenfeld & Nicolson. ISBN 978-1-84513-115-9.
- Palermo, Michele (2014). Eagles over Gazala: Air Battles in North Africa, May–June 1942. Roma: IBN Editore. ISBN 978-88-7565-168-8.
- Pitt, B. (1980). The Crucible of War: Auchinleck's Command. II (2001 ed.). London: Cassell. ISBN 978-0-304-35951-6.
- Porch, Douglas (2005) [2004]. Hitler's Mediterranean Gamble (Cassell Military Paperbacks ed.). London: Weidenfeld & Nicolson. ISBN 978-0-304-36705-4.
- Playfair, Major-General I. S. O.; with Flynn, Captain F.C. RN; Molony, Brigadier C. J. C. & Gleave, Group Captain T. P. (2004) [1st. pub. HMSO 1960]. Butler, Sir James (ed.). The Mediterranean and Middle East: British Fortunes reach their Lowest Ebb (September 1941 to September 1942). History of the Second World War, United Kingdom Military Series. III. Uckfield, UK: Naval & Military Press. ISBN 978-1-84574-067-2.
- Richards, Denis; Saunders, Hilary St. G. (1975) [1954]. Royal Air Force 1939–1945: The Fight Avails. II. London: HMSO. ISBN 978-0-11-771593-6.
- Walker, Ian W. (2003). Iron Hulls, Iron Hearts: Mussolini's Elite Armoured Divisions in North Africa. Marlborough: Crowood. ISBN 978-1-86126-646-0.
Journals
- Windrow, M. (1976). "Bir Hakeim". War Monthly. London: War Monthly Publications (32). ISSN 0307-2886.
Websites
- Liardet, J-P. (2012). "Bir Hakeim 1942, Les Français Libres contrarient les plans de Rommel" [Bir Hakeim 1942, The Free French Against Rommel]. Net4war. Archived from the original on 4 February 2012. Retrieved 24 March 2015.
Further reading
Books
- Bergot, Erwan (1975). La Légion au combat: Narvik, Bir-Hakeim, Diên Biên Phu. La 13e demi-brigade de Légion étrangère [The Legion in Battle: Narvik, Bir Hakeim, Dien Bien Phu. The 13th Demi-Brigade of the Foreign Legion] (in French). Paris: Presses de la Cité. OCLC 476143073.
- Buffetaut, Yves (1992). Bir-Hakeim. La guerre du desert (in French). II. Paris: Armes Militaria Magazine HS 06. OCLC 463803978.
- Crémieux-Brilhac, Jean-Louis (1996). La France Libre: de l'appel du 18 juin à la Libération [Free France: The Call of June 18 at the Liberation] (in French). Paris: Nouvelle Revue Française (Gallimard). ISBN 978-2-07-073032-2.
- Grigg, John (2013). 1943: The Victory That Never Was. london: Faber & Faber. ISBN 978-0-571-30374-8.
- Kœnig, Marie Pierre (1971). Robert Laffont (ed.). Bir Hakeim: 10 Juin 1942 [Bir Hakeim: 10 June 1942] (in French). Paris. OCLC 462985488.
- Krumeich, Gerd; Brandt, Susanne (2003). Schlachtenmythen: Ereignis, Erzählung, Erinnerung [Battle Myths: Events, Narratives, Memory]. Europäische Geschichtsdarstellungen (in German). Köln: Böhlau. ISBN 978-3-412-08703-6.
- Lormier, Dominique (2003). Rommel: La fin d'un mythe: biographie [Rommel: The End of a Myth: Biography] (in French). Paris: Le Cherche midi. ISBN 978-2-7491-0108-8.
- Onana, Raphaël (1996). Un homme blindé à Bir-Hakeim: récit d'un sous-officier camerounais qui a fait la guerre de 39–45 [A Tank Man at Bir-Hakeim: Story of a Cameroonian Non-Commissioned Officer who was in the War 39–45] (in French). Paris: L'Harmattan. ISBN 978-2-7384-4239-0.
- Rondeau, Daniel; Stephane, Roger (1997). "16 Testimonies". In Bernard Grasset (ed.). Des hommes libres: La France Libre par ceux qui l'ont faite [Free Men: Free France by those Who Did] (in French). Paris. ISBN 978-2-246-49011-1.
- Waechter, Matthias (2006). Der Mythos des Gaullismus: Heldenkult, Geschichtspolitik und Ideologie 1940 bis 1958 [The Myth of Gaullism: Hero Worship, History, Politics and Ideology 1940–1958]. Moderne Zeit (in German). XIV. Göttingen: Wallstein Verlag. ISBN 978-3-8353-0023-1.
- Zdráhala, Richard (1990). Válčil jsem v poušti [I Fought in the Desert] (in Czech). Praha: Naše vojsko. ISBN 80-206-0048-5.
Journals
- Messmer, Pierre (1986). "La bataille de Bir Hakeim" [The Battle of Bir Hakeim]. Espoir, revue de l'institut Charles de Gaulle (in French). Paris: Institut Charles de Gaulle. OCLC 29827723.
External links
| Wikimedia Commons has media related to Battle of Bir Hakeim. |
