Axis capture of Tobruk
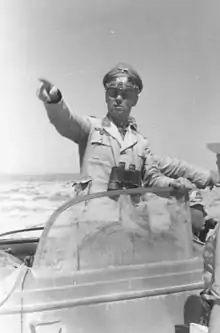
The Axis capture of Tobruk, also known as the Fall of Tobruk and the Second Battle of Tobruk (17–21 June 1942) was part of the Western Desert Campaign in Libya during the Second World War. The battle was fought by Panzer Army Africa (Panzerarmee Afrika/Armata Corazzata Africa) an Axis (German–Italian) military force in north Africa, which included the Afrika Korps, led by Generalleutnant Erwin Rommel) and forces from the United Kingdom, India, South Africa and Allied contingents in the British Eighth Army (General Neil Ritchie).
| Axis capture of Tobruk | |||||||
|---|---|---|---|---|---|---|---|
| Part of the Western Desert Campaign of the Second World War | |||||||
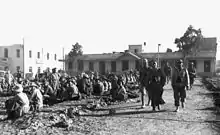
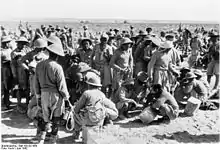
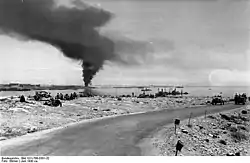 The road from Bardia to Tobruk on 21 June 1942 with British prisoners of war on the left, sunken ships in the harbour and smoke over the port. | |||||||
| |||||||
| Belligerents | |||||||
|
|
| ||||||
| Commanders and leaders | |||||||
|
|
| ||||||
| Strength | |||||||
| 96,000 troops (40,000 German, 56,000 Italian) | 35,000 troops | ||||||
| Casualties and losses | |||||||
| <3,360 killed or wounded[1] | 33,000 prisoners[1] | ||||||
Axis forces had conducted the Siege of Tobruk for eight months in 1941 before its defenders, who had become an emblem of resistance were relieved in December. British commanders had decided not to defend Tobruk for a second time and its minefields had been stripped for use in the Gazala Line to the west. By mid-1942, the garrison included many inexperienced troops and on 15 June 1942, the newly promoted Major-General Hendrik Klopper of the 2nd South African Division took command.[2] An immense stock of supplies of every description had been accumulated around the port for a British offensive but the Axis forestalled the attack with Operation Venice (Unternehmen Venezia and the Battle of Gazala began on 26 May 1942. The Eighth Army was defeated and driven east of Tobruk, leaving it isolated. The British Prime Minister Winston Churchill placed great store on the symbolic value of Tobruk and there was an exchange of ambiguous signals leading to the garrison being surrounded, rather than evacuated as originally intended.
Panzerarmee Afrika attacked Tobruk with massed air support, penetrated a weak spot on the eastern defensive perimeter, taking Tobruk and 33,000 prisoners, many of the garrison on the western perimeter not having been involved in the fighting. The surrender was the second largest capitulation by the British Army in the war, after the Battle of Singapore in February 1942. The loss of Tobruk came as a severe blow to the British leadership and precipitated a political crisis in Britain. Unexpectedly, the defeat evoked additional sympathy from the United States for the British and the dispatch of supplies and equipment from the US to the Middle East was expedited. Rommel persuaded the Axis commanders that the supplies captured at Tobruk and the disorganised state of the British forces would enable the Axis easily to occupy Egypt and the Suez Canal.
Operation Herkules, the invasion of Malta, was postponed and the Axis air forces supported the pursuit into Egypt instead, which was hampered by supply constraints as the Panzerarmee Afrika advanced further from its bases. The Axis advance was halted at the First Battle of Alamein in July 1942. A British Court of Inquiry was held in absentia in 1942, which found Klopper to be largely blameless for the surrender and ascribed the defeat to failures among the British high command. Only seven copies of the verdict were circulated, one being transmitted to General Jan Smuts on 2 October 1942.[3] The findings were kept secret until after the war, which did little to restore the reputation of Klopper and his troops.
Background
The small port of Tobruk in Italian Cyrenaica had been fortified by the Italians from 1935. Behind two old outlying forts, they constructed a novel fortification, consisting of a double line of concrete-lined trenches 54 km (34 mi) long, connecting 128 weapons pits protected by concealed anti-tank ditches but the fortifications lacked overhead protection and there were no defences in depth.[4] Tobruk was captured by Australian forces in January 1941 during Operation Compass, the first large Allied military operation of the Western Desert Campaign.[5] Following the arrival of the German Afrika Korps commanded by Erwin Rommel in Operation Sonnenblume in March, Axis forces retook much of the lost territory in Cyrenaica;[6]
Tobruk was cut off and besieged between April and December 1941. Using the Italian defences, ill-organised attacks by Axis forces were defeated by the 30,000-strong Australian garrison (replaced in September by a British and Allied force), allowing time for the fortifications to be improved. The Allied occupation of Tobruk was a threat to the Axis communications, it denied them the use of the port, and it tied down four Italian divisions and three German battalions, a force twice the size of the garrison.[7] During 1941, supplied from the sea and surviving successive Axis assaults, the defence of Tobruk became a symbol of the British war effort. The relief of Tobruk was the object of Operation Brevity in May and Operation Battleaxe in June, both of which failed. Operation Crusader in November and December 1941 raised the siege and forced the Axis out of Cyrenaica into Tripolitania.[8]
Supplied with more modern tanks, the second Axis offensive saw the reoccupation of western Cyrenaica but the Axis advance ran out of supplies west of Gazala. A lull followed as both sides prepared for a new offensive. The British built up the Gazala Line, a row of fortified positions known as "boxes", defended by extensive minefields.[9] The Axis forces forestalled the British with Unternehmen Venezia (known to the British as the Battle of Gazala), which began on 26 May 1942.[10] Poorly armed and armoured British tanks and poor co-ordination allowed Rommel to defeat the Eighth Army armour piecemeal and by 13 June the British had begun to retreat eastwards from Gazala, leaving Tobruk vulnerable.[11][12]
Axis plans
On 1 May 1942, a meeting of Axis leaders was held at the Berghof in Berchtesgaden, with Adolf Hitler and Albert Kesselring, the Wehrmacht Commander-in-Chief South, representing Germany, and Benito Mussolini and Ugo Cavallero, the Chief of the Defence Staff representing Italy.[13][14] It was decided that Rommel should start Unternehmen Venezia (Operation Venice), an offensive at the end of May, to capture Tobruk. If successful, Rommel was to go no further east than the Egyptian border and take up defensive positions while an invasion of Malta (Operation Herkules) was undertaken, scheduled for mid-July.[15] The capture of Malta would secure the Axis supply lines to North Africa before allowing Rommel to invade Egypt, with the Suez Canal as the final objective.[13] Axis planning had been given considerable assistance after the Italian Servizio Informazioni Militare (Military Information Service) had broken the Black Code used by Colonel Bonner Fellers, the US military attaché in Cairo, to send detailed and often critical reports to Washington of the British war effort in the Middle East.[16]
British plans
In a meeting held in Cairo on 4 February 1942, the service Commanders-in-Chief of the British Middle East Command considered what their course of action should be in the event of a further successful Axis offensive, the front line at that time being only 30 mi (48 km) west of Tobruk. The commanders knew how valuable the port would be to Axis forces but decided against defending it. General Sir Claude Auchinleck was reluctant to have a valuable division tied down as a garrison, especially as reinforcements might be urgently needed for Persia and Iraq; Admiral Sir Andrew Cunningham could no longer risk the loss of shipping which had been incurred supplying the garrison during the first siege and Air Marshal Sir Peter Drummond (deputy to Air Chief Marshal Sir Arthur Tedder), contended that it might prove impossible to provide fighter cover for the port. Auchinleck drafted orders for Lieutenant-General Neil Ritchie, the commander of the Eighth Army, that he was to make every effort to prevent Tobruk from being taken but he was not to allow his forces to be surrounded there. If the fall of Tobruk was imminent, "the place should be evacuated and the maximum amount of destruction carried out in it", while a firm defence line should be established further east on the Egyptian border.[17] This withdrawal arrangement was formalised as Operation Freeborn.[18]
By 14 June, Operation Venice had forced Ritchie to implement Operation Freeborn, the withdrawal of the units holding the Gazala positions, the 50th (Northumbrian) Infantry Division and the 1st South African Infantry Division, eastwards through Tobruk and on towards the Egyptian border. On the previous day, Auchinleck had confirmed to Ritchie that, if all else failed, the frontier should be "a rallying point". Auchinleck now began to reassess the Tobruk position; neither he nor Ritchie wanted to lose the considerable stocks of fuel, munitions and other stores which had been built up at the port for the intended British offensive. On the morning of 14 June, he had received a message from Winston Churchill that "retreat would be fatal"; despite the misgivings of his senior commanders, Churchill had apparently told Roosevelt that he would hold Tobruk.[19]
Auchinleck signalled to Ritchie that he was to hold a line from Acroma (west of Tobruk) extending south-east to El Adem, which would screen Tobruk. Ritchie did not receive the order until two hours before his carefully organised night withdrawal was due to start; too late to alter the manoeuvre. The 50th and 1st South African divisions were saved from encirclement but were withdrawn beyond the line which Auchinleck intended them to hold. Ritchie informed Auchinleck that he would attempt to hold the Acroma–El Adem line with troops from XXX Corps but warned that if this failed, Tobruk might either become "temporarily isolated" or be evacuated and asked which option was to be taken. Auchinleck replied that "On no account will any part of Eighth Army be allowed to be surrounded in Tobruk and invested there", which Ritchie interpreted as meaning that he should evacuate Tobruk if there were an Axis breakthrough.[20]
On the morning of 15 June, the situation was confused further by a message from Churchill which included the phrase "Presume there is no question in any case of giving up Tobruk?" Auchinleck replied to Churchill that Ritchie had sufficient troops to hold Tobruk. Auchinleck then signalled to Ritchie that although Tobruk was "not to be invested", it could be "isolated for short periods" and that he should organise a garrison accordingly. It was clear to Ritchie that an Axis breakthrough of the Acroma–El Adem line was imminent.[21]
Tobruk isolated
The area around El Adem was held by 29th Indian Infantry Brigade (Brigadier Denys Reid). On 15 June, El Adem was attacked three times by the 90th Light Division but were repulsed by the defenders. Simultaneously, an attack by 21st Panzer Division on a defended area called Point B 650 some 8 km (5.0 mi) north of El Adem was defeated by the Indians and the 7th Motor Brigade; a second attack succeeded later that evening. The attacks on El Adem were stopped after further reverses but the threat of being surrounded caused its evacuation on the night of 16/17 June. This left the airfields on the coast at RAF Gambut vulnerable, causing the Desert Air Force (DAF) to withdraw eastwards, severely limiting air support. The last outpost of the defensive line was Belhamed, a hill adjacent to Sidi Rezegh, which was held by the 20th Indian Infantry Brigade, a new formation.[22]
On 17 June, the 4th Armoured Brigade was ordered to attack, hoping to take the flank of the German armour, now supplemented by 15th Panzer Division, as it moved northwards towards the coast. The brigade had been hurriedly reformed after the Gazala battles and had about ninety tanks in composite units but lacked much of its artillery, which had been detached to form harassing columns. After an engagement lasting most of the afternoon, the British brigade withdrew to refit and then towards Egypt, having lost 32 tanks.[23] The 20th Indian Brigade was ordered to withdraw during that night but were caught as the German armour reached the coast at Gambut and two of its battalions were captured. Also captured was the abandoned RAF base with 15 aircraft and considerable fuel supplies; to the west, a vast Allied stores dump with thousands of lorries was taken.[24] The next morning, 18 June, Rommel was able to report to Berlin that Tobruk had been surrounded and was under siege.[25]
Opposing forces
Eighth Army
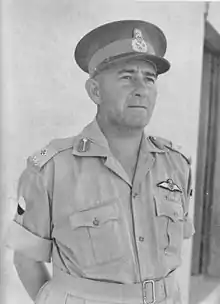
A third of the Tobruk garrison comprised the 2nd South African Infantry Division (Major General Hendrik Klopper). The division consisted of only the 3rd South African Infantry Brigade and 6th South African Infantry Brigade with a number of attached units. The 2nd South African Division was not a veteran formation but had captured Bardia and Sollum during Operation Crusader in January. The division had been based in Tobruk since the end of March; Klopper had been in command since 14 May, having been a divisional staff officer. Klopper was put in charge of the Tobruk garrison on 15 June, five days before the Axis attack. On the following day, Lieutenant-General William Gott (XIII Corps) whose headquarters were still in the port, suggested that he should take command but was overruled by Ritchie and withdrew, leaving three of his staff officers to assist Klopper. Before Gott left, he ordered Klopper to prepare three plans – for co-operating with the Allied forces outside Tobruk, for re-establishing a presence at Belhamed and for the evacuation of the garrison eastwards. This placed a considerable extra burden on Klopper and his staff who were already very busy.[26]
The South African brigades held the west and south-west sectors of the perimeter, where most of the fighting in the first siege had taken place. The 32nd Army Tank Brigade, with about sixty serviceable infantry tanks, mostly Valentines and a few Matilda IIs, the 201st Guards Motor Brigade with three infantry battalions, only one of which was a Guards unit and the 11th Indian Infantry Brigade with three battalions, one of which was a Gurkha unit and one the experienced Queen's Own Cameron Highlanders; also attached to the brigade was a composite infantry battalion made up from various units in the 1st South African Division and known as Beergroup comprised the remainder of the garrison. The Indian brigade was deployed to the east and south of the perimeter.[27]
The defence included three regiments of field artillery and two of medium artillery, the latter possessing sixteen 4.5-inch medium guns and sixteen 155 mm M1918 howitzers between them. In the anti-tank batteries in Tobruk there were fifteen new 6-pounders, 32 of the older and less effective 2-pounders and eight Bofors 37 mm anti-tank guns. There were eighteen 3.7-inch heavy and one light anti-aircraft regiment.[28]
The garrison was numerically large but included around 8,000 support troops and around 2,000 non-combatant labourers. The perimeter was 35 mi (56 km) long, and the coastline added another 20 mi (32 km).[29] Each infantry battalion had to defend a frontage of about 35 mi (56 km) on average and each anti-tank gun would have had to defend a frontage of 750 yd (690 m) if they had been spread evenly across the perimeter.[30] Although many non-essential troops had been evacuated, there remained a number of administrative units under the command of a brigadier. Unnecessary shipping had also been evacuated but some small coastal vessels and a shore-based Naval Establishment were retained. The fightersof 40 Squadron SAAF had been withdrawn from the airfield within the perimeter but a forward air control unit, known as a "tentacle", remained.[31] The combat squadrons of the DAF had been compelled to move to airfields at Sidi Barrani, which put Tobruk beyond the range of all their fighters except for No. 250 Squadron RAF, which operated Curtiss Kittyhawks, able to carry drop tanks.[32]
Fortifications
Owing to the earlier decision not to allow Tobruk to endure another siege, little work had been done to maintain its defences. In many places, the trenches and the anti-tank ditch had collapsed or filled with drifting sand and part of the ditch had been filled in to allow the British armour to deploy during the December 1941 breakout. Large quantities of barbed wire and land mines had been removed to bolster the Gazala defences, while some of the old Italian mines which remained were found to be defective.[33][34] Some work had been done by South African engineers to remedy the situation but there is conflicting evidence as to the condition of the defences at the start of the siege.[35]
Panzerarmee Afrika/Armata Corazzata Africa
A plan for the rapid capture of Tobruk had been agreed between Kesselring and Cavallero on 10 June, consisting of an attack in stages from the south and west. Rommel ignored them and used his plan of October 1941, attacking from the south-east, where the ground was flatter than the gullied terrain in the south-west. He began to deploy his forces to their jumping-off positions on 18 June.[36]
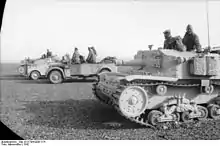
On the western end of the line was the Italian XXI Corps comprising the 7th Bersaglieri Regiment, the 60th Infantry Division Sabratha and the 102nd Motorised Division Trento, southwards from the coast. At the south-west corner of the perimeter was the German 15th Rifle Brigade. To the south was the Italian X Corps with the 27th Infantry Division Brescia forward and the 17th Infantry Division Pavia in reserve. In the south-eastern corner were the German 90th Light Division and the Axis artillery. On the eastern boundary was the Italian XX Motorised Corps with the 101st Motorised Division Trieste forward; the armoured 132nd Armoured Division Ariete was in the south-west at Bir er Reghem and the newly arrived 133rd Armoured Division Littorio was moving in behind it. The 15th Panzer Division and 21st Panzer Division were in the east, on either side of the village of Kambut.[37]
Kesselring had warned that, because all Axis aircraft had to be withdrawn by the end of June, for the invasion of Malta, an early result was vital.[38] About 150 bombers of various types were available, mostly German, including 40 to 50 fighter-bombers and 21 Junkers Ju 87 (Stuka) dive-bombers. About 50 German and 100 Italian fighters were also within range. The recent capture of airfields close to the Tobruk perimeter allowed for rapid refuelling and rearming.[39]
Battle
Initial dispositions

Wishing to exploit the disorganisation of the Eighth Army, Rommel issued his orders for the assault on 18 June and reconnaissance of deployment areas commenced early the next day.[39] Starting in the afternoon of 19 June and through that night, the Afrika Korps armoured formations changed places with 90th Light Division, so that they were facing the south-eastern corner of the perimeter, occupied by the inexperienced 2nd Battalion, 5th Mahratta Light Infantry. The 15th Panzer Division was on the left of the attack and 21st Panzer on the right, with a motorised infantry group (detached from the 90th Light Division and commanded by Generalleutnant Erwin Menny) in the centre. XX Corps was to attack further to the left, followed by X Corps, which was to occupy and hold the perimeter defences. In the west, XXI Corps was to make a feint attack to pin down the South African brigades, while in the east, the 90th Light Division was to prevent relief attempts on Tobruk by the Eighth Army.[40] When the Axis artillery arrived at their positions near El Adem, they found Axis ammunition, which had been abandoned in November and had never been cleared away.[41]
Breakthrough
The assault opened at 5:20 a.m. on 20 June with an intense air bombardment on the south-eastern perimeter. The Luftwaffe flew 588 sorties, the highest sortie rate achieved in the Mediterranean theatre, while the Regia Aeronautica flew 177.[42] The total weight of bombs dropped was more than 365 t (359 long tons). Gruppe Menny began its attack at 7:00 a.m., which coincided with the opening of the artillery barrage, which had been delayed by late arrivals at their positions; a breach in the line between two strong points had been made at 7:45 a.m. The German 900th Engineer Battalion was able to make crossings over the anti-tank ditch, using prefabricated bridging equipment; the first German tanks were across the ditch by 8:30 a.m. By then, several strong points had been taken by the infantry, creating a bridgehead 2 km (1 mi) wide.[43][44] The Mahrattas committed their reserves in an abortive counter-attack and although they had been given to understand that a tank battalion would be coming to their assistance, this never materialised. The Ariete Division, the spearhead of XX Corps, had failed to penetrate the line held by 2nd Battalion, Cameron Highlanders and were redirected into the breach made by the Afrika Korps and then sent westwards towards Fort Pilastrino.[45]
Counter-attack

At Klopper's headquarters, after believing the attack in the south-east to be a feint, it was thought that orders for a counter-attack by the 32nd Army Tank Brigade, supported by whatever elements of the Guards and Indian brigades they required had been received. The intention had not been understood at the tank brigade headquarters and only the 4th Battalion, Royal Tank Regiment (RTR) was ordered to attack. The assistance of a battlegroup from 3rd Coldstream Guards was declined through lack of orders.[46] The counter-attack might have succeeded if it had been made with greater force, while the Axis armour was still making its way across the anti-tank ditch but by the time it had begun, the Afrika Korps had been moving into the perimeter for an hour and a half and the Ariete armoured division was established on their left.[47] The 7th RTR moved up in support on their own initiative but half were diverted to assist the Camerons. The Afrika Korps defeated the British armour in detail, aided by constant attack from the air. The only British air raid that morning was called in by the forward air control "tentacle" to bomb Axis vehicles moving through the south-east breach and was carried out by nine Douglas Bostons escorted by long-range Kittyhawk fighters.[48]
Consolidation
By noon, Rommel had 113 tanks inside the perimeter.[49] By 1:30 p.m., the Afrika Korps had reached their objective, the Kings Cross road junction on the crest of the Pilastrino Ridge and overlooked the town of Tobruk, about 9 km (6 mi) to the north. The 21st Panzer headed for the town, scattering the remaining tanks of the 7th RTR. The last obstacle for the panzers was a motley of artillery units which put up a stiff defence, including the use of several 3.7-inch anti-aircraft guns against the German tanks; Rommel later praised their "extraordinary tenacity".[50]
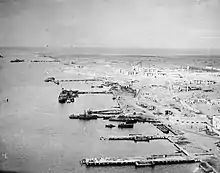
Later in the afternoon, Klopper's headquarters were shelled.[51] At 4:00 p.m., German tanks were seen to the east and Klopper thought that his headquarters, to the south-west of the town, was in danger of being overrun. He ordered a hurried evacuation, in which much of the communication equipment was destroyed. The German tanks moved off in a different direction but now without communications equipment, Klopper moved to the headquarters of 6th South African Brigade in the north-west of the fortress at 6:30 p.m. The leading German units did not reach the outskirts of the port until 6:00 p.m. At about the same time, British engineers and supply troops began to demolish the immense quantities of fuel, water, ammunition and stores in the town along with the port facilities. The 15th Panzer Division had begun to advance westwards along the Pilastrino Ridge, where elements of the 201st Guards Brigade had taken up exposed positions at short notice. When their brigade headquarters was overrun at about 6:45 p.m., most of the units either stopped fighting or withdrew to Fort Pilastrano at the western end of the ridge. The 15th Panzer ended their advance since they were under orders to cover the approach of 21st Panzer to the town, which was reported to have been taken at 7:00 p.m. The final evacuation of small naval vessels had been carried out under fire—fifteen craft escaped but twenty-five, including a minesweeper, were sunk in the harbour or lost to air attacks on the passage to Alexandria.[52]
British options
At last light, the Axis units halted for the night. The remnants of the British and Indian units in the eastern sector of the fortress prepared themselves for all-round defence; the South African brigades had not been engaged except for some diversionary activity. From Klopper's new headquarters came a signal that all units should prepare to break out at 10:00 p.m. and a message was sent to the Eighth Army HQ, "Am holding out but I do not know for how long". The Eighth Army staff suggested that the breakout should be on the following night (21/22 June) and that it was essential that all the fuel be destroyed. Although Ritchie had ordered the 7th Armoured Division to move north towards Sidi Rezegh, to the south-east of the Tobruk perimeter, there is no evidence that they advanced very far or threatened the Axis cordon. Discussions between Klopper, his brigadiers and staff officers followed. The chances of a breakout were impeded by the fact that the 2nd South African Division was not a motorised formation and many of the vehicles that they did possess were in the town and had been captured. The option to stand and fight in the western sector was considered but the main ammunition dumps had also been captured. At 2:00 a.m. on 21 June, Klopper signalled to the Eighth Army HQ that he would attempt a breakout that evening. In the meantime, the garrison would "fight to the last man and the last round".[53]
Surrender
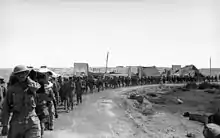
As dawn approached Klopper changed his mind and concluded that any value to be gained from continuing the fight would not be worth the cost in additional casualties. In an exchange of signals at 6:00 a.m. Ritchie sent, "I cannot tell tactical situation and therefore leave you to act on your own judgement regarding capitulation". Shortly after this, German officers were invited to Klopper's headquarters to finalise the details. Orders to surrender were sent out and received with astonishment by those units who had scarcely been engaged. Some units did not receive the order; the 2nd Battalion, 7th Gurkha Rifles, on the eastern perimeter, fought on until that evening, while the Cameron Highlanders continued fighting until the morning of 22 June. Captain Sainthill of the Coldstream Guards and 199 of his officers and men were able to break out of the south-west perimeter in their battalion transport and rejoin the Eighth Army. A small group of 188 South Africans, largely of the Kaffrarian Rifles, escaped eastwards along the coast and reached El Alamein 38 days later.[54][55] Rommel entered the town at 5:00 a.m. and established his headquarters at the Hotel Tobruk.[56] A meeting was arranged with Klopper, who surrendered to Rommel on the Via Balbia about 6 km (4 mi) west of Tobruk at 9:40 a.m. on 21 June.[57]
Aftermath
Casualties
It was the second largest capitulation of British Army forces in the war after the fall of Singapore and the biggest defeat in the history of the Union Defence Force.[58] [59] The Germans left the task of housing the prisoners to the Italians, who lacked the infrastructure to treat the prisoners in accordance with the Geneva Convention. The prisoners were crammed into open pens to await deportation and were left seriously short of food and water.[60] Conditions improved after the prisoners had been transported in cargo ships to Italy. Many of them, especially South Africans, were subject to recriminations from other prisoners who felt that Tobruk had surrendered too easily. At the Italian armistice in September 1943, many prisoners escaped, including Klopper, who was rescued by Popski's Private Army (Major Vladimir Peniakoff) which was operating nearby.[61]
The number of Eighth Army prisoners taken in the battle is not known precisely because the Eighth Army records were lost. Axis casualties are not known either but German casualties for the fighting since 26 May (including Gazala) was reported as 3,360 of whom 300 were officers. Their losses for 20 to 22 June would have been considerably less than that.[62] The estimate in the British official history, the History of the Second World War is,
| Nationality | POW[63] |
|---|---|
| British | 19,000 |
| South African | 10,720 |
| Indian | 2,500 |
| Total | 32,200 |
Analysis
In 1942, a Court of Inquiry was held in absentia, which found Klopper to be largely blameless for the surrender. The verdict was kept secret, it did little to enhance his or his troops' reputation.[64][65] After the war, Winston Churchill wrote that the blame belonged to the British High Command, not to Klopper or his troops. He accepted that the facts were obscured at the time as the Tobruk leadership were all prisoners of war but that the truth had since emerged.[66]
Playfair wrote in 1960 that "the reasons for the disaster are plain enough".[67] It was commonly accepted that there was no intention of defending Tobruk against another siege, therefore Tobruk was never prepared to defend against either a siege or a determined assault. Neither Auchinleck nor Ritchie appreciated the extent of the defeat which the Eighth Army had suffered at Gazala and that the Eighth Army was no longer able simultaneously to attempt to continue to fight in the Tobruk area, as well as to defend the frontier and prepare for a counter-attack. Klopper and his staff did not have the experience to make best use of their resources under such difficult circumstances. Rommel had overwhelming air support at Tobruk, because almost all of the Allied fighter aircraft had been withdrawn out of range of Tobruk and German aerial bombing played a key role in breaching the defences.
Repercussions
On 21 June, Churchill was in the White House in Washington conferring on the direction of the war with President Franklin D. Roosevelt, (the Second Washington Conference). An American aide arrived with the news of the Tobruk surrender, which he gave to the President who then passed it to Churchill.[68] Churchill recalled in his memoirs,
I did not attempt to hide from the President the shock I had received. It was a bitter moment. Defeat is one thing; disgrace is another. Nothing could exceed the sympathy and chivalry of my two friends. There were no reproaches; not an unkind word was spoken. "What can we do to help?" said Roosevelt. I replied at once, "Give us as many Sherman tanks as you can spare and ship them to the Middle East as quickly as possible.”
— Winston S. Churchill, The Second World War: The Hinge of Fate (1950)
Roosevelt asked the Chief of Staff of the United States Army, General George Marshall, to see what could be done. Marshall ordered the 2nd Armored Division, which was training with the new M4 Sherman tanks, to prepare to move to Egypt. When it became apparent that this new formation could not be made operational until the autumn, Marshall decided instead to send three hundred of their Shermans, a hundred M7 Priest (105 mm self-propelled guns), spare parts and one hundred and fifty instructors, in a fast convoy beginning on 1 July.[69]
General Alan Brooke, the British Chief of the General Staff, who was also in the room when the news broke, later wrote
I always feel that the Tobruk episode in the President's study did a great deal towards laying the foundations of friendship and understanding built up during the war between the President and Marshall on the one hand and Churchill and myself on the other.
On 25 June the Maldon by-election was won by Tom Driberg, a left-wing journalist, standing as an Independent, who gained sixty per cent of the vote, defeating the Conservative Party candidate. Churchill and others attributed the defeat to the loss of Tobruk four days before; Driberg denied this was a major factor, suggesting instead that it was part of a wider swing to the left and away from the established political parties. [71][72]
In parliament, there was a growing feeling that Churchill was responsible for the muddle and lack of direction in the management of the war, despite his popularity with the public. Labour Party MP Aneurin Bevan attempted to force a parliamentary enquiry into Churchill's role in the defeats at Gazala and Tobruk but was prevented by Clement Attlee, the Labour Deputy Prime Minister. When a right-wing Conservative, Sir John Wardlaw-Milne, tabled a motion of no-confidence in the coalition government, there was speculation that it might go the way of the Norway Debate, which had led to the resignation of the previous prime minister, Neville Chamberlain in May 1940. The debate opened on 1 July and on the following day Bevan attacked Churchill by saying that he "fights debates like a war and war like a debate". Churchill replied with (according to Anthony Eden) "one of his most effective speeches" and the government won by 425 votes to 25.[73]
Axis
The Nazi hierarchy shared Churchill's view of the symbolic importance of Tobruk and Joseph Goebbels, the Reich Minister of Propaganda, made much of its capture. On 22 June, Hitler promoted Rommel to Generalfeldmarschall, making him the youngest field marshal in the German Army, much to the annoyance of senior Italian officers.[74][75] Although Rommel undoubtedly considered it a great honour, he later confided to his wife that he would rather have been given another division.[74] Mussolini was also jubilant and is said to have ordered that a suitable white horse be found for his triumphal entry into Cairo.[76]
Despite efforts to destroy the fuel at Tobruk, the Axis captured some 1,400 t (1,400 long tons) and 20 t (20 long tons) at Belhamed. Amongst the 2,000 vehicles captured were 30 serviceable tanks and it has been estimated that Rommel was using some 6,000 captured British lorries by the end of the month.[77][78] Also taken in Tobruk were 7,000 t (6,900 long tons) of water and three million rations of food (5,000 t (4,921 long tons)).[58][77] Because of the tenuous supply line that Rommel depended on, his troops had been living on very short rations and the British supplies were enthusiastically received, especially chocolate, canned milk and vegetables; stores of shirts and socks were enthusiastically looted. The equally deprived Italian troops tended to be excluded from the plundering.[79]
In the afternoon of 21 June, the day of the surrender, Kesselring visited Rommel's headquarters and reminded him of the agreement that the invasion of Malta would follow the capture of Tobruk and that his aircraft were already returning to Italy. The next day, a senior Italian staff officer arrived with orders from General Bastico to halt. Rommel, now a field marshal, was able to decline this "advice".[80] He had the latest pessimistic report from the U.S. military attaché Bonner Fellers in Cairo to Washington on the British dispositions, which concluded with the phrase; "If Rommel intends to take the Delta, now is the time"; the supplies captured at Tobruk made that possible.[81]
Axis invasion of Egypt
On 22 June, Rommel by-passed the chain of command by writing directly to Mussolini via the German attaché in Rome, Enno von Rintelen, requesting that the offensive be allowed to continue and that the Malta invasion be postponed to preserve his air support.[82] Mussolini forwarded the letter to Hitler, who had been harbouring doubts about the Malta operation. Hitler replied the next day with an effusive letter which agreed with Rommel's suggestion and urged Mussolini not to let the opportunity slip away, stating that "the goddess of success passes generals only once".[83] The British retreat soon became a rout. Ritchie decided not to regroup at the Egyptian border as planned but further east at the fortified port and army base at Mersa Matruh. Auchinleck sacked Ritchie on 25 June, taking charge of the Eighth Army and began a further withdrawal to a better defensive position at El Alamein. On the next day, Rommel arrived at Matruh and broke through in the centre. The Battle of Mersa Matruh was another fiasco for the Eighth Army, who suffered 8,000 casualties and lost a lot of equipment and supplies but the bulk of the Eighth Army was able to break out and fall back to El Alamein.[84] Rommel hoped that a swift central attack on the new British positions might succeed in the same way as at Mersa Matruh but he was moving further away from his air support and supply bases. The Axis came correspondingly within the range of the DAF and their advance was eventually halted at the First Battle of El Alamein. El Alamein was to be the furthest advance eastwards of the Panzer Army Africa.[85]
References
- Playfair 2004, p. 274.
- Hartshorn 1960, p. 111.
- Hartshorn 1960, pp. 136–145.
- Boog 2001, p. 697
- Harper 2017, p. 9
- Harper 2017, pp. 10–11
- Grehan and Mace 2017, p. 98
- Perrett 2000, p. 255
- Butler 2015, p. 315
- Beckett 2013, p. 84
- Harper 2017, p. 18
- Beckett 2013, pp. 85–87
- Beckett 2013, p. 83
- Stewart 2002, p. 93
- Playfair 1960, pp. 219, 195
- Butler 2015, p. 310
- Playfair 1960, pp. 197–198
- Stewart 2002, p. 83
- Nash 2013, p 182
- Stewart 2002, pp. 84–86
- Stewart 2002, pp. 86–87
- Ford 2008, p. 74
- Playfair 1960, p. 257
- Pitt 1986, p. 245
- Ford 2008, p. 75
- Playfair 1960, p. 263
- Playfair 1960, p. 264
- Playfair 1960, p. 262
- Nash 2013, p 184
- Nash 2013, p 186
- Playfair 1960, pp. 262–263
- Playfair 1960, p. 259
- Playfair p.261
- Horn & Katz 2016, p. 195
- Playfair p.261
- Boog 2001, pp. 696-697
- Boog 2001, p. 697
- Boog 2001, p. 695
- Playfair 1960, p. 266
- Boog 2001, p. 696-697
- Mitchem 2007, p. 83
- Boog 2001, p. 699
- Playfair 1960, p. 266
- Boog 2001, p. 698
- Playfair 1960, pp. 266–267
- Playfair 1960, p. 267
- Mitcham 2007, p. 84
- Playfair 1960, p. 268
- Nash 2013, p 186
- Playfair 1960, p. 269
- Nash 2013, p 186
- Playfair 1960, pp. 268–270
- Playfair 1960, pp. 271–272
- Playfair 1960, pp. 272–273
- Churchill 1948, p 376
- Mitcham 2007, p. 86
- Boog 2001, p. 699
- Harper 2017, p. 23
- Horn & Katz 2016, p. 190
- Lett 2014, pp. 5–7
- Horn & Katz 2016, pp. 201–202
- Playfair 1960, p. 274
- Playfair 1960, p. 274
- Brock Katz 2017, p. 256
- Horn & Katz 2016, p. 194
- Churchill 1948, p. 378
- Playfair 1960, p. 275
- Beevor 2014, p. 318
- Boog 2001, p. 703
- Fraser 1997, pp. 232–233
- McKinstry 2019, p. 240
- Cook & Ramsden 1997, pp. 138–139
- McKinstry 2019, pp. 240–242
- Butler 2015, p. 337
- Boog 2001, p. 710
- Smith 2008, p. 7
- Stewart 2001, p. 92
- Beckett 2013, p. 91
- Beevor 2014, p. 317
- Barr 2015, p. 18
- Barr 2005, pp. 20–21
- Barr 2005, pp. 19–20
- Boog 2001, p. 707
- Beckett, pp. 89–90
- Beckett 2013, pp. 92–93
Sources
Books
- Barr, Niall (2005). Pendulum of War: Three Battles at El Alamein. London: Pimlico. ISBN 978-0-7126-6827-9.
- Beckett, Ian F. W., ed. (2014). Rommel Reconsidered. Mechanicsburg, PA: Stackpole Books. ISBN 978-0-8117-1462-4.
- Beevor, Antony (2012). The Second World War. London: Weidenfeld & Nicolson. ISBN 978-1-78022-564-7.
- Boog, Horst; Rahn, Werner; Stumpf, Reinhard; Wegner, Bernd, eds. (2001). Germany and the Second World War: The Global War. VI (Eng. trans. Clarendon Press, Oxford ed.). Potsdam: Militärgeschichtliches Forschungsamt (Research Institute for Military History). ISBN 978-0-19-822888-2.
- Brock Katz, David (2017). South Africans versus Rommel: The Untold Story of the Desert War in World War II. Rowman & Littlefield. ISBN 978-0-81176-608-1.
- Butler, Daniel Allen (2015). Field Marshal: The Life and Death of Erwin Rommel. Oxford: Casemate. ISBN 978-1-61200-297-2.
- Churchill, Winston (1948). The Hinge of Fate. Second World War. IV. New York: Houghton Mifflin Harcourt. ISBN 9-780-39541-058-5.
- Cook, Chris; Ramsden, John, eds. (1997). By-Elections in British Politics. London: Routledge. ISBN 978-1-85728-535-2.
- Ford, Ken (2008). Gazala 1942: Rommel's Greatest Victory. Oxford: Osprey. ISBN 978-1-84603-264-6.
- Fraser, David (1997). Alanbrooke. London: HarperCollins. ISBN 978-0-00-638863-0.
- Grehan, John; Mace, Martin (2015). Operations in North Africa and the Middle East 1939–1942: Tobruk, Crete. Barnsley, South Yorkshire: Pen and Sword Military. ISBN 978-1-78346-217-9.
- Harper, Glyn (2017). The Battle for North Africa: El Alamein and the Turning Point for World War II. Bloomington, IN: Indiana University Press. ISBN 978-0-253-03142-6.
- Hartshorn, Eric P. (1960). Avenge Tobruk. Cape Town: Purnell & Sons. OCLC 26084683.
- Lett, Brian (2014). An Extraordinary Italian Imprisonment: The Brutal Truth of Campo 21, 1942–3. Barnsley: Pen & Sword Military. ISBN 978-1-4738-2269-6.
- McKinstry, Leo (2019). Attlee and Churchill: Allies in War, Adversaries in Peace. London: Atlantic Books. ISBN 978-1-84887-660-6.
- Mitcham, Samuel W. (Jnr.) (2007). Rommel's Desert War: The Life and Death of the Afrika Korps. Mechanicsburg, PA: Stackpole Books. ISBN 978-0-8117-3413-4.
- Nash, N. S. (2013). "Strafer": The Desert General: The Life and Killing of Lieutenant General W. H. E. Gott CB CBE DSO MC. Barnsley: Pen and Sword. ISBN 978-1-47382-976-3.
- Perrett, Bryan (2000). The Changing Face of Battle: From Teutonburger Wald to Desert Storm. London: Orion Books. ISBN 978-0-304-35307-1.
- Pitt, Barrie (1986). The Crucible of War: Auchinleck's Command. II. London: Macmillan. ISBN 0-333-41386-5.
- Playfair, I. S. O. (2004). The History of the Second World War - The Mediterranean and Middle East: British Fortunes Reach Their Lowest Ebb (PDF). III (pbk. repr. Naval and Military Press, Uckfield ed.). London: HMSO. ISBN 978-1-84574-067-2.
- Smith, Peter (2008). Massacre at Tobruk: The British Assault on Rommel, 1942. Mechanicsburg, PA: Stackpole Books. ISBN 978-0-8117-3474-5.
- Stewart, Adrian (2002). Early Battles of the Eighth Army: Crusader to the Alamein Line. Barnsley, South Yorkshire: Pen & Sword Books. ISBN 978-0-85052-851-0.
Journals
- Horn, Karen; Katz, David (2016). "The Surrender of Tobruk in 1942: Press Reports and Soldiers' Memories". Scientia Militaria. 44 (1): 190–208. doi:10.5787/44-1-1167. Retrieved 10 November 2019.